• Friends, our 2nd Amendment rights are always under attack and the NRA has been a constant for decades in helping fight that fight.

    We have partnered with the NRA to offer you a discount on membership and Muzzleloading Forum gets a small percentage too of each membership, so you are supporting both the NRA and us.

    Use this link to sign up please; https://membership.nra.org/recruiters/join/XR045103

Homemade Squirrel Skinning Stand

Muzzleloading Forum

Help Support Muzzleloading Forum:

This site may earn a commission from merchant affiliate links, including eBay, Amazon, and others.

TDM

Cannon
Joined
May 28, 2022
Messages
9,655
Reaction score
24,200
Location
Louisiana & My camp in Mississippi
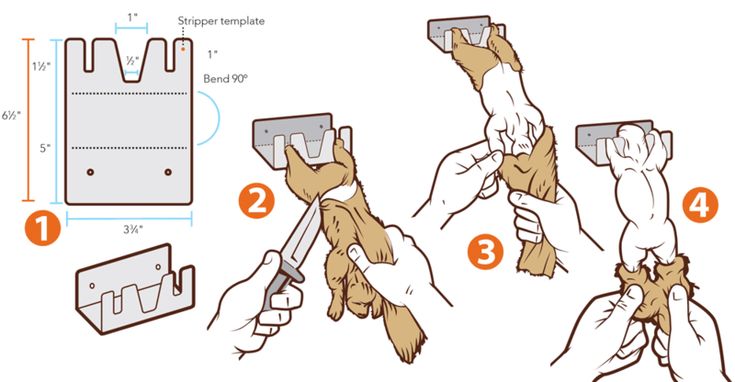
I haven’t squirrel hunted in years. One of my excuses was that I lost my old skinning stand that a buddy made for me many years ago. Now the grandkids are older and want to hunt and I have acquired a couple of appropriate BP squirrel weapons I had to build another skinning stand. I keep a fair amount of scrap steel here so I dug around and found what I thought would work. I traced out the design, cut, sanded, welded it to a piece of 2”x2” square tube, and painted it. Then mounted it on one of the support beams of my cooking and cleaning shed. I think it will work well and I’m anxious to try it out.
 

Attachments

  • IMG_2589.jpeg
    IMG_2589.jpeg
    3.7 MB
  • IMG_2590.jpeg
    IMG_2590.jpeg
    2.4 MB
  • IMG_2591.jpeg
    IMG_2591.jpeg
    1.9 MB
  • IMG_2592.jpeg
    IMG_2592.jpeg
    2.5 MB
  • IMG_2593.jpeg
    IMG_2593.jpeg
    1.8 MB
  • IMG_2594.jpeg
    IMG_2594.jpeg
    3.2 MB
  • IMG_2595.jpeg
    IMG_2595.jpeg
    2.1 MB
  • IMG_2597.jpeg
    IMG_2597.jpeg
    1.7 MB
  • IMG_2596.jpeg
    IMG_2596.jpeg
    6 MB
I haven’t squirrel hunted in years. One of my excuses was that I lost my old skinning stand that a buddy made for me many years ago. Now the grandkids are older and want to hunt and I have acquired a couple of appropriate BP squirrel weapons I had to build another skinning stand. I keep a fair amount of scrap steel here so I dug around and found what I thought would work. I traced out the design, cut, sanded, welded it to a piece of 2”x2” square tube, and painted it. Then mounted it on one of the support beams of my cooking and cleaning shed. I think it will work well and I’m anxious to try it out.
Looks good. After you bring home some squirrels how about a thread showing how it works.
 
Looks good. After you bring home some squirrels how about a thread showing how it works.
Thanks, I will do that. But it’s pretty straightforward, the head and neck fit through the center V to open up the belly for gutting. The feet fit through the outside Vs and hold while skinning.

It just gives you extra 3rd or 4th hand.
 
I prefer cleaning my squirrels in the field, shortly after having shot them. The hide comes off much easier on a warm squirrel than it does on one that has cooled down. My method takes only a few minutes, leaves little if any hair on the carcass (which is the devil to remove) and leaves me with a dressed out squirrel which I put in my game bag that has chemical cooler in it to get the meat cooled down.
 
Thanks, I will do that. But it’s pretty straightforward, the head and neck fit through the center V to open up the belly for gutting. The feet fit through the outside Vs and hold while skinning.

It just gives you extra 3rd or 4th hand.
No doubt that will work well on squirrels that have been shot with a scattergun or head shot, but with a body shot from a RB, I have my doubts. They tend to rip apart quite easily.
 
I too skin in the field as it is warm out. But I like that idea and might make one to leave down in my woodsor mount to the Polaris.
 
I too skin in the field as it is warm out. But I like that idea and might make one to leave down in my woodsor mount to the Polaris.
A skinning stand definitely makes it an easier job, especially for older guys with less dexterity like me!

There’s a couple of small companies that make them too.
 
Here are a few photos from the early season in Kentucky this past June of using one of the skinners I fabricated. The first picture has the feet hooked into their respective slots while the tail is slit from underneath through the tailbone, but leaving the skin on the top of the tail:

Legs Hooked.jpg


Then with the tail hooked in the middle cutout the legs are pulled down to peal the skin off the body:
Tail Hooked.jpg


The the head is placed in the larger middle cutout to finish pulling the rest of the hide from the body:
Skinning Squirrel.jpg


Excuse the overly large photos. This was a session where I skinned a couple squirrels so one photo may be mixed with the other animal, but it gives you an idea how these tools work. There are good tutorials on YT and other sites to glean from, which is where I found all this out.
 
Here are a few photos from the early season in Kentucky this past June of using one of the skinners I fabricated. The first picture has the feet hooked into their respective slots while the tail is slit from underneath through the tailbone, but leaving the skin on the top of the tail:

View attachment 252265

Then with the tail hooked in the middle cutout the legs are pulled down to peal the skin off the body:
View attachment 252267

The the head is placed in the larger middle cutout to finish pulling the rest of the hide from the body:
View attachment 252269

Excuse the overly large photos. This was a session where I skinned a couple squirrels so one photo may be mixed with the other animal, but it gives you an idea how these tools work. There are good tutorials on YT and other sites to glean from, which is where I found all this out.
That’s it! Nicely done.
 
I haven’t squirrel hunted in years. One of my excuses was that I lost my old skinning stand that a buddy made for me many years ago. Now the grandkids are older and want to hunt and I have acquired a couple of appropriate BP squirrel weapons I had to build another skinning stand. I keep a fair amount of scrap steel here so I dug around and found what I thought would work. I traced out the design, cut, sanded, welded it to a piece of 2”x2” square tube, and painted it. Then mounted it on one of the support beams of my cooking and cleaning shed. I think it will work well and I’m anxious to try it out.
Never knew I needed such a thing but now I want one. Ha. I can see where it makes things easier at the end of the day. Thanks for sharing.
 
I'd never seen one. I always made a cut crosswise in the back skin, put a finger on each hand in, and pulled the hide off.
That's my method as well. Not too difficult if done right away.

But, I don't have enough squirrels to get excited about. I envy you who can step out the back door and hunt a good squirrel population like @ETipp
 
My field method for skinning squirrels in the "Step On" method. I slice the skin cross wise across the rump at the base of the tail. Insert my fingers to get the skin loose in both direction (head & tail). Step on the head and pull the skin over the shoulders, then pull the skin at the hips over the rear legs. Cut the rear & front legs at the elbow & knees and tail at the base ( I use surgical scissors), and cut off the head. Lay the carcass on some clean leaves or moss. Insert knife tip at point of the diaphragm and slice skin to the crotch. Remove entrails. Wipe out the body cavity with some clean leaves and place your kill in a canvass bag with some cold packs to cool down. This process takes longer to explain than it does to accomplish in the field.
 
Back
Top