• Friends, our 2nd Amendment rights are always under attack and the NRA has been a constant for decades in helping fight that fight.

    We have partnered with the NRA to offer you a discount on membership and Muzzleloading Forum gets a small percentage too of each membership, so you are supporting both the NRA and us.

    Use this link to sign up please; https://membership.nra.org/recruiters/join/XR045103

A little tinkering yesterday and today

Muzzleloading Forum

Help Support Muzzleloading Forum:

This site may earn a commission from merchant affiliate links, including eBay, Amazon, and others.

ameling

45 Cal.
Joined
Jun 29, 2005
Messages
855
Reaction score
2
The recent discussion of a possible 1700's pipe hawk reference in Minnesota got me thinking about those sheet iron pipes again.

I did a little ... tinkering ... yesterday and today. I'm supposed to be resting my back a bit, but I just couldn't set here and do nothing. Although, the few minutes I did spend out in the shop preparing the metal for this bit of "tinkering" let me know I was pushing things. Plus temps back in the mid 80's with similar humidity didn't help much.

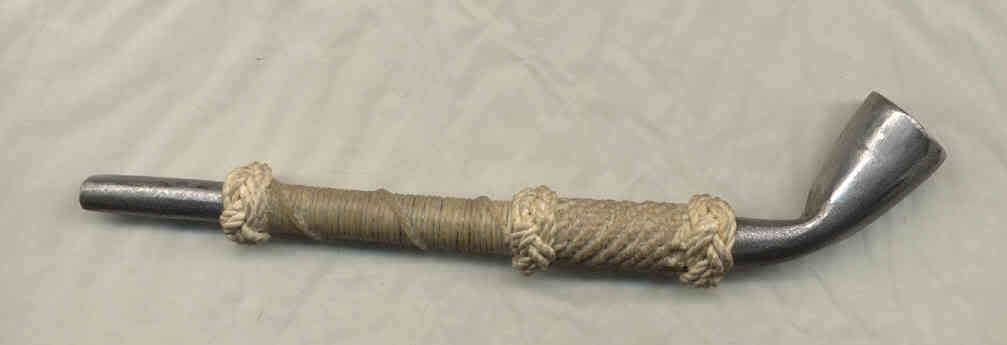
I played around with my sheet iron pipe pattern, size, and final shaping. I kind of like the longer stem, and also the gentle curve. The surviving originals were straight stemmed, but there's just something about that curved stem that catches the ... imagination.
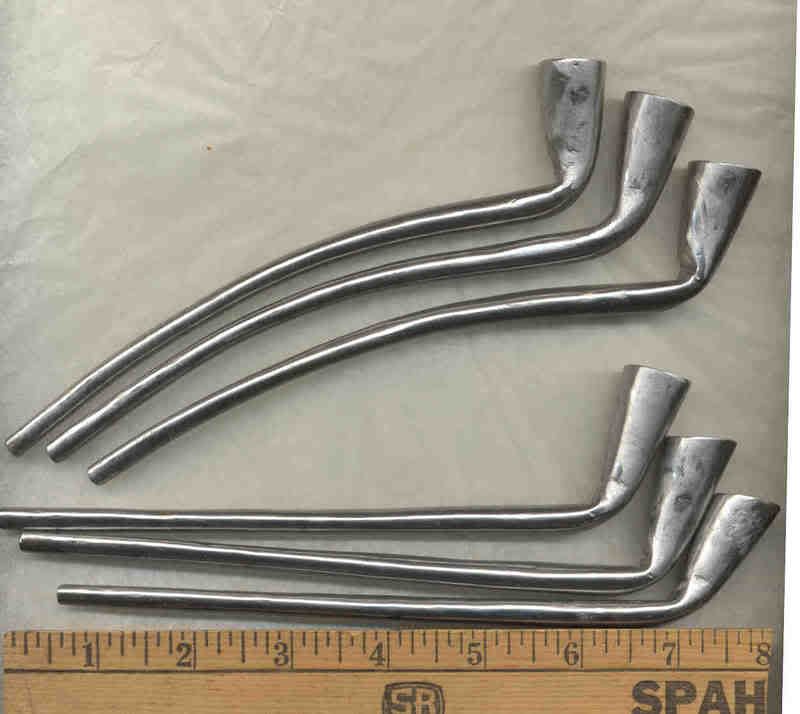
IronPipesLong1.jpg


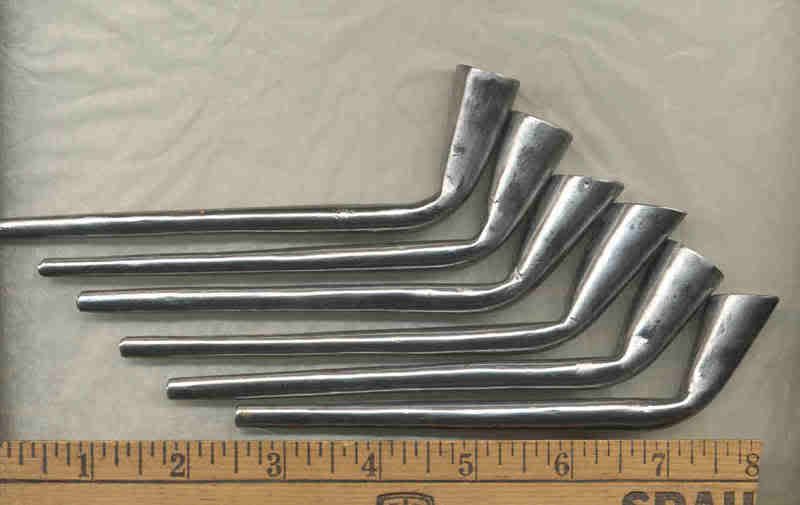
And I made a few of the regular size/shape sheet iron pipes as well.
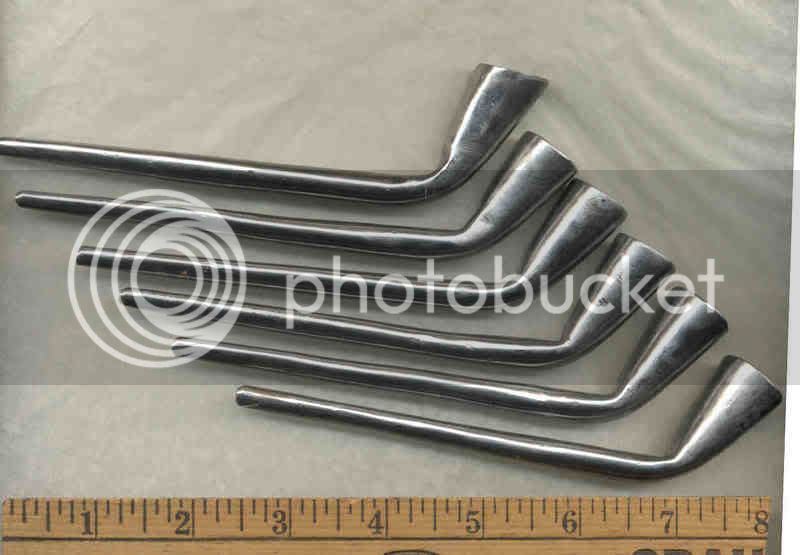
IronPipes6a.jpg


IronPipes6b.jpg


Yes, an ... interesting ... way to spend a little recovery time.

Mikey - yee ol' grumpy German blacksmith out in the Hinterlands
 
Never heard of such. That is just cool Mike. I guess they have to be held behind the bowl in smoking them. In what time frame did these show up?
 
MIke: That would have to be a very hot smoke. with the pipe made of metal. Were the bowls lined with clay or anything? Even with a long stem, it would not take much time for the stem to get hot at the other end, too.

Very nice work, however. Hope your back gets better.
 
"I bought a tin pipe having a Stem for a Brasse of Calico on my own Account, the one that I got of le petit Brochet having got broken."

Michel Curot, NW Wisconsin, 1804.
 
Thanks, guys. Yes, the back is slowly mending. I try hard not to put it in those odd/weird angles and positions, but sometimes things just don't work out. Like a week ago when I was doing some repair from the flooding a month ago. I was waste deep in a fast flowing section of the creek with several ropes and pry bars trying to move a foot bridge back into place. But there's only so much you can do to get low and in the correct positions under those conditions. But the foot bridge is back in place - until the next BIG flood.

The pipes heat up fairly similar to those clay pipes. Some people wrap the stem and some don't. There is an original sheet brass pipe in a museum collection in upstate NY that still has remnants of reeds wrapped around the stem. And then those naval guys have to do their "thing" and put that sailor's graffiti on them - like this one that Otter "knotted" up. The first needle-hitching he did on a pipe was on his favorite clay pipe - to cover up the joint where he glued it back together after breaking it. These sheet iron pipes are a tad harder to break.

ironpipewrapped.jpg


Here's the little ... blurb ... I wrote up on the history of these sheet iron pipes.
____________________________________
It is made in the same general style and shape as the clay trade pipes that show up in most trade goods lists from very early European contact on up through the 1800's. Sheet Iron and Sheet Brass pipes show up in various archeological digs throughout the Eastern half of America, from the 1600's Tunica sites in Alabama, up through the original 13 Colonies, in the upper Ohio River valley around 1800, and on throughout the Fur Trade areas of Canada and the Great Lakes. I based this sheet iron pipe on originals pictured in the book Indian Trade Relics, Collectors Illustrated Encyclopedia of the American Revolution, and several pipes in museums. I made it out of 20 gauge sheet iron by hammering it into several iron swages and wood forms, and then trimmed and sanded/polished it for the final shape and look. The bowls are approximately 1 3/4 inches tall 5/8 inches in diameter. The stems are about 4 inches long, with the pipe being 5 inches overall. There is no finish on these iron pipes, just the bare metal. They will rust and tarnish with use. The seam will gunk/rust up in use, and seal up air tight, but I have put a little paste glue along the seam to help seal it now.
_________________________________


In the past couple years, I have had a number along down to the Colonial Trade Fair and Rifle Frolic at Fort de Chartres in the spring. A number of people have been using them and tell me they like them. Plus, they are far less ... fragile ... than the clay pipes. They are just another little iron trade item of those bygone days.

Mikey - yee ol' grumpy German blacksmith out in the Hinterlands
 
Thanks for the History, Mike. If I have seen something like this in a museum, I just don't remember it. The only brass " pipe " I have ever seen on an original was on a " Peace Pipe", and its a casting. Lots of replicas of those being made, and most don't have a hole through the bottom, or the wood stem to allow smoking.
 
The early Minnesota connection was discussed over on the Frontier Folk message board. It was originally about a possible 1700 Pipe Hawk reference.

----------------------------------

He is at Lake Pepin, at his recently constructed Fort L'Huillier, negotiating a peace between the Sioux and Assiniboin.

Here it is, straight from Le Sueur's journal:

"...et, comme c'est la coustume des sauvages d'accompagner leurs paroles d'un présent proportionné à l'affaire qu'ils traitent, il leur donna cinquante livres de poudre, autant de balles, six fusils, dix haches, douze brasses de tabac et un calumet d'acier." chapitre III, pp. 84-85

Découvertes et établissments des Français dans le ouest et dans le sud de l'Amérique Septentrionale (1614-1754) Mémoires et documents originaux.
Sixième partie - Exploration des affluents du Mississipi et découverte des Montagnes Rocheuses (1679-1754)
ed. Pierre Margry
Paris: Imprimerie Jouast et Sigaux, 1886

Here is from a translation by an American contemporary of Margry's:
"...and, as it is the Indian custom to accompany their words with a present proportioned to the affair treated of, he gave them fifty pounds of powder, and as many of balls, six guns, ten hatchets, twelve fathoms of tobacco, and a steel calumet." p. 91

Early Voyages Up and Down the Mississippi by Cavelier, St. Cosme, Le Sueur, Gravier and Guignas
John Gilmary Shea
Albany: Joel Munsell, 1861

The picture I had in mind was the steel pipes of which M. Ameling posted some images.

-------------------------------

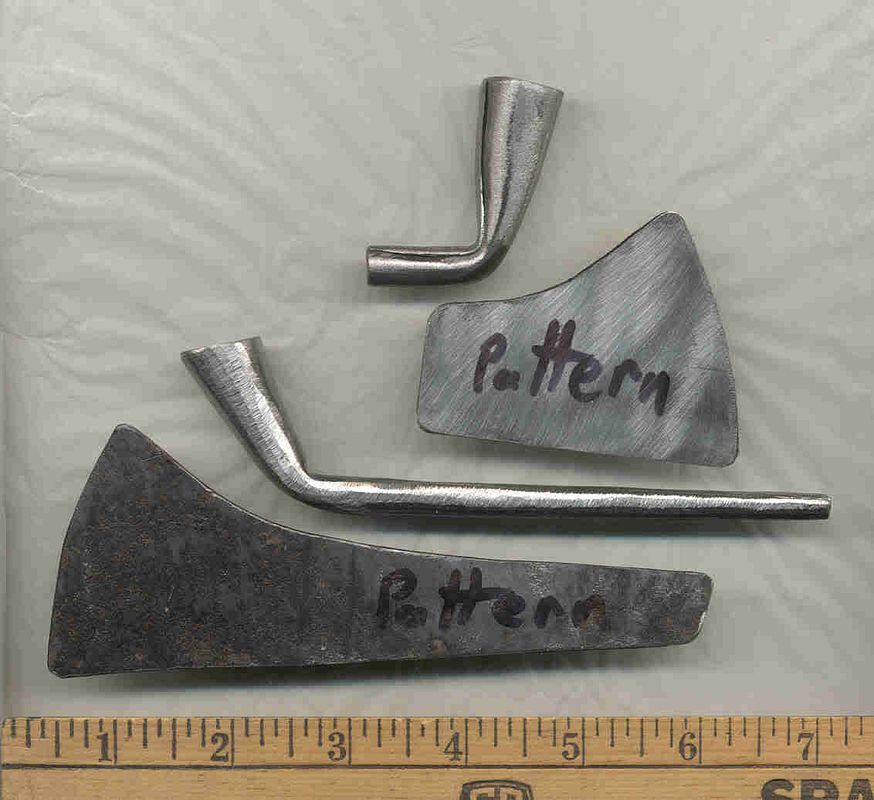
For all those getting the hankering to ... beat up ... some cold sheet iron, here's the pattern I use for those sheet iron pipes. For the longer stem ones I just extended the pattern a little - just be carefull to keep the extra stem sections fairly even as you extend it. If you taper too much you end up with too narrow of a stem to pull smoke through.

And NO, I'm not worried about sharing any "secrets". I know the work involved, and anybody willing to do the work is welcome to do so. Besides, you can't get a patent or trademark on replicating such artifacts. And those "papers" are only as good as you protect them - which just makes lawyers rich.

ironpipes8p.jpg


I use some 20 guage sheet steel - scrap pieces from some steel household doors. I grind off that paint coating down to bare metal before I start, so they are a tad thinner than 20 guage. You could also use something like coffee or bean can material. And I hammer them to shape cold. The only "heat" they get is when I'm sanding/grinding the surface to prepare the metal or with the final belt sanding after they are made. I do not "solder" the seam. That seam "gunks" up and seals itself in use. But I do run a little bead of past glue along it to help initially seal it.

I mostly use a tapered V groove carved into the end of an oak block for the forming. And a well-rounded peen on a lighter hammer to start formining the tube, then a light ballpeen hammer for the rest of the forming. And I ground a punch into a rounded/tapered shape to help form the inside of the bowl - and make it a little more consistent.

A friend too one and really "whored" it up. He does silver work. So he polished/buffed it up, "blued" it, and soldered on a trade silver turtle onto the bowl. It looked pretty good. Much harder to document, but really did look nice! For those pipe bowls, I form the stem around a 1/4 inch rod - to accept a standard Reed stem.

So anybody that wants to ... tinker ... please do. I only messed up 3 or 5 as I was "learning". And yet they still smoked OK - just a little "off" in shape.

Mikey - yee ol' grumpy German blacksmith out in the Hinterlands
 
Mike,...Saw a silversmith make some pipes very simular to yours several years back, down in Missouri. I thought it was neat the way he flared and then bent the stems by swedging the bowls with heat and a forming cone. The stems were shaped by packing interior with fine sand, plugging each end with a hardening wax glue of some sort. When the glue hardened, he bent the stems slightly over a sand bag. I thought the base of the bowl might "kink", but they didn't.
After bending, he just warmed the finish pipe a little and the sand and glue residue easily cleaned out. ..... Pretty neat method!
 
nice pipes mike... I think I'll go out to the shed and have myself a pipe and a wee sip of the good stuff.
hope your back heels up ok.
:hatsoff:
 
Mike;
Well, that was interesting. I made a pipe this morning before heading off to work. I cut the basic shape out and started hammering away. The hard wood chunk seemed to work the best for starting the metal into the shape of a pipe. I worked the piece into a long pipe and then I started shaping the bowl. The hint you gave refering to a narrow punch to use as a anvil worked great. The stem was easy. When I started forming the bowl things got wierd. The material near the bottom of the bowl was too big in diameter. I should have hammered it into a smaller diameter of tube before I started trying to bend it. I used a punch that I heated up and bent to form the actual bowl. Now I have the tools I'm off to start again. This time the seam will be inside, I put the seam on the bottom of the pipe, another reason I probably had a hard time bending the stem at the end.

Anyway, great project. I hope the back's feeling better. It's nice to hear that other folks are so truly obsessed with making things that they can't even stop when the body says stop. I thought it was just me that was obsessed like that.

Regards
Loyd Shindelbower
Loveland
Colorado
 
Obsessed? Yeah, probably am.

I went through 3 or 5 before I got the "kinks" worked out making them. They still worked, just not ... purty lookin.

I try to bend both long edges in first. I do a long gentle curve to the whole pipe to start, but then work on those side edges. It's easier to get them started curling in before you make the long final main bends. You just can't get "inside" on most of those parts. And, for me, it works best to have the straight edge be just inside, and the curved edge lap over the outside. I form them up pretty straight. It helps me "round" out the stem and keep things lined up. I then take my rounded punch, insert it into the pipe bowl, loosely clamp the stem in my vise near where I want to bend it, and the grunt and tap with a hammer to bend it to the angle I want. I stop several times to "tweak" things back straight, and to try not to "kink" it too sharply. I also line it up to do that big final bend with the seam just slightly to the side. This puts that "bulge" of the pipe bowl pattern directly in line with the final pipe stem. That's where the extra material is anyway.

There are advantages to a slight "kinking" at the bottom of the pipe bowl where you bend the stem. It narrows down the pipe bowl - to help keep the tobacco in the bowl instead of headed towards your mouth. That way you do not need any "screen" in the bottom like you do with some of the clay pipes with too large of a hole from the stem.

But if you end up kinking it too much, then it restricts the air flow too much and it won't draw. If this happens, you can try "squishing" it a bit in the jaws of your vise - on the sides. This sometimes opens that kink up a bit. Otherwise, it's just easier to start over. You can try working a punch down into that bend from the inside, but you risk punching a hole out the side. And bending the whole thing back will stress the metal more - possibly leading to cracks.

If you ever really mess up the long stem but have a good bowl and main bend, don't give up. Just cut the bad stem off around 1/2 to 1 inch past the bowl. And then use a regular reed stem in it - just like you would with those clay pipe heads. And there are documented originals that were just the pipe bowl for use with a reed stem - just like the clay pipes.

I use a belt sander to smooth and finish up the outsides - either the electrical one or a strip in my hands run back/forth over the pipe. And I take an old sythe whetstone to rub inside the top of the bowl to smooth off any sharp edges.

It's also fun to "tinker" around hammering that cold sheet iron to see just how far you can form it - without adding heat. After working with it a bit, you can start to feel when it is "work hardening" and getting to that brittle/cracking stage.

Have fun playing!

Mikey - yee ol' grumpy German blacksmith out in the Hinterlands

p.s. No, I'm not giving away any "trade secrets" with these tips, nor worried about any "competition". Anybody playing around with it will figure them out eventually. Plus, I know the work involved. Anybody willing to do the work is welcome to do so. There ain't no "quick buck" involved. Well, unless you subcontract out to Mexico or China, but then you will have to deal in a WHOLE LOT of VOLUME! Any potential market just isn't there for that.
 
You da man. I made another one last nigh but It didn't dawn on me to simply bend the stem at the point at wich it enters the bowl. I kept tweeking the bowl back twords the mouth piece using a chunk of wood and the punch. That would cause the sides to flare out so I used a chunk of wood to re-straighten the bowl on the sides and then start all over again tweeking some more. I finshed off by taking a 4" angle grinder and setting the angle of the top of the bowl right.
The part about keeping the straight line inside is just right. I hammered down that line just like rolling a hand rolled smoke with paper. Carefully folding the edge and then rolling the top piece over.
Again, great project. I love small jobs that don't require heat, it's a nice change. With this confidence, I think I'll tackle a frying pan.

Regards
Loyd
Loveland Colorado
 
I forgot to mention truing up the top of the bowl. When I get the pipe hammered and bent to shape, I usually clamp the stem in my vise and use the hacksaw to cut the top of the bowl even. That also gives me the option of HOW to angle the top of the pipe bowl - either square with the bowl or slightly angled (in the same plane as the stem). Then I smooth the cut up with my belt sander and round/smooth in the edges. I use that stone to smooth off the edge inside the bowl.

When I make just a pipe bowl, I uses a 1/4 inch rod inside that little stub stem section when I do my final hammering. This trues it up and leaves an even stub of a stem to put your reed stem in.

It's actually a little easier to make the full iron stem pipes than just the pipe bowls. That stem helps you "hang onto" it all while you are hammering and shaping it. With the pipe bowls, I usually leave that 1/4 inch rod in the stub of a stem while making/forming it, to help hang onto things.

Yeah, fun little projects.

Frypans? Hammering up one from flat sheet takes A LOT of work. Not that complicated, but a lot of work and ... tweaking. Converting one of those more modern heavy stamped sheet iron skillets are pretty easy. The hard part is cutting off that old integral stamped handle, and then smoothing up the edge/rim where it had been. After that it is some pretty regular iron forging - for the handle to rivet on, and any "legs" to rivet on if you are making it into a spider.

Have fun with your projects.

Mikey - yee ol' grumpy German blacksmith out in the Hinterlands
- who now has to run into Decorah to bug all the Norkies in town for the annual Nordic Fest - I always stop by to bug the Viking reenactors and the crafts people demonstrating (blacksmith, potter, wood turner, knife makers).
 
Back
Top