• Friends, our 2nd Amendment rights are always under attack and the NRA has been a constant for decades in helping fight that fight.

    We have partnered with the NRA to offer you a discount on membership and Muzzleloading Forum gets a small percentage too of each membership, so you are supporting both the NRA and us.

    Use this link to sign up please; https://membership.nra.org/recruiters/join/XR045103

A peripheral part of a Kibler Woodsrunner

Muzzleloading Forum

Help Support Muzzleloading Forum:

This site may earn a commission from merchant affiliate links, including eBay, Amazon, and others.
Joined
Mar 7, 2007
Messages
700
Reaction score
2,177
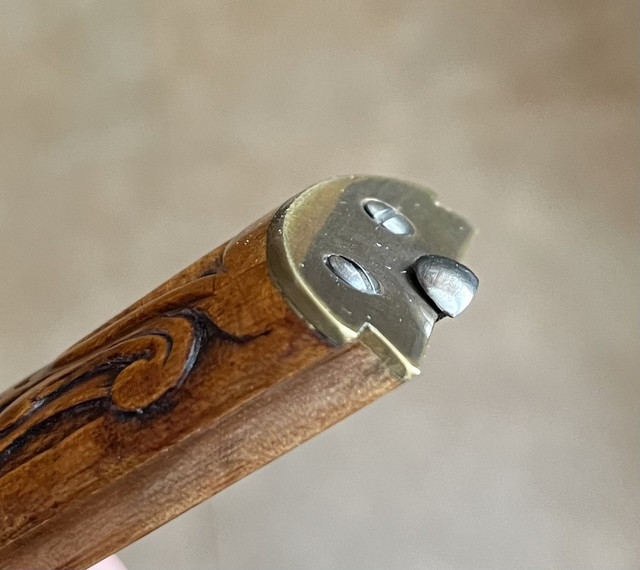
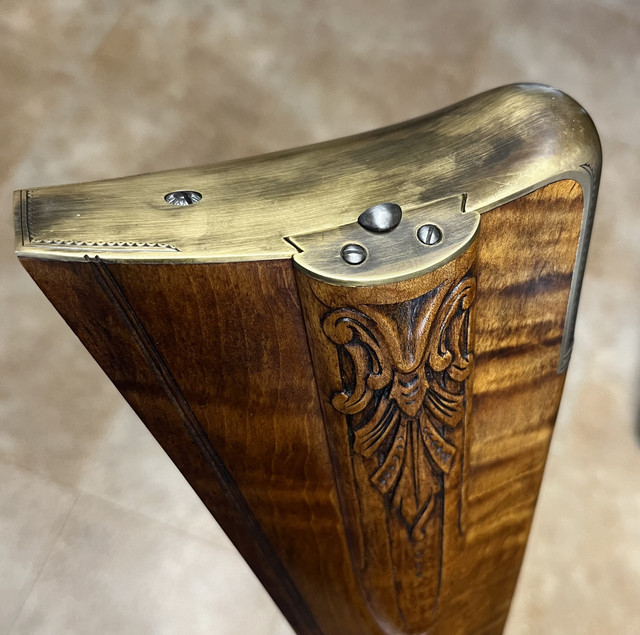
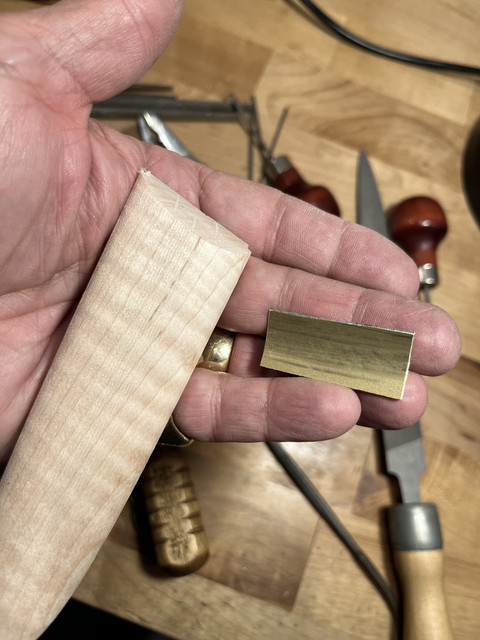
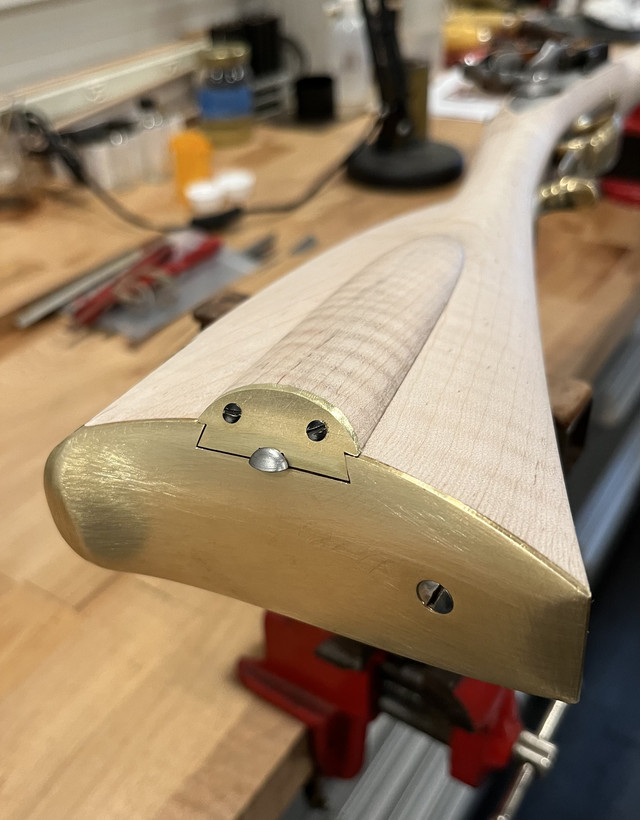
OK....having enjoyed assembling and decorating one of Jim's outstanding Colonial rifles back in late 2019, (Kibler Colonial Kit Assembled), I ordered a Woodsrunner last October. It showed up a couple of weeks ago, and since I am up to my neck in work and other projects that I have left hanging, I took it out of the box and put it aside. However, while looking at it on my work bench the other day, I noticed that Jim had included a small piece of 1/16" thick brass roughly cut into a rectangle. In the moment I wasn't sure what that was for.....until I looked at the sliding wood patch box....and realized that it was included in case you wanted to go to the trouble of putting a brass shoe on the end of the patch box. I really didn't intend to but thought, "How would I do that.....if I wanted to?" Well, an hour later I noticed that I had almost finished the task. I don't have time to finish the rifle now (although I am engraving the lock for another Woodsrunner for a fellow ALR member :eek:) but I thought some of you might be interested in putting a brass end plate on a wood patch box lid.

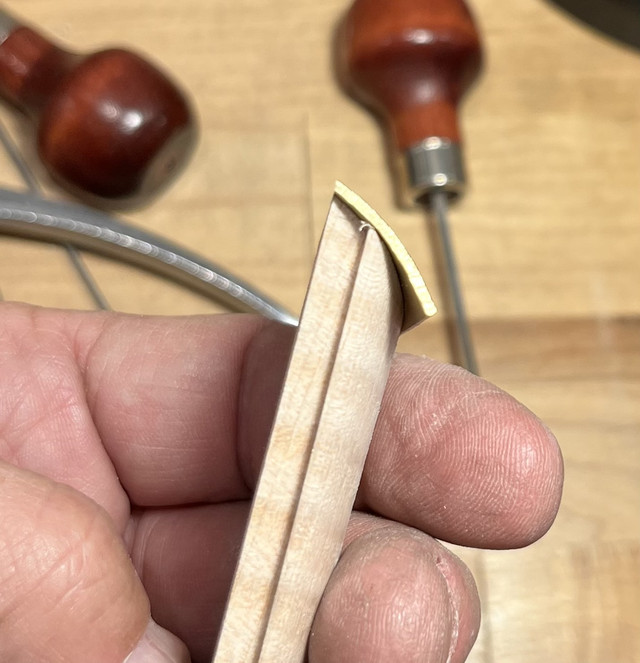
The piece of brass plate Jim sent with the kit is flat. The perfectly fitted wood patch box lid has a very smoothly curved end that blends nicely into the butt plate. So to use the 1/16" material, and keep the same nice contour, it would need to be curved to match the wood. And the wood would need to be shortened by a little less than the 1/16" thickness of the brass to leave enough material to blend.

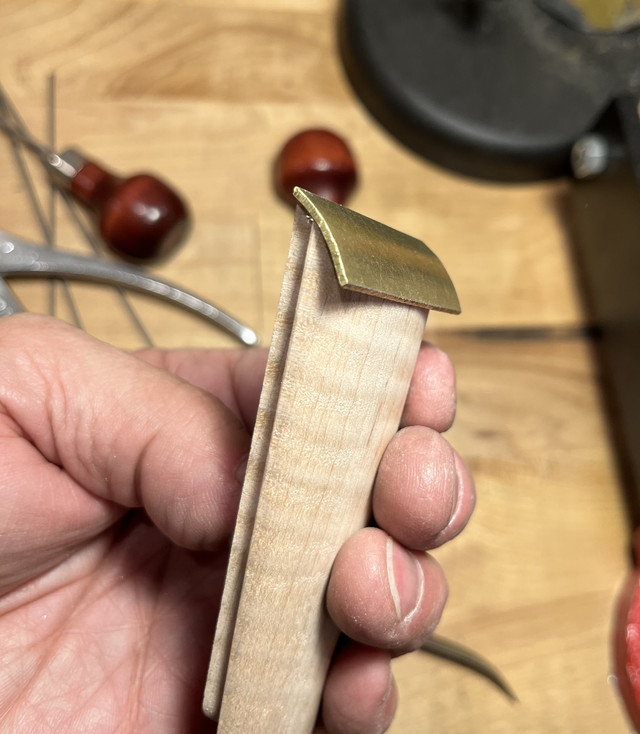
So, the first thing I did was to use a round piece of steel bar stock, about 3/4 inch in diameter, and a lead block to hammer a matching curve in the brass plate. It took a bit of trial and error to get it to match the CNC'd curve at the end of the patch box lid, but in short order the brass fit the contour nicely. Once it did, I roughly cut away a lot of the excess brass material with a jeweler's saw with the intent that I would file the final matching contour once the brass was firmly mounted to the box lid.

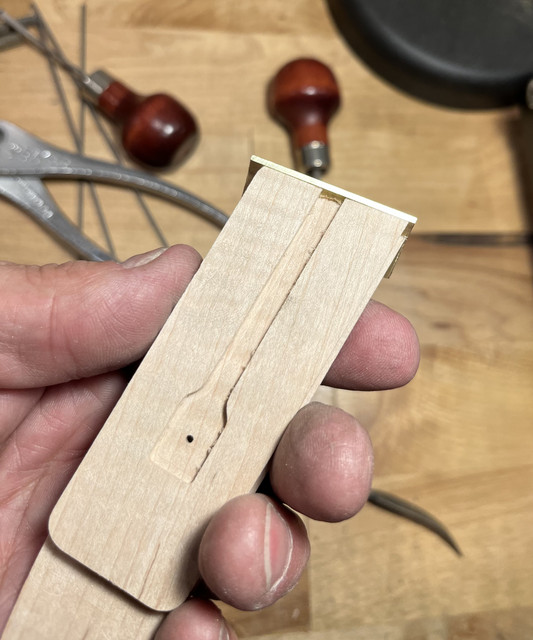
To shorten the wood, while keeping the curved convex contour, I used a hack saw blade (removed from its frame) to cut four or five parallel grooves (top surface to bottom surface) a little less that 1/16 inch deep. Then I filed the wood surface down until the grooves disappeared. With a few more strokes of the file, I got the wood back to matching the curvature of the brass.

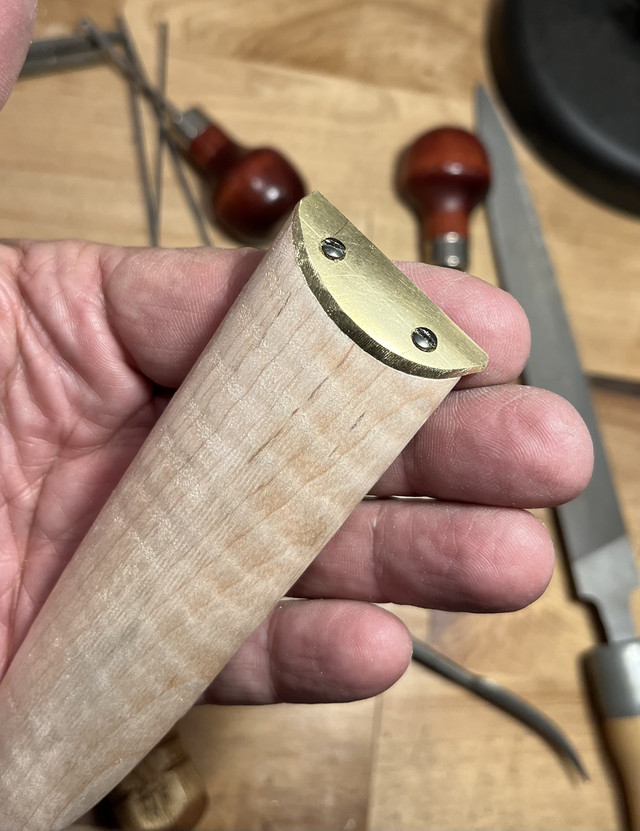
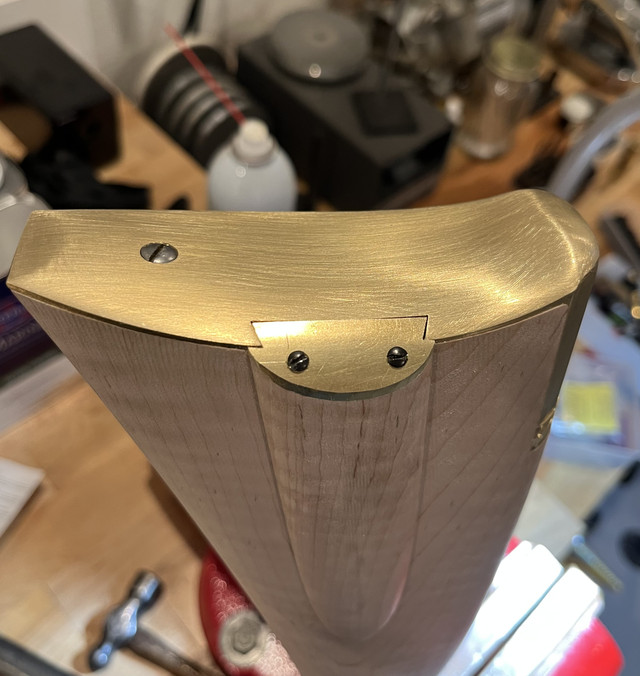
From prior experience I knew that I wanted to mount the plate to the lid with small wood screws. Drilling and installing the tiny screws with a loose plate and on a thin wood lid was a bit of a challenge that I knew would be much easier if the plate was not loose to begin with. So.....carefully avoiding any excess glue that would mess up future staining...I super glued the brass to the wood. Once the brass was firmly glued in place, I drilled and counter sunk for the small screws and firmly attached the brass plate. Now it was a fairly simple task to carefully file the contour of the brass shoe to match the wood and then make sure it still fit the dovetail on the stock and butt plate. When it did, I filed the necessary very slightly concave surface required to get a perfect match with the butt plate contour. With that all done, I cut the notch for the catch and mounted the catch. A few file strokes on the catch and the box lid, with its new brass shoe, worked perfectly.


Talk about perfect timing! I am just starting my Woodsrunner and want to add the brass plate to the end of the lid. Before I received it I thought the lid would be flat and fabrication would be simple. After looking at it I figured I would have to bend the plate to match the curved end of the box lid and was just going to chuck it in a vise and hammer it to fit. I like your method better and will give it a try!

Thanks for posting this thread!
 
OK....having enjoyed assembling and decorating one of Jim's outstanding Colonial rifles back in late 2019, (Kibler Colonial Kit Assembled), I ordered a Woodsrunner last October. It showed up a couple of weeks ago, and since I am up to my neck in work and other projects that I have left hanging, I took it out of the box and put it aside. However, while looking at it on my work bench the other day, I noticed that Jim had included a small piece of 1/16" thick brass roughly cut into a rectangle. In the moment I wasn't sure what that was for.....until I looked at the sliding wood patch box....and realized that it was included in case you wanted to go to the trouble of putting a brass shoe on the end of the patch box. I really didn't intend to but thought, "How would I do that.....if I wanted to?" Well, an hour later I noticed that I had almost finished the task. I don't have time to finish the rifle now (although I am engraving the lock for another Woodsrunner for a fellow ALR member :eek:) but I thought some of you might be interested in putting a brass end plate on a wood patch box lid.

The piece of brass plate Jim sent with the kit is flat. The perfectly fitted wood patch box lid has a very smoothly curved end that blends nicely into the butt plate. So to use the 1/16" material, and keep the same nice contour, it would need to be curved to match the wood. And the wood would need to be shortened by a little less than the 1/16" thickness of the brass to leave enough material to blend.

So, the first thing I did was to use a round piece of steel bar stock, about 3/4 inch in diameter, and a lead block to hammer a matching curve in the brass plate. It took a bit of trial and error to get it to match the CNC'd curve at the end of the patch box lid, but in short order the brass fit the contour nicely. Once it did, I roughly cut away a lot of the excess brass material with a jeweler's saw with the intent that I would file the final matching contour once the brass was firmly mounted to the box lid.

To shorten the wood, while keeping the curved convex contour, I used a hack saw blade (removed from its frame) to cut four or five parallel grooves (top surface to bottom surface) a little less that 1/16 inch deep. Then I filed the wood surface down until the grooves disappeared. With a few more strokes of the file, I got the wood back to matching the curvature of the brass.

From prior experience I knew that I wanted to mount the plate to the lid with small wood screws. Drilling and installing the tiny screws with a loose plate and on a thin wood lid was a bit of a challenge that I knew would be much easier if the plate was not loose to begin with. So.....carefully avoiding any excess glue that would mess up future staining...I super glued the brass to the wood. Once the brass was firmly glued in place, I drilled and counter sunk for the small screws and firmly attached the brass plate. Now it was a fairly simple task to carefully file the contour of the brass shoe to match the wood and then make sure it still fit the dovetail on the stock and butt plate. When it did, I filed the necessary very slightly concave surface required to get a perfect match with the butt plate contour. With that all done, I cut the notch for the catch and mounted the catch. A few file strokes on the catch and the box lid, with its new brass shoe, worked perfectly.


Now that I think about I almost wish you hadn’t posted that beautiful work. Now I’ll feel compelled to try the same on my Woodsrunner went it arrives. No rest for the weary & the wicked. ;)
 
I used brass screws on my Colonials.... countersink them in a ways. Then file them off flush and smooth.
20230301_164612.jpg

20220708_073752.jpg
 
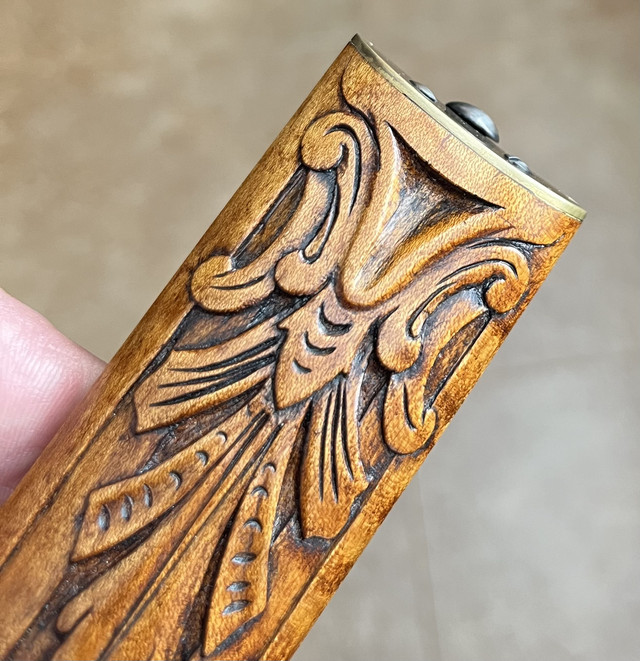
Glad to see the posts about the Colonial.....After thinking about this for a while, I realized that I had put a brass shoe on the wood patch box lid on the Kibler Colonial I did a couple of years ago and I didn't remember having to bend / curve the brass plate to make it fit the wood. So I pulled the rifle out and checked. The end of that patch box lid was almost flat and, in fact, had a very slight curve in the other direction. Here are a few photos of the colonial patch box brass shoe plate......this one is much easier to do.....


Kansas,

I thought about that, but since the lid dovetail is tapered over its full length, I would have had to relieve the wood along the entire length as well as cutting the stop at the end shorter. It certainly can be done that way, but the box lid fit so well I thought it would be easier to shorten the end of the lid enough to apply the brass shoe.
 
OK....having enjoyed assembling and decorating one of Jim's outstanding Colonial rifles back in late 2019, (Kibler Colonial Kit Assembled), I ordered a Woodsrunner last October. It showed up a couple of weeks ago, and since I am up to my neck in work and other projects that I have left hanging, I took it out of the box and put it aside. However, while looking at it on my work bench the other day, I noticed that Jim had included a small piece of 1/16" thick brass roughly cut into a rectangle. In the moment I wasn't sure what that was for.....until I looked at the sliding wood patch box....and realized that it was included in case you wanted to go to the trouble of putting a brass shoe on the end of the patch box. I really didn't intend to but thought, "How would I do that.....if I wanted to?" Well, an hour later I noticed that I had almost finished the task. I don't have time to finish the rifle now (although I am engraving the lock for another Woodsrunner for a fellow ALR member :eek:) but I thought some of you might be interested in putting a brass end plate on a wood patch box lid.

The piece of brass plate Jim sent with the kit is flat. The perfectly fitted wood patch box lid has a very smoothly curved end that blends nicely into the butt plate. So to use the 1/16" material, and keep the same nice contour, it would need to be curved to match the wood. And the wood would need to be shortened by a little less than the 1/16" thickness of the brass to leave enough material to blend.

So, the first thing I did was to use a round piece of steel bar stock, about 3/4 inch in diameter, and a lead block to hammer a matching curve in the brass plate. It took a bit of trial and error to get it to match the CNC'd curve at the end of the patch box lid, but in short order the brass fit the contour nicely. Once it did, I roughly cut away a lot of the excess brass material with a jeweler's saw with the intent that I would file the final matching contour once the brass was firmly mounted to the box lid.

To shorten the wood, while keeping the curved convex contour, I used a hack saw blade (removed from its frame) to cut four or five parallel grooves (top surface to bottom surface) a little less that 1/16 inch deep. Then I filed the wood surface down until the grooves disappeared. With a few more strokes of the file, I got the wood back to matching the curvature of the brass.

From prior experience I knew that I wanted to mount the plate to the lid with small wood screws. Drilling and installing the tiny screws with a loose plate and on a thin wood lid was a bit of a challenge that I knew would be much easier if the plate was not loose to begin with. So.....carefully avoiding any excess glue that would mess up future staining...I super glued the brass to the wood. Once the brass was firmly glued in place, I drilled and counter sunk for the small screws and firmly attached the brass plate. Now it was a fairly simple task to carefully file the contour of the brass shoe to match the wood and then make sure it still fit the dovetail on the stock and butt plate. When it did, I filed the necessary very slightly concave surface required to get a perfect match with the butt plate contour. With that all done, I cut the notch for the catch and mounted the catch. A few file strokes on the catch and the box lid, with its new brass shoe, worked perfectly.


Wow, I wish I could do mine like that. Not experienced enough to try it. It’s very nice, I enjoy watching craftsmanship like this. I spent my entire life in Law Enforcement, I wish I could have learned some type of craft. People like you make it nice for the rest of us to enjoy.
 
.... I noticed that Jim had included a small piece of 1/16" thick brass roughly cut into a rectangle. In the moment I wasn't sure what that was for.....until I looked at the sliding wood patch box....and realized that it was included in case you wanted to go to the trouble of putting a brass shoe on the end of the patch box. ...
That's Kibler Class for ya.
 
How do you highlight that brass where it’s dark by the details,it really adds to it
If going for authenticity/PC, you don't want to hide the screws. No makers of the original guns did that. Also, just my way, not the only way, to curve the door plates is to go with a dead flat to a dead flat fit with an oversized but roughly pre-shaped thicker than needed brass plate super glued or epoxied. From there carefully file the fit, curve and external slope of the plate, then install the screws counter sunk with minimal to no edges of the crater showing after cleanup. Takes time but pays off. Dave2 did a fine job also. Either method should get you there.
1698406069249.png
1698406184253.png
 

Latest posts

Back
Top