In this episode we will discuss my method of installing the lockplate we inletted in the first post.
With the lock inletted and functioning we need to determine where the locks thru bolts need to be.
At first, one might say, well the front one would be in the middle of the forward projection where it will clear the mainspring.
There is more to it than that though.
The forward screw must go under the barrel and over the ramrod to keep things from hitting it.

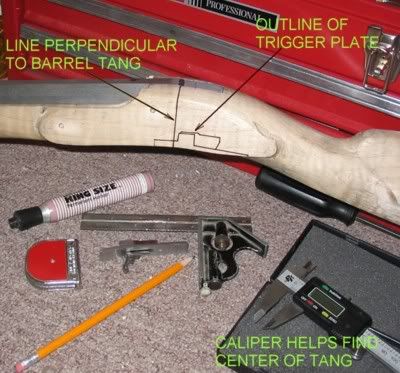
In this picture notice the two pencil lines I drew on the side of the stock. The upper line represents the bottom of the barrel. The lower one represents the top of the ramrod hole.
To determine the bottom of the barrel is easy. Just use a Vernier or digital Caliper and measure down from the top of the stock or if you didn't take my recommendation and buy one of those, you can bridge across the barrel channel with a block of wood and use a smaller piece of wood which reaches down to the bottom flat of the barrel channel. Mark the depth relative to the bridge wood and you have the answer.
Transfer this depth to the outside of the stock in at least 2 places in the area of the lock and draw a straight line connecting them.
Install a dowel in the ramrod hole and measure from the top of the stock down over the dowel. Subtract the dowel diameter and you have the depth of the top of the ramrod hole from the top of the stock. Again transfer the dimension in 2 places and draw another straight line.
The screw must go between the two lines and ahead of the mainspring. This doesn't leave much room when you remember that the screw will be either .160 or .190 diameter depending on whether you use a #8 or a #10 screw. I prefer the # 8 because of the tight quarters the screw must live within.
Note that the lock should be disassembled to do this task.
The rear screw must obviously clear the back of the barrel, but it can go thru the breech plug tang as you will later see.
It should be located just far enough behind the barrel so it doesn't interfere. I try to keep it about 3/16 behind the barrel and be about 3/16 to 1/4 inch below the top of the lockplate in this area.
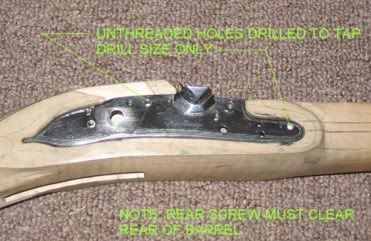
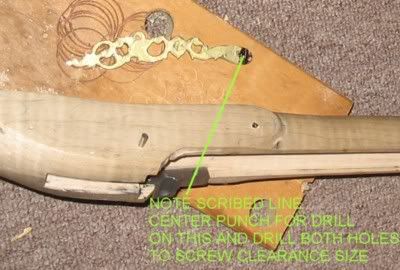
After you have located both screws, center punch the location for the drill. After centerpunching, I like to use a hand drill to start a 1/16 inch drill in them. This keeps the larger tap drill from walking.
Speaking of tap drills, these are special size drills which will leave enough material for the tap to turn into threads.
If you are using a #8-32 screw, the tap drill should be a #19. "Where the H... am I going to get that" you ask? OK, it is .136 diameter and many Good hardware stores will have it. If you cannot get one, then use a 9/64 dia drill. It is .140 diameter and the threads will never know the difference.
If you are using a #10-32 screw, the tap drill is 13/64 (.159) diameter.
We will be using this tap drill for almost everything we do so buy several.
Although a drill press is nice, you can tap drill the holes with a electric hand drill. Just try your best to keep it perpendicular to the lockplate and drill straight thru. Dont let the drill move from side to side because this will enlarge the hole.
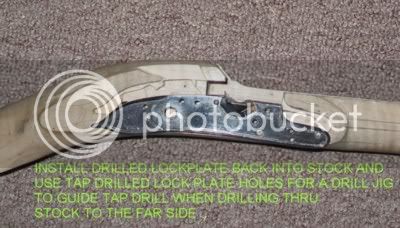
Now with the 2 holes drilled, reinstall the lockplate into the stock. This will become our drill jig to guide the drill into the stock.
Using the drilled holes, drill back thru the plate and thru the stock with the tap drill. DO NOT drill a clearance size hole yet. The tap drill is the size we want to use.
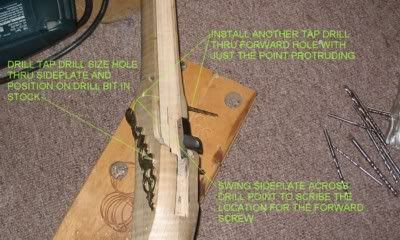
Use the tap drill to drill the upper rear hole thru the sideplate. Locate it to best fit the plate contour without the screw head hanging over the edges.
Insert a tap drill in the stocks new rear lock screw hole. Place the sideplate onto the drill shank.
Now insert another tap drill (I told you to buy several, remember?) into the front screw hole so that the point of the drill sticks just a little outside of the wood on the sideplate side.
Swinging the sideplate around the rear holes drillbit, the front drill point will scribe a arc on the backside of the sideplate. It is on this arc that the forward sideplate hole must live. (Hay, this is a CUSTOM GUN! That means pieces are not interchangable like those newfangled factory guns).
At this stage, you can drill both sideplate holes to the clearance drill size. This is 11/64 (.171) for a #8 screw or 13/64 (.203) for a #10 screw.
You can also enlarge the holes thru the stock at this time using the same clearance drill. Let the existing tap drill holes in the wood guide the drill. Do not try to tell the drill where to go, just let it follow the existing tapdrilled hole. It is best to enlarge these holes from the sideplate side of the stock because often there are only partial holes where they pass thru the lock mortice or inletted wood. DO NOT ENLARGE THE HOLES IN THE LOCKPLATE!!!!!
TAPS: A song you hope will be a long time coming for you. It is also the special tool which creates the threads in the steel lockplate.
You will need a tap for the screw you are using. No other tap will work. Most lock screws are #8-32 (.164 diameter with 32 threads per inch) or #10-32 (.190 diameter with 32 threads per inch). I prefer the #8 because it is more than strong enough for the job and it takes less room. Some builders like to use a #8 for the forward screw and a #10 for the rear screw. This helps prevent confusion when the owner has removed the lock because the forward screw will be a different length than the rear screw when your done.
Back to TAPS. BUY THE VERY BEST TAPS YOU CAN FIND. This is no place for saving a few cents. The ugly black taps made in China where you can get 30 taps for $2.00 are not worth the Pyrodex to blow them to hell! Buy top quality precision ground high speed tool steel taps. You will thank me.
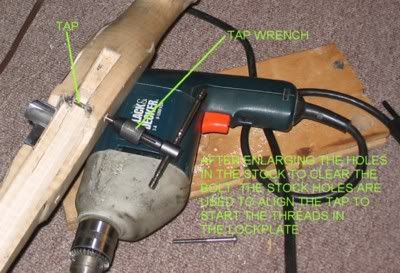
The tap must be started perpendicular to the lockplate. This is difficult to do with the lock sitting on the bench so here we will use the stock to help us.
The picture above shows how the enlarged holes in the stock can guide the tap. Place the lockplate into the stock and clamp the tap into the tap wrench (yes, you should buy one, but you can get by with locking pliers or a small adjustable wrench).
Run the tap thru the stock until it hits the lockplate.
We want to cut only the first couple of threads so using moderate pressure, turn the tap about 3/4 turn. Now unscrew it about 1/2 turn. Turn it back in until you feel it begin to cut and turn it about another 3/4 turn. Unscrew it 1/2 turn. Turn it in another 3/4 turn and then unscrew it from the plate. This will "start" the tap into the sideplate holes so they are going in the right direction.
After doing this to both holes, remove the lockplate.
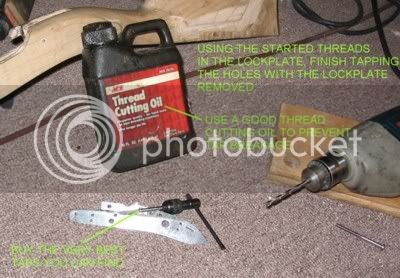
Lubricate the tap with a good Thread Cutting Oil and start it into the partially tapped hole. This oil has sulpher added to prevent the steel from bonding to the tap and causing it to break. Regular oil might work, but why take the chanch?
Continue the 3/4 turn in and 1/2 turn out routine until the tap doesn't feel like it is cutting and that hole is complete.
Complete tapping the other hole.
NOTE. Failure to back out the tap (called chip breaking) or failing to lubricate the tap will almost always result in a broken tap. These things are harder than hell so you don't want to break one in your treasured gun.
Now is a good time to screw the screws into the gun to make sure they align with the lock holes (they will). Note that they protrude thru the lockplate. You will have to cut them off to prevent interference with the hammer or frizzen spring
but a word of caution here. If they are not going to inlay the sideplate, be sure the screws are passing thru it before you screw them thru the lockplate. If you forget this little thing, you will cut them off to short.
Also don't try to cut them off when they are engaged into the lockplate. Just count the threads protruding or better yet, measure how much they stick out. Then remove them and cut off the excess material. Also chamfer the ends of the screw with a file or grinder so they self pilot into the lockplate holes when your assembling the gun.
Now is a good time to find out what you will have to do to the barrel breech plug. It most likely will be in the way of the rear lock screw.
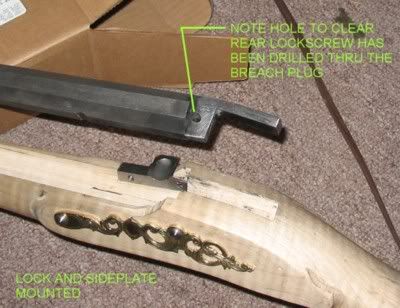
Install the barrel into the stock and run the Clearance drill bit mounted in an electric hand drill thru the rear screw hole in the stock from the sideplate side until it hits the breech plug tang. Just start the drill enough to make a mark on the plug.
Now remove the barrel and determine if just filing a notch will do, or if you need to drill a larger clearance hole thru the plug. It doesn't hurt to go oversize on this clearance hole. In fact it is better to have lots of clearance here.
By the way, now that we have drilled this clearance hole, do you understand why you NEVER want to try to remove the barrel from a rifle of this type without first removing the rear lock plate screw? I knew you would understand. I hope the nonbuilders read this far to learn this little bit of wisdom.
It will save them much grief in the future.
Well, thats about it for now. We will continue in the near future.
Any comments (good or bad) are welcome. The more input we have, the better we can all become.
With the lock inletted and functioning we need to determine where the locks thru bolts need to be.
At first, one might say, well the front one would be in the middle of the forward projection where it will clear the mainspring.
There is more to it than that though.
The forward screw must go under the barrel and over the ramrod to keep things from hitting it.

In this picture notice the two pencil lines I drew on the side of the stock. The upper line represents the bottom of the barrel. The lower one represents the top of the ramrod hole.
To determine the bottom of the barrel is easy. Just use a Vernier or digital Caliper and measure down from the top of the stock or if you didn't take my recommendation and buy one of those, you can bridge across the barrel channel with a block of wood and use a smaller piece of wood which reaches down to the bottom flat of the barrel channel. Mark the depth relative to the bridge wood and you have the answer.
Transfer this depth to the outside of the stock in at least 2 places in the area of the lock and draw a straight line connecting them.
Install a dowel in the ramrod hole and measure from the top of the stock down over the dowel. Subtract the dowel diameter and you have the depth of the top of the ramrod hole from the top of the stock. Again transfer the dimension in 2 places and draw another straight line.
The screw must go between the two lines and ahead of the mainspring. This doesn't leave much room when you remember that the screw will be either .160 or .190 diameter depending on whether you use a #8 or a #10 screw. I prefer the # 8 because of the tight quarters the screw must live within.
Note that the lock should be disassembled to do this task.
The rear screw must obviously clear the back of the barrel, but it can go thru the breech plug tang as you will later see.
It should be located just far enough behind the barrel so it doesn't interfere. I try to keep it about 3/16 behind the barrel and be about 3/16 to 1/4 inch below the top of the lockplate in this area.

After you have located both screws, center punch the location for the drill. After centerpunching, I like to use a hand drill to start a 1/16 inch drill in them. This keeps the larger tap drill from walking.
Speaking of tap drills, these are special size drills which will leave enough material for the tap to turn into threads.
If you are using a #8-32 screw, the tap drill should be a #19. "Where the H... am I going to get that" you ask? OK, it is .136 diameter and many Good hardware stores will have it. If you cannot get one, then use a 9/64 dia drill. It is .140 diameter and the threads will never know the difference.
If you are using a #10-32 screw, the tap drill is 13/64 (.159) diameter.
We will be using this tap drill for almost everything we do so buy several.
Although a drill press is nice, you can tap drill the holes with a electric hand drill. Just try your best to keep it perpendicular to the lockplate and drill straight thru. Dont let the drill move from side to side because this will enlarge the hole.

Now with the 2 holes drilled, reinstall the lockplate into the stock. This will become our drill jig to guide the drill into the stock.
Using the drilled holes, drill back thru the plate and thru the stock with the tap drill. DO NOT drill a clearance size hole yet. The tap drill is the size we want to use.

Use the tap drill to drill the upper rear hole thru the sideplate. Locate it to best fit the plate contour without the screw head hanging over the edges.
Insert a tap drill in the stocks new rear lock screw hole. Place the sideplate onto the drill shank.
Now insert another tap drill (I told you to buy several, remember?) into the front screw hole so that the point of the drill sticks just a little outside of the wood on the sideplate side.
Swinging the sideplate around the rear holes drillbit, the front drill point will scribe a arc on the backside of the sideplate. It is on this arc that the forward sideplate hole must live. (Hay, this is a CUSTOM GUN! That means pieces are not interchangable like those newfangled factory guns).
At this stage, you can drill both sideplate holes to the clearance drill size. This is 11/64 (.171) for a #8 screw or 13/64 (.203) for a #10 screw.
You can also enlarge the holes thru the stock at this time using the same clearance drill. Let the existing tap drill holes in the wood guide the drill. Do not try to tell the drill where to go, just let it follow the existing tapdrilled hole. It is best to enlarge these holes from the sideplate side of the stock because often there are only partial holes where they pass thru the lock mortice or inletted wood. DO NOT ENLARGE THE HOLES IN THE LOCKPLATE!!!!!


TAPS: A song you hope will be a long time coming for you. It is also the special tool which creates the threads in the steel lockplate.
You will need a tap for the screw you are using. No other tap will work. Most lock screws are #8-32 (.164 diameter with 32 threads per inch) or #10-32 (.190 diameter with 32 threads per inch). I prefer the #8 because it is more than strong enough for the job and it takes less room. Some builders like to use a #8 for the forward screw and a #10 for the rear screw. This helps prevent confusion when the owner has removed the lock because the forward screw will be a different length than the rear screw when your done.
Back to TAPS. BUY THE VERY BEST TAPS YOU CAN FIND. This is no place for saving a few cents. The ugly black taps made in China where you can get 30 taps for $2.00 are not worth the Pyrodex to blow them to hell! Buy top quality precision ground high speed tool steel taps. You will thank me.
The tap must be started perpendicular to the lockplate. This is difficult to do with the lock sitting on the bench so here we will use the stock to help us.
The picture above shows how the enlarged holes in the stock can guide the tap. Place the lockplate into the stock and clamp the tap into the tap wrench (yes, you should buy one, but you can get by with locking pliers or a small adjustable wrench).
Run the tap thru the stock until it hits the lockplate.
We want to cut only the first couple of threads so using moderate pressure, turn the tap about 3/4 turn. Now unscrew it about 1/2 turn. Turn it back in until you feel it begin to cut and turn it about another 3/4 turn. Unscrew it 1/2 turn. Turn it in another 3/4 turn and then unscrew it from the plate. This will "start" the tap into the sideplate holes so they are going in the right direction.
After doing this to both holes, remove the lockplate.
Lubricate the tap with a good Thread Cutting Oil and start it into the partially tapped hole. This oil has sulpher added to prevent the steel from bonding to the tap and causing it to break. Regular oil might work, but why take the chanch?
Continue the 3/4 turn in and 1/2 turn out routine until the tap doesn't feel like it is cutting and that hole is complete.
Complete tapping the other hole.
NOTE. Failure to back out the tap (called chip breaking) or failing to lubricate the tap will almost always result in a broken tap. These things are harder than hell so you don't want to break one in your treasured gun.


Now is a good time to screw the screws into the gun to make sure they align with the lock holes (they will). Note that they protrude thru the lockplate. You will have to cut them off to prevent interference with the hammer or frizzen spring
but a word of caution here. If they are not going to inlay the sideplate, be sure the screws are passing thru it before you screw them thru the lockplate. If you forget this little thing, you will cut them off to short.
Also don't try to cut them off when they are engaged into the lockplate. Just count the threads protruding or better yet, measure how much they stick out. Then remove them and cut off the excess material. Also chamfer the ends of the screw with a file or grinder so they self pilot into the lockplate holes when your assembling the gun.
Now is a good time to find out what you will have to do to the barrel breech plug. It most likely will be in the way of the rear lock screw.
Install the barrel into the stock and run the Clearance drill bit mounted in an electric hand drill thru the rear screw hole in the stock from the sideplate side until it hits the breech plug tang. Just start the drill enough to make a mark on the plug.
Now remove the barrel and determine if just filing a notch will do, or if you need to drill a larger clearance hole thru the plug. It doesn't hurt to go oversize on this clearance hole. In fact it is better to have lots of clearance here.
By the way, now that we have drilled this clearance hole, do you understand why you NEVER want to try to remove the barrel from a rifle of this type without first removing the rear lock plate screw? I knew you would understand. I hope the nonbuilders read this far to learn this little bit of wisdom.
It will save them much grief in the future.
Well, thats about it for now. We will continue in the near future.
Any comments (good or bad) are welcome. The more input we have, the better we can all become.


