• Friends, our 2nd Amendment rights are always under attack and the NRA has been a constant for decades in helping fight that fight.

    We have partnered with the NRA to offer you a discount on membership and Muzzleloading Forum gets a small percentage too of each membership, so you are supporting both the NRA and us.

    Use this link to sign up please; https://membership.nra.org/recruiters/join/XR045103

Color Case Hardening???

Muzzleloading Forum

Help Support Muzzleloading Forum:

This site may earn a commission from merchant affiliate links, including eBay, Amazon, and others.
Joined
May 7, 2007
Messages
97
Reaction score
5
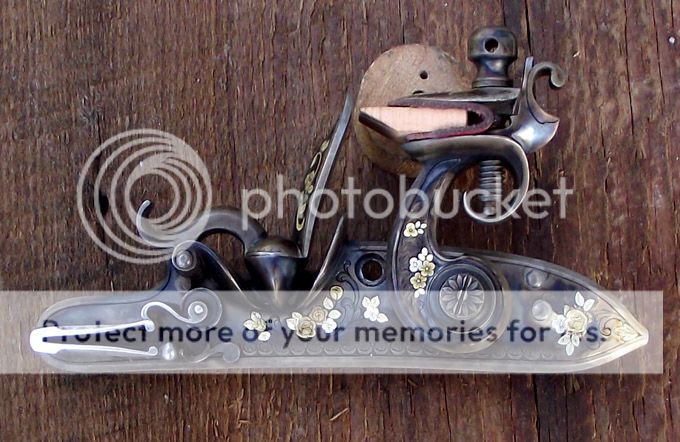
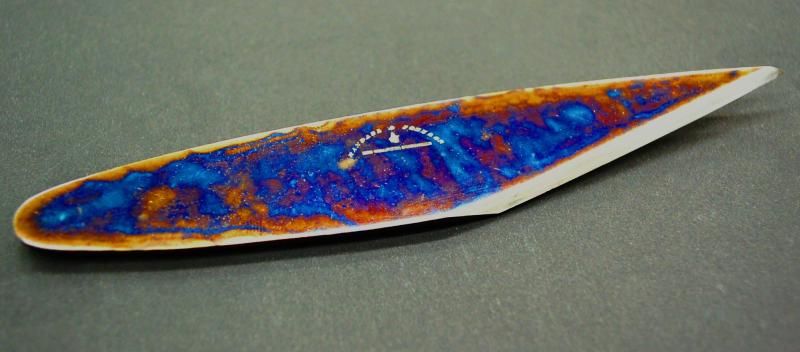
Anyone have any advice on how to color case harden??
I have looked over the YOUTUBE stuff. It all seems pretty complicated, and maybe a good way to ruin some good gun parts??
I see on line there are several products available that they say "simplify" it allot.
Any experience??
Thanks all,
Happy Thanksgiving
 
There are places that do it professionally. I can't think of the names of any at the moment but they are out there. The process is a bit tricky and you are right about being able to mess up a part trying to get a decent looking color case hardening. It's best to just ship them to one of the folks who do it professionally and you will end up with a nice looking part.
http://www.bing.com/search?q=Color+Case+Hardening+Services&FORM=R5FD6
 
Last edited by a moderator:
Unless you are willing to make an investment into equipment and a bigger investment in time to learn the process and get the kinks out before going on to your precious parts then I second what Bellnpatti said. Go to a professional. I say this from (professional )experience.
 
Send me a personal Email and I will give you the exact details. I have done this for many years and still do. It will not ruin parts.
You will need a controlled heat source.
 
haven't done it myself but, I've seen some people do a pretty decent job of fakin' case colors with a small propane torch.
 
I case color as well Jerry and will send you an E-mail as I always like to hear how other folks do it so I can pick up some new tips.
I have a pretty good file going now on different folks ideas and methods.
Started with Oscar Gaddy's methods and have some good information from an English double gun maker.
I will send you an E-mail if the one listed in the members is current.
 
It is a fun process and not overly difficult if you have the right equipment. I have done it in my university lab and at home for the past several years and students rarely have trouble getting good colors on their engine parts on the first try. As long as you have an accurate furnace and good quality charcoal you shouldn't have too many problems. The biggest hurdle for me was getting the parts into the quench tank without leaving them exposed to the outside air. My solution was to use an inverted crucible on a sheet steel carrier. When the whole setup was brought to the quench tank (with a sheet steel cover) the crucible could be slid off so the parts drop instantly into the quench. The pictures below are some I took several years ago of the process, my setup has gotten considerably better over the years, but the process is still essentially the same.

IncomingCrucibleEdited.jpg


GoingOverTheEdgeEdited.jpg


TheQuenchEdited.jpg


ExplosionEdited.jpg


AnotherExplosionEdited.jpg


Here is a drawing of the crucible that I currently use, I don't have any photographs of it but I will try to get some soon.

carrierassembled.jpg


crucibleexploded.jpg


crucibleoncarrier.jpg


I experimented with casehardening a few throwing knives this summer with decent results. Here is one that I finished awhile back.

RandallandJohnsonBowie1.jpg
 
What are your temperatures hold times and charcoal mixes please? Did you use aerated water?
Can't show some of the single shot receivers I've done.
Lots of blue,tan, red and creams!
 
Well, maybe it looks fake but it's not.

It is the same colored oxides that real color case hardening has and if the owner isn't too picky, making a colored pattern with a small propane torch can be done.

With some care, a person can do a lot better than I did on this one. :grin:

 
Propane case coloring looks nothing like packed hardwood and bone charcoal case coloring or cyanide casing.
All three are distinctly different in color and pattern.
 
This was a color case hardening project I had recently. Part of a full restoration of a Joseph Lang double gun. The colors are actually more vibrant than the photo shows, but unfortunately my photographic skills are lagging.

Everyone is right, it is not that difficult of a process, but you do need some specialized equipment, which most importantly is a controlled heat source.

Here is a very long thread from another forum, that will details other peoples attempts and experiments with the process. http://www.marlin-collectors.com/forum/viewtopic.php?f=21&t=3732


29x768.jpg
 
Last edited by a moderator:
Nice, looks like original English high end case colors which are usually more muted and tend to the browns and cream colors.
Some of my colors come out awfully loud and gawdy with the blues, reds and creams so I generally do not polish the metal after getting it cleaned up but use glass beading instead.
That and a coat of true oil over the top after the temper draw really knocks down the super bright colors that show up fresh out of the quench.
Color some times tones down in the temper draw cycle used on whole action bodies.
 
Problem is I never deleted it. It is still there. ????
I haven't figured this out yet. I will


casehardenedlock3_zpsb057f16c.jpg
 
M.D. said:
What are your temperatures hold times and charcoal mixes please? Did you use aerated water?
Can't show some of the single shot receivers I've done.
Lots of blue,tan, red and creams!

I try to keep my temperatures around 1450F, I find that temperatures that get over 1500F tend to produce very dark colors and temperatures much lower than 1400F could result in the parts being quenched under critical temperature range. That is my main objection to the Marlin thread where the originator of that thread liked to quench in the 1250F range. I know from experience that lower temperature ranges (read that less than critical) can yield some nice colors, but it definitely is not ideal if the intent is to harden parts. Hold times very with the intended purposed, but generally I give them at least 2 hours at temperature.

The charcoal that I use is from Brownells, but I believe there's is sourced from the Berger Bros. in Chicago. Most of the time I use a 50/50 (bone to wood) mix, though I have played with other ratios in the past. I don't generally aerate the tank, I found that wrapping the parts in soft iron wire before packing them in the crucibles gives about the same effect and is more predictable. This is something that I learned from one of Jerry's posts many years ago.

I still contend that the method that parts are delivered to the quench is as important, if not more important, than most of the other variables as far as colors are concerned, this also includes the methods that parts are inserted into the pack giving consideration to how they will fall from the crucible.

This is a photo of a marking knife that I made recently that was done with a higher concentration of wood to bone which tends to result in more blues I have found.

DSC_1121.jpg
 
Back
Top