• Friends, our 2nd Amendment rights are always under attack and the NRA has been a constant for decades in helping fight that fight.

    We have partnered with the NRA to offer you a discount on membership and Muzzleloading Forum gets a small percentage too of each membership, so you are supporting both the NRA and us.

    Use this link to sign up please; https://membership.nra.org/recruiters/join/XR045103

CVA Mountain Rifle Lock Problem.

Muzzleloading Forum

Help Support Muzzleloading Forum:

This site may earn a commission from merchant affiliate links, including eBay, Amazon, and others.
Joined
Aug 25, 2007
Messages
3,747
Reaction score
5,347
Recently acquired an early USA CVA Mountain Rifle. Very humid where I live and rifle came from CT. When it arrived I discovered that the lock will not engage at either half or full ****. Took out lock. Works fine. Fiddled with screws. No screws, loose screws, tight screws, no change. I thought wood might have swollen, but weeks in the safe have not changed anything. What is the fix? :confused:
 
The first thing to check is that the lock screws are not over tightened, just snug should be right. Make sure the sear arm that contacts the trigger bar is not bent down (i had one like that) and the trigger is not binding or over tightened if they are the wood may have been crushed and you would need a shim under the trigger plate. Also check for any binding against the wood of the in-letting of the lock or trigger.
 
bpd303 mentioned it,, it's the trigger.
(I mean the wood under the trigger)
CVA removed a lot of wood during inletting, then add the age of the gun and several owners and the wood under the trigger drys and gets crushed.

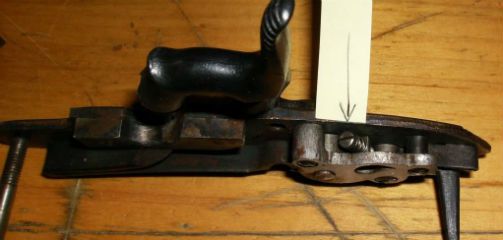
The tang bolt goes through the stock and threads into the front of the trigger plate,, years of over tightening,, the trigger cams ride too high and are always in contact with the trigger sear arm,, (something that shouldn't happen) then the trigger sear is never allowed to engage the tumbler.
The fix is to shim under or re-bed the area directly above the front of the trigger plate,, bringing the entire trigger mechanism down to where it should be.
 
The popsicle stick shim kind, sorta worked. For a minute. Did not have any suitable washers to try. The shim worked fine until I put any tightness on the lock plate screws. Gonna take some fiddling, but after watching the Packers get creamed, I have no enthusiasm for anything.
 
You are on the right track. This is a problem on a lot of different CVA models. I have a CVA Squirel Rifle Kit on my bench that is under construction. New in the box kit that was never assembled and had the same problem with it. Not all that hard to fix and the repair is hidden.
 
I did mine a long time ago, like 25 years. I don't even know how I figured out what it needed but I believe if I remember right, half **** or full **** wouldn't work all the time and if I bumped it at full ****, sometimes the hammer would fall.
 
BigSkyRambler said:
The popsicle stick shim kind, sorta worked. For a minute. Did not have any suitable washers to try. The shim worked fine until I put any tightness on the lock plate screws. Gonna take some fiddling, but after watching the Packers get creamed, I have no enthusiasm for anything.

Two things to note here.
1. The triggers worked with the Popsicle stick shim.
2. The problems returned when you tightened the lock plate bolts.

This is indicating that the lock is also being pulled too deep in the lock mortise and the sear is catching internally on the wood or the tumbler is catching and preventing the lock from functioning properly. You may need a shim in the lock mortise to provide some internal clearance. You also only need to tighten the bolts (trigger, lock and tang) to the snug. No need to over tighten.

If the trigger mortise was allowing the triggers to be pulled too far into the stock, then it is likely that the lock is also being pulled in too far also.

Look to see if the sear is rubbing in the recess in the lock mortise for the sear. Look for signs of rubbing anywhere in the lock mortise.
 
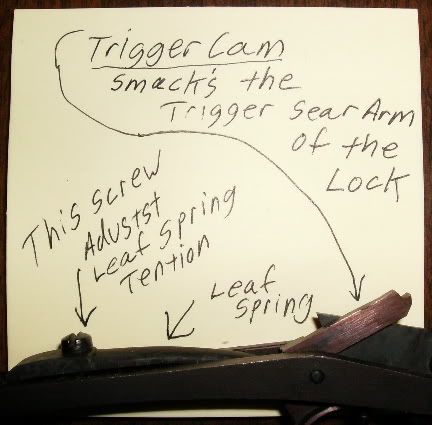
Be sure to have this screw backed out some. If it's in too far the sear will not engage.

Untitled-6.jpg
 
To do the fix right you should really try to measure the depth needed for correct contact of the trigger bar to lock sear. A small mechanical ruler should be employed. Popsicle stick wood is very soft and compresses easily. I built up my inlet with epoxy fill and re-inletted the trigger to the pre-determined (from measuring) depth. Solved that problem. Now, my biggest problem is fouling buildup getting into the lock and interfering with full ****. I have tried a flash cup but that is only partly helping.
 
I am currently building a CVA Mountain Rifle kit (not USA). To solve the trigger problem I glued maple veneer into the mortise and carved away what was not needed. A little sanding and scraping shimmed it correctly. The lock mortise had to be worked to get the lock to work smoothly. Make sure that there is clearance for the moving parts and the mainspring.
 
Grenadier1758 said:
BigSkyRambler said:
The popsicle stick shim kind, sorta worked. For a minute. Did not have any suitable washers to try. The shim worked fine until I put any tightness on the lock plate screws. Gonna take some fiddling, but after watching the Packers get creamed, I have no enthusiasm for anything.

Two things to note here.
1. The triggers worked with the Popsicle stick shim.
2. The problems returned when you tightened the lock plate bolts.

This is indicating that the lock is also being pulled too deep in the lock mortise and the sear is catching internally on the wood or the tumbler is catching and preventing the lock from functioning properly. You may need a shim in the lock mortise to provide some internal clearance. You also only need to tighten the bolts (trigger, lock and tang) to the snug. No need to over tighten.

If the trigger mortise was allowing the triggers to be pulled too far into the stock, then it is likely that the lock is also being pulled in too far also.

Look to see if the sear is rubbing in the recess in the lock mortise for the sear. Look for signs of rubbing anywhere in the lock mortise.

There are signs that the sear presses into the bottom of the lock mortise. I placed a small, thin washer at thefronnt of the lock here the screw could pass through it and stacked two very tiny metal shims on what little "shelf" supports the aft "nipple" of the plate. Gently tightened screws. Still only holds half ****. But I made a discovery that I seem to have read about before: If I set the trigger first, the hammer firmly holds full ****. Not overly comfortable with this. I still need to do more work filling, shimming, scraping, and cussing. Any thoughts on the situation with setting the trigger before cocking?
 
When you move from half **** to full **** that changes the position of the sear downward slightly. So to get it to full **** you still need a hint of shimming. When you engage the set trigger it pulls the trigger bar down just slightly and so it is then clearing the sear enough to engage full ****. I personally think its safer to set the trigger after you have pulled the hammer to full ****.
 
The fact that the lock sets to the full **** position IF the rear set trigger is first set indicates that the blade on the top of the rear trigger is pushing up on the sear arm when it is left in the unset position.

This can be fixed by either adding more shims or you can take a smooth flat metal cutting file and file off a little material off of the top of the rear triggers blade.
You will probably need to remove a little over 1/32" of material to make things right.

This rear set trigger blade does not have to fit closely to the locks sear arm to work.

It works by inertia and whacks the sear arm to release it from the full **** position.

It does not work by gently pushing the sear arm so a little extra clearance here won't hurt anything.
 
Ok, it's about the rear cam, the leaf spring tension dictates how high the cam rides while un-set.

HPIM0709.jpg


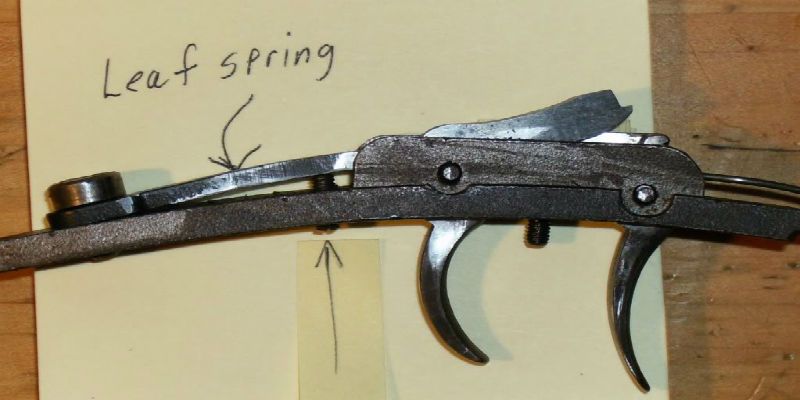
However with the CVA triggers there's another screw on the bottom;

Untitled.jpg


The bottom screw adjusts how far the leaf spring travels,,
So there three adjustments on the trigger itself, the leaf spring tension, leaf spring travel and the set distance of the rear trigger engagement.
It's all a balancing act,,
 
Back
Top