• Friends, our 2nd Amendment rights are always under attack and the NRA has been a constant for decades in helping fight that fight.

    We have partnered with the NRA to offer you a discount on membership and Muzzleloading Forum gets a small percentage too of each membership, so you are supporting both the NRA and us.

    Use this link to sign up please; https://membership.nra.org/recruiters/join/XR045103

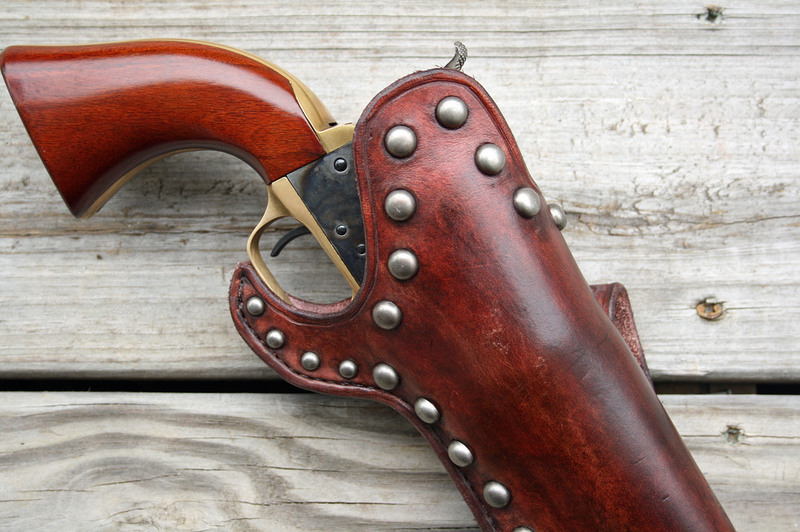
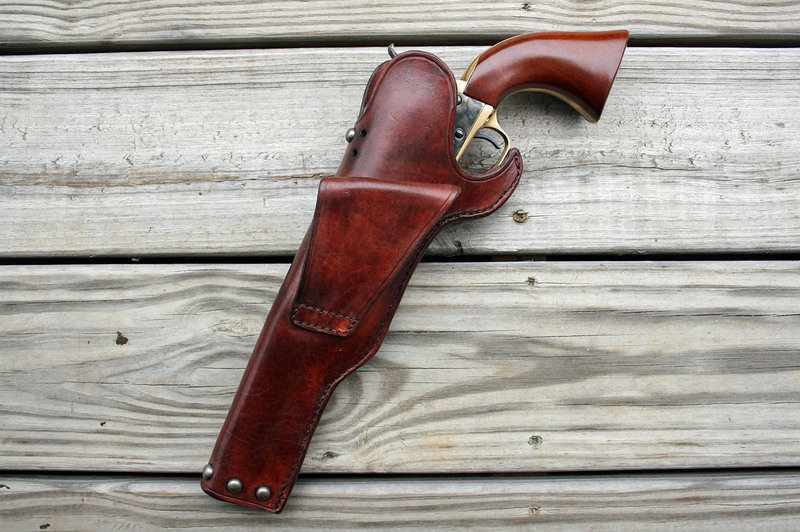
First holster (pics)

Muzzleloading Forum

Help Support Muzzleloading Forum:

This site may earn a commission from merchant affiliate links, including eBay, Amazon, and others.

Guest
Before this, I've made a ball bag, a cigar pouch and a knife sheath. All out of chrome tanned stuff from the craft store, before I knew any better and with a bare minimum of tools. About a year ago I finally decided to get serious and got most the tools I needed, plus a couple hides. I fiddle-farted around for the last several months and have just now finished my first project out of hand-dyed, 8-9oz vegetable tanned leather. A Slim Jim for a Uberti 3rd Model Dragoon. A big thanks to Chuck Burrows for his excellent video. I think it turned out fairly well. It actually looks quite rustic which is entirely by accident. Haven't decided if that's good or bad yet. It's a crossdraw that rides a little higher than normal. Decorated with antique nickel spots, made my own pattern and mixed my own dye. Finished with gum trag and bag kote.

IMG_1237b.jpg


IMG_1247b.jpg


IMG_1242b.jpg
 
DANG! Craig you make me feel like a proud papa! :grin:
It makes my heart glad to see I've helped out folks along their journey into the wonderful world of leathercraft which I've been part of for so long. It's especially heartening to see some one with so much obvious talent like yourself on that journey.

I'd be right proud of that even if it was my 100th or my 4,000th and not my first (I stopped counting at 4K). The stitching looks great and the color you achieved is very, very nice - what dye did you make? I also like the vintage look that you got whether it be on purpose or it just happened. FWIW - I always struggled to get the new look, the vintage look just seems to come natural - luckily I like the vintage look and it finally caught on with a lot of others as well.

Again GREAT job - keep it up...... :hatsoff:

BTW - I'm now getting all of my veg/bark tan leather from RJF Leather - it's old time pit tanned and is the best leather I've seen/used in years. Another plus - no minimum orders and Roger sells REALLY nice double shoulders which for most hobbiests (and even many pros) is the best bang for the buck and since they are about half the size of sides the cost is lower for those who don't need a large amount.

Labonte aka Chuck Burrows.......
 
ain't nuttin wrong with that!Looks like a movie piece to me..

alias GCR :v
 
Wow, I don't even know what to say!!! Thank you very much to all who responded.

Chuck, that means a lot coming from you. I've thoroughly enjoyed my leather from outfits like El Paso Saddlery and C.O.W.S. but was never inspired to do my own until I saw yours. Not that I thought it looked easy, quite the contrary. I knew it took a lot of extra effort to produce new leather that looks old and worn. Like it just came off a time machine. When you get right down to it, that's the whole point, to be transported back in time. Looking at it on the website was one thing but to actually get to see you produce two holsters, taking so much of the mystery out of it and sharing your knowledge, that's something special. The fact that you share information the way you do is not taken lightly either.

I would hope I struggle to attain the "new" look too but I'll probably never try. I'll leave that to others. The antique stuff is what really appeals to me and I hope the unintentional vintage look was not a fluke. You've also gotten me into beadwork. I was going to do a beaded cuff on the sheath I made but decided to save the beading I started for something a little better, rather than the chrome tanned remnant bag junk. I've bought more books on beadwork in the last year than I can count. On our summer trip through the southwest, we stopped at every museum we passed and I've got literally hundreds of pictures of original beadwork. Plus I found a good bead shop in Santa Fe and stocked up on some stuff I couldn't find locally.

I dropped Rob Leahy of Simply Rugged a line to find out what he uses for his oxblood color. On his tip, I just played around with mixing mahogany and tan to get the color I wanted.

Thanks for the tip on RJF, I'll look them up. Once I finish up my cheap hide from Tandy I'll probably want to try some good stuff. I figured the cheap hide was probably the reason for a lot of my color variation.

Anyway, thanks again for the kind words and encouragement. You made my day!
 
Looks great, good job.
I would have brought the top up a little higher to fully cover the hammer. That prevents accidental catches.
I once came back to camp after a day deer hunting to find the Ruger Old Army on my hip at full cock. :shocked2: Could have been bad news. After than I used either full flap or holsters that cover the hammer.
 
That's a good idea. I was using my El Paso 1849 as a reference and didn't realize it came back far enough to cover the hammer. I should've had it come up higher around the triggerguard too. :thumbsup:
 
Good work ! I like the color. After carrying a gun many hours a day and trying many different styles I switched to a slim Jim and love it . Keep it up!
 
Got my new shooting bag drawn up and cut out last night. I'm doing this one in 4-5oz vegetable tanned and it's a nicer hide than the one I used for the holster. It's already turning out better. Got one whole seam stitched up this afternoon and might start another tonight. I may bead the flap. Pics to follow.
 
Well personally I think it is fantastic, especially considering this is a first. First or tenth I think you hit it out of the ball park on this one!!!
The leather work is great and the color turned out well too.

CraigC said:
That's a good idea. I was using my El Paso 1849 as a reference and didn't realize it came back far enough to cover the hammer. I should've had it come up higher around the triggerguard too. :thumbsup:

As for the hammer problem, you could always easily attach a hammer strap. You know gunslinger style. Keeps the gun in place until released and keeps if from an accidental cocking!

Either way great work! :hatsoff:
 
Thank you very much for the kind words!

You can see the two holes I punched for the hammer thong in the bottom pic. I just haven't found any lacing I want to use yet. All the stuff I have is too thick. Unless I think I can cut some lacing out of the 4-5oz stuff I'm working on now.
 
Craig - what I use as a hammer thong is a bit different than most others - I take a piece of 3/4 oz (4/5 is bit heavy but can be sanded down on the back side easily) about 6-8" inches long - cut in the shape of a tadpole with the wide part about two inches long and the rest a narrow tail.
In the middle of the wide part punch a hole big enough to go over the hammer and then cut a slit going towards the tail about 1/2-3/4" long - make the hole/slit fit snug but not tight over the hammer. By putting the hole/slit in the middle and lower section it leaves a nice tab above to grasp onto when taking it off the hammer.
Dampen the tail and feed it through the holes start from the outside on the top hole than back out through the lower hole - adjust as needed. I usually add a couple of large brass beads to the tail but it can be left as is.

Here's a pic that might help "see" what I'm saying - you can see the tab fitting over the hammer and the tail hanging down:
bell-holster-2-sheath.jpg
 
I know exactly what you're talking about. I can manage that. Might be able to find something in my scrap bin to make work. Maybe I can throw a couple Crow beads on the tails. Thanks again!
 

Latest posts

Back
Top