• Friends, our 2nd Amendment rights are always under attack and the NRA has been a constant for decades in helping fight that fight.

    We have partnered with the NRA to offer you a discount on membership and Muzzleloading Forum gets a small percentage too of each membership, so you are supporting both the NRA and us.

    Use this link to sign up please; https://membership.nra.org/recruiters/join/XR045103

First shoot patch diagnosis

Muzzleloading Forum

Help Support Muzzleloading Forum:

This site may earn a commission from merchant affiliate links, including eBay, Amazon, and others.

mikemeteor

45 Cal.
Joined
Nov 16, 2008
Messages
660
Reaction score
3
took my brandy new LR build out to the range yesterday and was thrilled when it went bang.
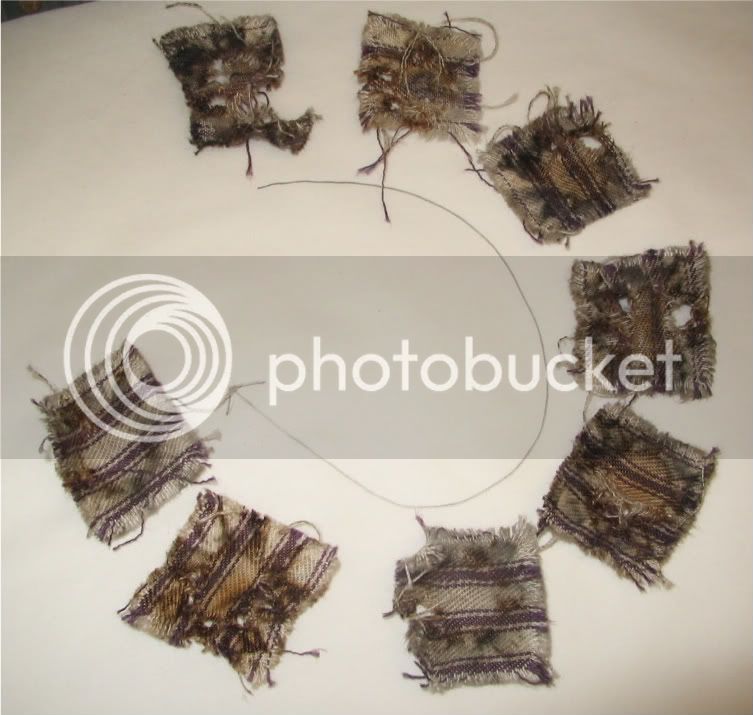
I collected some patches - but I'm a little too new at this to tell much about my gun from them.
They did seem to get better as I shot more.

These were shot in .50 cal, with 70 grains, .490 rb and .018 patch.

I didn't get them all, but have included a picture of patches placed in close chronological order, with the shredded one at top the very first shot out of this gun, and the last one was about shot #20.
Would appreciate any insight I should take home based on the looks of these.

patchesOct40003.jpg
 
Looks like a new barrel with sharp rifling. You can scrub it with steel wool wrapped around a dowel. One or two hundred stokes should help. Gota stop those patches from looking like that.
 
Swampy said:
Looks like a new barrel with sharp rifling. You can scrub it with steel wool wrapped around a dowel. One or two hundred stokes should help. Gota stop those patches from looking like that.

Swampy beat me to it!

If you look closely, you can see where each of the lands cut the patch while loading.
 
Use a slightly larger "square " of fabric. You are getting a little close to the side of some of these patches. Add a quarter of an inch per side, and you will find loading better.

The front of the lands is cutting the patches. Use a tool handle that fits down into the muzzle, to support some emery cloth to polish and round the front of the lands at the muzzle. That will get rid of some of the burrs on the front edges of those lands, too. If you can get rid of the cuts, I think the patch thickness and lube look about right for you, based on that black ring and the discolored centers of the patches shown. Right now, you are losing velocity by the gases cutting through and tearing your patches, so that you will not get consistency in accuracy.

If you use these same patches again, changing nothing, you might try pouring about 20 grains(by volume) of Cream of Wheat, or Corn Meal, down the barrel, on top of the powder to act as a filler, to hold back the gas behind the patch. Your groups will come down in size doing so, but you will still see cuts in the patches from those sharp lands. Work at removing those sharp edges on the lands.

You can test your work progress by using a long strip of patch fabric, leaving to 3-5 inch "wings" of fabric on each side of the muzzle. Start the ball into the muzzle. Then grab the wings and pull the ball out of the muzzle. Examine the fabric for cuts. If you still have them, the location of each of the offending lands will be apparent, and you can continue to polish them until they don't cut the fabric anymore. :thumbsup:
 
You may seriously want to think about contacting Joe Wood who makes a wonderful muzzle conning tool. I forgot his email otherwise I'd post it.
 
My patches looked exactly like yours out of a new Lyman barrel.
If it is really hard to push your load down you could try a thiner patch.
The "fix" for mine was a doubled over cleaning patch that I worked full of a mag wheel/aluminum polish I got at the auto parts store. Flitz would probably work too.
I swabbed the bore full length 100 strokes. The patch as it was compressed on entry also polished the crown. My theory in such a mild abrasive was to take just enough off and no more. I figured if 100 didn't do it the next 100 would. My own stupid opinion is that even 4 aught steel wool can be harsh for all but the very worst of bores.
 
Actually, the last patch you show looks pretty good but Paul V is right about using slightly larger patches.

As for the cuts, it's pretty hard to determine if they are just from the sharp rifling or not.
The next to the last patch at the bottom definitely looks like it was cut by the sharp edges at the muzzle.

I'm sure you've read my method using your thumb or pinkie and a small square of wet/dry silicone carbide sandpaper to round off those sharp edges where the rifling meets the chamfer or crown of the muzzle.

Try that and see if your problems don't go away.

If you don't want a bright shiny lead in at the muzzle you can always blue it with some Cold Gun Bluing.
 
Swampy said:
You may seriously want to think about contacting Joe Wood who makes a wonderful muzzle conning tool. I forgot his email otherwise I'd post it.

Good suggestion! I didn't even think about it.

Here's the email I have for Joe Wood: [email protected]
 
Since it looks like you cut your own patches,use the same material in a larger amount seat the ball level then pull it back out with the excess cloth as a handle..Se if the problem is the crown first..Then try seating the ball all the way and pull it with out firing to see if is the rifling..Ray
 
In the event of rough bores and sharp rifling I slug the barrel, attach the slug to a piece of threaded aluminum and embed the slug with some very fine clover. Work it back and forth to polish the bore and knock off sharp edges.

To just deburr the lands I've used a patch impregnated with clover and worked it with the jag & ramrod. Since the lands are the pressure points on the patch they'll see the most "cutting" action. Clean the tube well afterward.
 
thanks guys !
I'll step through the diagnostics and treatments provided above.

Before final assembly of the rifle, I did the 100 strokes with the green scotchbrite pad and water-based valve grinding compound (NAPA).
Seems like I may have needed a few hundred more strokes. I'll get on that tonite.
I'll try the coneing fix too.

Gotta ask a rookie question, Rootsy - what the heck is the "clover" you speak of ? :confused:
 
Buy a pack of over powder wads, shoot them all and then try again without them. Shooting tends to smooth out the barrel surface.

If the first patch used with the OPW does not have holes, then your rifling is not cutting it and you don't need to fix it.

I have never had a torn patch when I used an OPW. Besides an OPW shoots tighter groups.
 
Hi, Meteorman,

KV Rummer said:
Buy a pack of over powder wads, shoot them all and then try again without them. Shooting tends to smooth out the barrel surface.

If the first patch used with the OPW does not have holes, then your rifling is not cutting it and you don't need to fix it.

I have never had a torn patch when I used an OPW. Besides an OPW shoots tighter groups.
Before buying the wads, try the same with just an extra patch seated on the powder (you may have to use the back end of your rammer to do this, if the front is flared & rounded to fit the ball) before you load your patch and ball. It should work about the same as the wad, as should the filler that Paul suggested. Any of them should get wedged into the periphery behind the ball by the powder gas, so that any patch damage you see is only from the lands and/or crown. Damaged patches can allow blowby and make it hard to tell if the burn was from a patch failure or from damage to the patch.

Another suggestion about the felt wads is to use a somewhat larger size - .54, or even .58 if it is thin, in a .50 - so there is plenty of wad to wrap around the curved backside of the ball and still jam in the periphery.

To expand on a point KV Rummer makes, some folks find their preferred combination of ball & patch does not seal well enough past a certain powder charge - or maybe with a clean bore. They usually find they get higher velocities and better accuracy with a filler, felt wad, or second patch under these circumstances.

Have fun sorting this out. Please let us know what works for you.

Regards,
Joel
 
It's a Green Mountain barrel.

I did the "start the ball with a long patch and pull it back out" diagnostic - did it three times and no cuts on the patch. The ball actually started in pretty easy. And that was with no lube.

At the original shoot, I was using spit for lube, and then Crisco. Maybe I just didn't do a good enough job spit lubin' it ?
 
I'm not so sure those holes are cuts from the lands, at least some look like burns at the grooves. Burn throughs indicate a loose fit of patch and ball and or a lube failure.
 
Here's my two pennies. I'm going along with CoyoteJoe. Here are some comparison patches and crown images of before and after. If I recall correctly, the load was similar. I also did the folded up patch directly on top of the powder BEFORE the PRB. That confirmed the gas jet burns over rifling cuts, though my JBMR lands and grooves are deep and crisp.

Crown before polishing.


jmbrmuzzle.jpg


Patches before polishing crown.


004ylr.jpg


Crown after polishing.

p3300528.jpg


Patches after polishing and some lube and powder charge tweaking.
Note the patch diameter; plenty of cloth to center the ball on.
003bwv.jpg


I think you've gotten the best tips to go experiment with. I just added what I experienced after posing the similar results from my first shoot with a new rifle. The guys here gave me the same advice. HTH and good luck.
Steve

PS- oh yea... the before and after targets.
jbmr3028.jpg
jbmr4004.jpg
 
I did the "start the ball with a long patch and pull it back out" diagnostic - did it three times and no cuts on the patch. The ball actually started in pretty easy. And that was with no lube.

Given the above, I'm in agreement with CoyoteJoe when he says;

I'm not so sure those holes are cuts from the lands, at least some look like burns at the grooves. Burn throughs indicate a loose fit of patch and ball and or a lube failure.

And, the easy loading of dry patch material and the lack of cuts from the crown supports the idea that the patch material is not thick enough or tough enough.

OTOH, once you tighten up with a thicker patch, then the crown may start to cut. :shocked2:

If you crown your muzzle as StevePrice2 has suggested and lap the bore (I prefer firelapping) you will relieve the pressure on the patch during loading, you will be able to load a tighter patch ball combo, and will achieve a tighter fit to a smoother bore resulting in less liklihood of patch burning in the grooves.
 

Latest posts

Back
Top