I've got some antlers in the shed that I've found over the years and I want to make something besides powder measures. If I get a fairly long, fat, and straight tine could I make a flinltock primer with it? The idea I had was cut it off at both ends and hollow it out, cut a tiny piece off the point of the tine, and use a very small drill bit to drill the hole the powder comes out. Then for the back of it fit a wooden plug like on any powder horn. Is this doable?
You are using an out of date browser. It may not display this or other websites correctly.
You should upgrade or use an alternative browser.
You should upgrade or use an alternative browser.
Flinltock Primer
- Thread starter luieb45
- Start date

Help Support Muzzleloading Forum:
This site may earn a commission from merchant affiliate
links, including eBay, Amazon, and others.
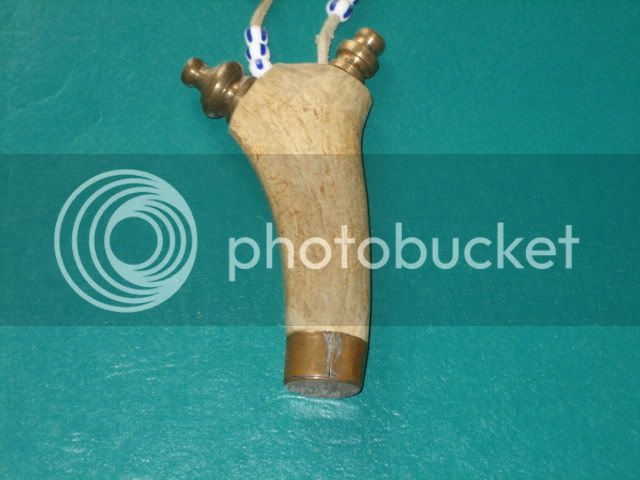
Here is that pic for you Luie.
Base plug and spout tip made from maple. I made this some years ago and never really gave it much thought until I read your post. It has been out of site and out of mind.
It made a for a handy primer, but I have been priming from my main horn for quite some time now and tossed this primer to the side.
Because of your post, I have an interest to make another one now.
Take care young man.
Steve

paulvallandigham
Passed On
- Joined
- Jan 9, 2006
- Messages
- 17,537
- Reaction score
- 94
You drill it from both ends, using PILOT holes to locate the center, and hopefully, to meet at the middle of the curve. I would not suggest a curved horn for your first attempt at working with antler.
At 3-5 grains of FFFFg powder per shot, you don't need to be carrying a lot of priming powder in this kind of tool for a day's shooting. I have one that has a straight Horn section about 4 inches long, with a 3.8" diameter in the trunk, stopping about an inch before the bottom. It holds more than 70 grains of powder, so I simply never worry about running short of priming powder. 20 shots in one day is a lot of shooting, for me.
At 3-5 grains of FFFFg powder per shot, you don't need to be carrying a lot of priming powder in this kind of tool for a day's shooting. I have one that has a straight Horn section about 4 inches long, with a 3.8" diameter in the trunk, stopping about an inch before the bottom. It holds more than 70 grains of powder, so I simply never worry about running short of priming powder. 20 shots in one day is a lot of shooting, for me.
Hi Luie,
As Paul says, drill on center from both ends and the holes will intersect in the curve. I suggest using a straighter antler as well. Working with prononced curves in both antler and horn requires more precision drilling and sometimes you will be off the mark and drill through the side of a piece .
.
Before you drill, try drawing a straight line right dead center of the diameter along the outside of the antler with a pencil from both the tip and the base. The pencil lines will intersect somewhere near the middle of the antler piece and they will provide a reference line when drilling.
On this one, I used a slightly bigger drill bit on the base end than I did for the tip. Then with a round file, I hollowed out the base even larger to gain volume space.
Steve
As Paul says, drill on center from both ends and the holes will intersect in the curve. I suggest using a straighter antler as well. Working with prononced curves in both antler and horn requires more precision drilling and sometimes you will be off the mark and drill through the side of a piece
Before you drill, try drawing a straight line right dead center of the diameter along the outside of the antler with a pencil from both the tip and the base. The pencil lines will intersect somewhere near the middle of the antler piece and they will provide a reference line when drilling.
On this one, I used a slightly bigger drill bit on the base end than I did for the tip. Then with a round file, I hollowed out the base even larger to gain volume space.
Steve
ohio ramrod
75 Cal.
- Joined
- Aug 21, 2008
- Messages
- 7,473
- Reaction score
- 2,213
Curved horn can be hollowed out by drilling an angled hole part way from both ends and then burning out the remainder with a hot bend steel rod. DO THIS OUTSIDE. While it has a nasty smell and takes a lot of burning a little at a time it is the historical way they did it. And if the horn has a lot of curve it is still the best way. :idunno:
- Joined
- Nov 14, 2010
- Messages
- 1,333
- Reaction score
- 1,829
What did you do to get that beautty finish.
thanks.walt
thanks.walt
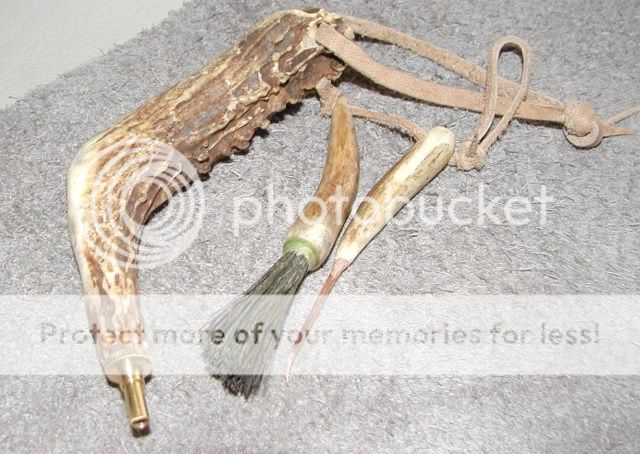
I made this one on the dogleg concept so the spout would be pointing towards the pan when holding in my hand. I loaned it to a friend about 2 or 3yrs ago and haven't seen it since. Only pic. I have of it, but it's got a screw in brass inlet. The brush is made of gobbler beard.


Similar threads
- Locked
- Replies
- 9
- Views
- 708
- Replies
- 4
- Views
- 415
- Replies
- 6
- Views
- 416
- Replies
- 9
- Views
- 570
- Replies
- 3
- Views
- 408


