Fur trade sketch book knife

Muzzleloading Forum

Help Support Muzzleloading Forum:

This site may earn a commission from merchant affiliate links, including eBay, Amazon, and others.

crockett

Cannon
Joined
May 1, 2004
Messages
6,352
Reaction score
42
Joe Yanta Really nice knife BUT MAN WHAT A LOT OF WORK! Still, a really hulk -a- hunk of knife.
I wanted to copy the one Sean mentioned in the fur trade cutlery sketch book. I started with a section of auto/truck leaf spring, hack sawing and filing. I never finished that spring although it is about half done and I am saving it for a future project. I next bought a machete at Harbor Freight tools for $3.00 and cut out a bar of it (cut off wheel/power hand drill) for the spring, the thickness is about 3/32" I annealed the cut out section, then saw/filed to shape-not too hard to do, then bent the spring to the shape of the wood handle, then curled the front part. I found that over bending the spring a little ( say 1/8" at midpoint on the handle) helps exert more pressure on the blade's tang once the spring is attached to the handle. Drilled a squared the hole for the tooth on the top of the tang. The spring has a 90 degree bent prong in the rear and a hole about 2/3rds of the way back for a small screw. The screw holds the spring to the handle. The combination of the screw and prong prevent sideways twist.
On the knife itself- I used the two pin set up, the second pin stopping the blade. Like you said such a knife is just a plain friction folder, all the spring does is lock the blade. Okay, so I have a two pin friction folder- I now had the blade in the open position and held the spring on top, I set the spring a little back so the knife would NOT lock. I held it with tape and drilled holes for the screw and prong and then put the spring on the handle.
What followed was a series of file and test fittings. I would remove the spring and use a square needle file the remove just a bit off the front of the spring's hole, until the blade would just snap into position. That way I got a wobble-free. locked blade.
The handle is wood, curved, and tapers towards the tip. The blade is thinner, 5" long, more pointed at the tip. I tempered the spring by going to cherry red and quenching, then polishing and re-heating to a bright blue and then quench. Other folks get better results by melting pure lead (use rifle balls if nothing else can be found)- about 700 degrees and then tempering in that. My spring is a bright blue. I'll try to post a photo if I can figure out how.
BYW- nice stamp mark, and once again- really nice knife.
 
Thanks Crockett for your comment. There was another reply refering to Hanson's book titled "Fur Trade Cutlery Sketchbook". I went through my references and found the book. The colonial pocket knives are very interesting. The more I research them the more interested I am becoming.

I would really like to see your knife when you get to post it.

Thanks

Joe
 
Hey Crockett,

Post a picture of that knife when you get'er done. I've seen your work and you aught to be proud of it and show it off here. That said I'll wager yours will lock up a lot tighter than the original did when it was new. For all the work involved in these they were still relatively cheap imports. A step up over a plain friction folder, but still not a high dollar thing.

Are you doing a horn haft? If so, is it pinned scales or what?

Sean
 
I am going to try to post some photos, keep your fingers crossed.

2003_0101folders0002.jpg


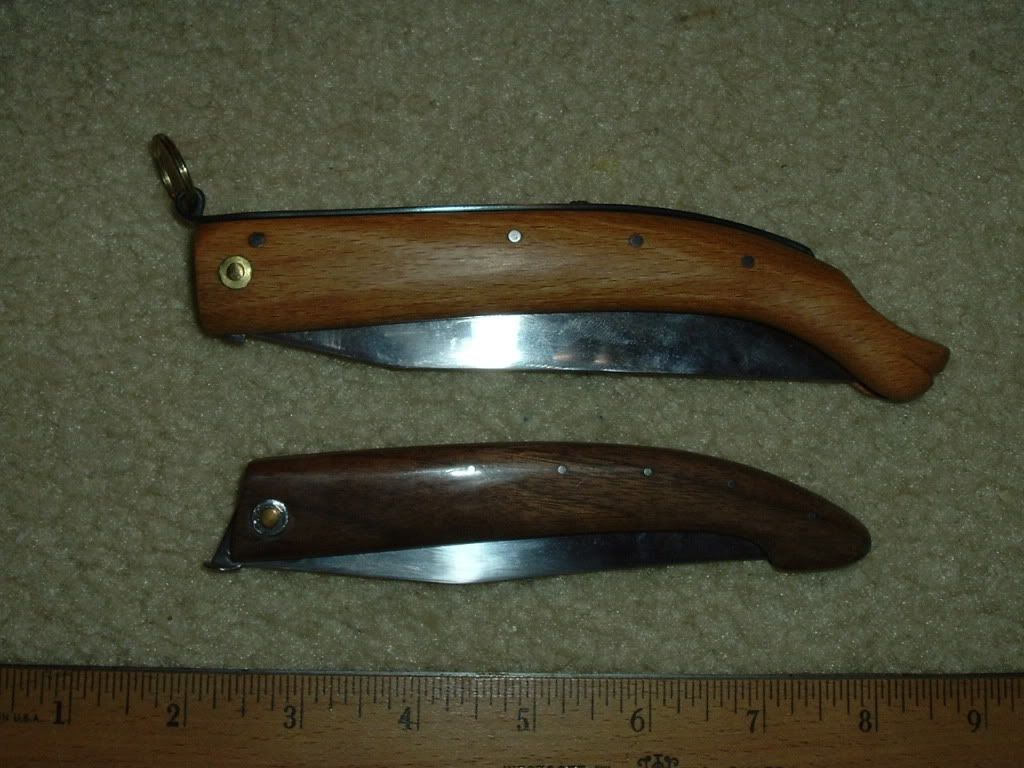
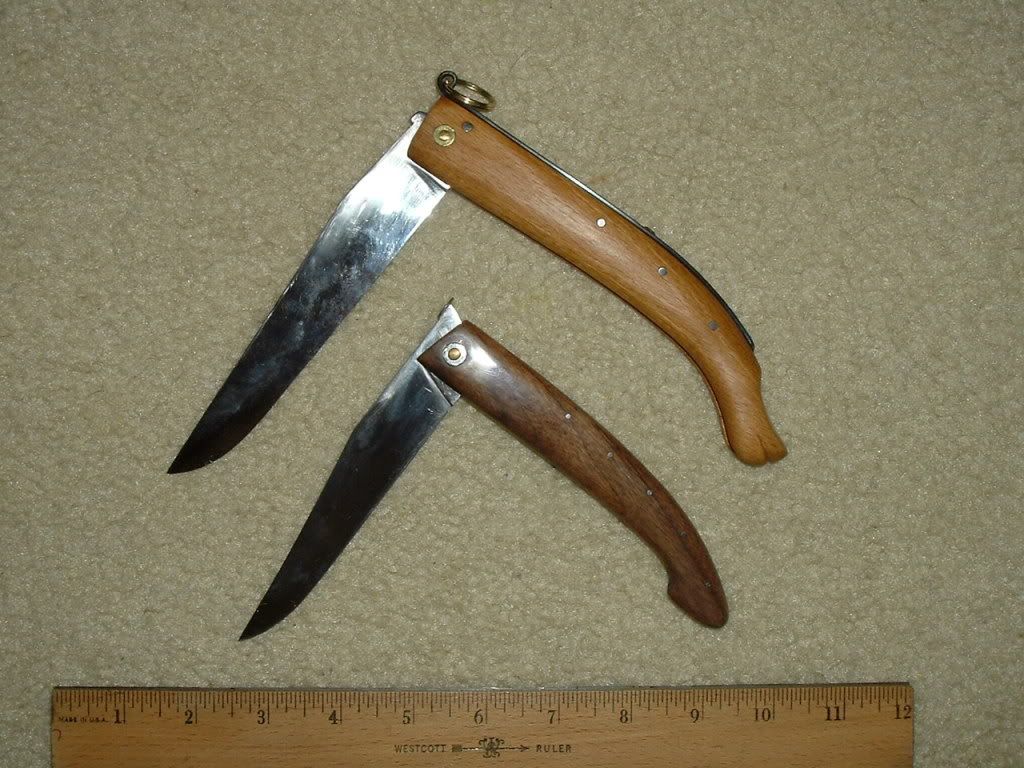
The top knife is the lock top, a while back someone was interested in a friction folder so I have added that as well. On the top knife, the horse face at the tip- I copied that out of the Neumann book. If you look closely above the washer, there is a second pin that stops the blade, the pins mid length on the handle are from the drawing in the Cutlery Sketch book, I think they strengthen the handle. The wood is beech. On the bottom knife, a friction folder with a flattened knob that stops the blade when open, notice the front of the handle is angled, so the blade's tang doesn't stick out that far beyond the front of the handle.
 
2003_0101folders0014.jpg
and

2003_0101folders0012.jpg


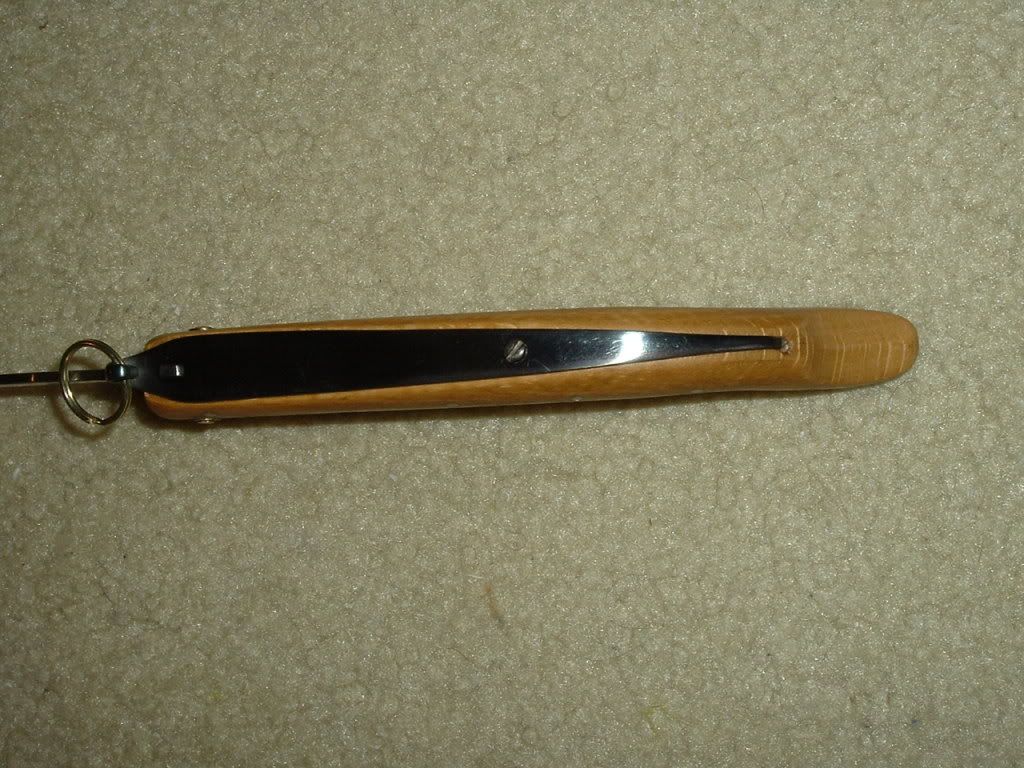
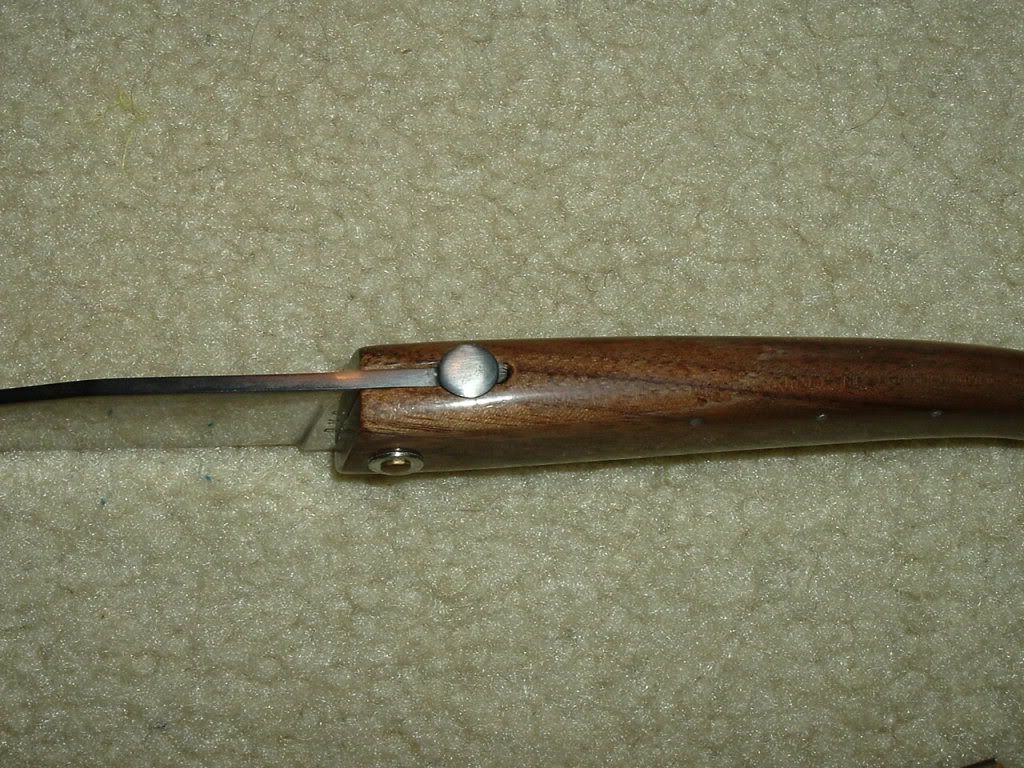
The split ring on the lock top isn't correct to my knowledge, I am going to make a solid ring for it. On the friction folder-top image-it looks like the tang extends behind the knob but what you are looking at is the slot in the handle, the flattened knob is at the back corner of the tang.

These are also pretty good sized knives. Personally I sort of like the friction folder, it is smaller and thinner and fits the hand well. The blade is about 4". The top knife has a 5 1/2" blade and was based on the 5 1/2" blade Spanish lock knives ordered by Wyeth. Whether the Wyeth knives looked similar- I don't know.

Also: the brass pivot pins are wrong, historically they should be iron but I have had a hard time trying to find iron or use mild steel and peen hammer the ends over- a lot of times the pin will bend instead of the ends mushrooming out as desired. Someone said nickel welding rod could be used and I'll try that of the next knives.
 
That's a big ol' knife and you did a fine job on it. I handled that friction folder when we met up in FL a while back and was pretty impressed. Its tight and well made. On the pins, have you ever thought about using annealed music wire? I picked up some of it through Amazon a while back for barrel pin stock. You can buy it in a variety of diameters pretty cheaply.
 
VERY nice job!
have had a hard time trying to find iron or use mild steel and peen hammer the ends over-

For "iron" pins I use finishing nails of the chosen diameter (3/32" was a pretty common size back when - IIRC that's and 8d finishing nail) and/or wire coat hangers - anneal them first - heat to bright red and bury in sand, ashes, or something similar to cool slowly. Drawn wire products such as these work harden and thus don't peen as easily as you want without annealing. Also chamfer the holes in the handle or whatever on both sides first and make sure the holes and pins are a press fit...
FWI - mild steel is hard to tell apart from good quality wrought iron (which came in various grades)......
 
Super fine job Crockett. I am going to have to try making one of those myself. I like the slimness of the knife with flat spring along the top. super job. Thanks for posting the pictures.

Joe
 
I'm going to try those various sources for pins. I should have noted on the spring, I made a paper pattern so I could test the curl at the front, etc and then glued the pattern on the steel (Elmer's Glue) and ground/filed to the pattern.
On working on springs, you annel the steel, grind to shape, heat and bend the parts. There should be a slight bow to the spring, about 1/8" high at the middle of the handle and then when you screw down the spring it flattens against the handle. At first I bent the spring to perfectly match the handle but it seemed sort of weak- or at least not working the way I wanted it to work. By bowing the spring a little it is pre-stressed and exerts a bit more pressure at the front/tang. Once you have the spring the proper shape heat up to cherry red or until a magnet won't stick to the metal and then quench. Oil is best if you have a cover in case of a flash fire but I use water and it seems to work ok. Next polish the metal and very slowly re-heat, the oxidation colors will appear, when you get a bright blue quench again, if you wait too long you'll have to start all over. I believe the temperature you are looking for is about 700 degrees.
The non-lead solder sold today melts around 425 degrees but pure lead melts at about 700 so another way (I AM TOLD) is to heat to cherry red and quench and then put the hardened steel in a bath of molten lead to reduce the hardness in that manner. Maybe Wick or some other guys that deal more with tempering steel could jump in on this.
And.... They are getting a little hard to find now a days but there is an industrial hacksaw blade used for cutting the big I beams used in tall buildings. These industrial hack saw blades are about 1 1/2" wide, 18" long, and 3/32" thick and...pretty good steel. They work out well for butchers and scalpers and folding knives of sorts. Sometimes you can get them for free or a dollar or two from a steel fabricator/shop.
On the friction folder, I had a tooth sticking up and peen hammered it flat. It took about ten heats. It wasn't perfectly round so I cleaned everything up with needle files.
 
Crockett I used 1/8" 1095 for my spring and forged it down to just a little thicker that 1/16". I wanted to have some forging marks to show.
lb001.jpg


After my oven reached 1500F I placed the spring in the oven. It took 6-7 minutes for the oven to reach 1500F again. I let it soak at 1500F for about 90 seconds and then imediately quenched it in Brownell's Tough Quench. I can normally tell how well the quench went by looking at project. Generally there is a thin layer or blistered burnt oil on the surface. This will wipe off with little effort using a shop towel. If the surface of the steel is sort of a chalky grey, I figure I got a good quench.

I had no idea what to temper it at. I knew I wanted more temper in the spring than blade so I placed the hardened spring in a toaster oven at 500F until my HT oven dropped to 700F (I really wish I had two ovens). At that time I place the spring back into the oven for about a 45 minute soak. The color of the spring was a very pale blue.

If I remember my college physics correctly, the strength of spring is determined by the cross sectional area, the length, the hardness of the metal, and the metallurgy of the spring material. You can have a varible rate spring varying one or all of the above.

My spring is stout. I think a youngster might have a problem pulling the spring to release and close the blade.

Interesting stuff.

Joe
 
Sorry I haven't responded quicker, yeah that spring on your knife looks really strong. One other point, it looks like on your knife the blade is locked by the spring and the spring -when locked- also stops the blade from further rotation. In other words the spring acts as a blade stop and locks the blade. With that type of arrangement you can form the bottom of the blade's tang so spring pressure will force/hold the blade in the slot (just like any spring back folding knife). The Opaki design does this. I did it a little different, based on the afore-mentioned examples in the Sketchbook and Neumann. On the locking blade I made, the second cross pin stops the blade from further rotation or opening past the desired position. When you make a knife that way you want to first set things up so the blade doesn't fully open. This is before you peen hammer the pin ends- at this point you are doing a trial and error fitting. Pull the main pin and remove the blade and file a bit where the tang bears against the second cross pin. Put everything back together and re-test the fit. The blade will stop a little closer to the desired open position. Keep going until the blade opens and stops where you want it. Now you do what I said before with the spring, set it back just a bit so it won't lock. Remove the spring from the handle and use a needle file to open the hole in the spring a bit more and re-test the fit. Keep going until the blade locks. The fit ought to be solid.
The big disadvantage with the second pin method is you need a slot on the underside of the tang so the blade will fully close into the handle. IMHO this weakens the blade a bit but since it was the method used at the time, that's the way I did it. Actually the 2 pin design is a pretty fool proof way for a newbie to make a folding knife, it takes some time but good results are pretty much a guarantee.
I should also say I spent a lot of time looking at the Novelle-France website, that's where I noticed some folders had a slant to the front of the handle that covered more of the tang when the blade was closed. On some of the custom friction folders currently being made the tang sticks way out when the blade is closed- okay in a hunting pouch but such could possible gouge you if in the pocket of a cloth pair of pants.
On the spring, I actually went too far to dull blue and had to cherry red-quench-polish-reheat to bright blue. One problem is re-heating so the entire or most of the spring is bright blue and not just a small part of it, the far better way to temper would be an oven that will go to 700 or the bath in lead.
 
Crockett. Lead melts at 625°. A good temper heat for 1095 spring stock is around 650°. A lead bath at 650° does a very good job of tempering because the liquid lead gives a very even heat. Smoke the spring before temper, and the lead will not stick to it.
 
Wick: forgive me for being an idiot but I need more explanation. Okay, let's assume I annealed the steel and then ground/filed/sawed it out the way I want and now it's time to heat treat.
1. First I heat to cherry red or until a magnet won't stick anymore. I immediately quench in water/brine/oil(make sure you have a flash guard against fire with oil).BYT on springs is the preferred quench oil or water?
2. Now the steel is hard and brittle, I have to draw away some of the hardness.
3. I smoke the steel per your instructions.
4. I put the steel in a pot of molten lead (625 degrees).
Question, if I let the lead cool I'll have the part embedded in solid lead so I assume I have to take the part out of the lead (I assume the part will be floating on top if a let go of it so if I have the part held with thongs- do I keep the part submerged in the lead? Do I leave the part in the lead for a set period of time, say 10 seconds? A minute? When I take the part out and it is now at 625 degrees, do I immediately quench it to hold that temper?
Thanks for any info.
 
Dave, if possible raise the lead temp to 650°, however I've done it at the melt point. 650° would make it less likely to break. You could be a tad higher with no harm done. Forget the magnet. In dim light bring it up to red-orange. Hold a few seconds, then quench in canola oil at 125°. Or ATF if you have to. Then smoke it. Use a wire to sink it into the lead. If you have temp control, it would be best to soak at 650° for half an hour, but if not, just hold it under for a few minutes. Turn off your heat source. Let the lead re-harden. Then re-melt the lead and let the spring float to the top, and you're done. I have done this at melt temp with a very short soak, and had good success, but if you could soak at around 650°, it would be better. Just a reminder. With 1095, do all your bending at a good red heat.
 
Back
Top