-
Friends, our 2nd Amendment rights are always under attack and the NRA has been a constant for decades in helping fight that fight.
We have partnered with the NRA to offer you a discount on membership and Muzzleloading Forum gets a small percentage too of each membership, so you are supporting both the NRA and us.
Use this link to sign up please; https://membership.nra.org/recruiters/join/XR045103
You are using an out of date browser. It may not display this or other websites correctly.
You should upgrade or use an alternative browser.
You should upgrade or use an alternative browser.
hammer removal
- Thread starter Hank45
- Start date

Help Support Muzzleloading Forum:
This site may earn a commission from merchant affiliate
links, including eBay, Amazon, and others.
Keb
50 Cal.
The common suggested way by Chambers is to remove all internal parts. Then support the plate and drive the tumbler out of the square hole in the hammer. Use a punch that fits on the square boss of the tumbler, not inside the screw hole. It is also suggested not to unscrew the hammer screw a little bit and tap on it. I admit I have done this a few times without consequence. I think Chambers will void your warranty if you break the tumbler using the "tap on the screw" method.
Yep that is the only way to safely remove a tight fitting hammer.
I ran into this situation a couple of years ago when I decided to tune up a lefty Siler lock on one of my rifles. Well, I hammered and tapped until I was sure I was going to ruin something.
Well, living close to Dixon's Muzzleloader Shop has always been my go-to resource for all things flintlock related, and Chuck took about 5 seconds to free the hammer with one swat and sent me on my way a happy man! :thumbsup:
Well, living close to Dixon's Muzzleloader Shop has always been my go-to resource for all things flintlock related, and Chuck took about 5 seconds to free the hammer with one swat and sent me on my way a happy man! :thumbsup:
galamb
58 Cal.
Yes, drive it out after removing the bridal/tumbler/springs/fly etc.
Or try the "pry and pray" approach.
The danger in simply trying to "pry" is you can end up (potentially) jiggering up square hole in the hammer (bad) or really toasting the reamed hole in the plate that the tumbler comes through to connect to the hammer (super bad - usually requiring replacement of the plate).
You forgot to mention something with your "pry and pray" method.
I didn't see anything about all of the scratches and scrapes that prying will leave on the face of the lockplate. :hmm:
To the OP:
Carefully examine the tumbler for the little tiny fly that locks often have.
It is the small part that blocks off the half cock notch.
The fly is often held onto the tumbler by the bridging "bridle" but on some locks, it is located next to the lockplate.
These locks that locate the tumbler next to the lockplate make removing the fly impossible until the tumbler is driven out of the hammer.
With the lockplate laying with the hammer on top while it rests on the two supports, you can't see the fly (it and the tumbler are under the lockplate). When the tumbler becomes loose, the fly usually takes the opportunity to escape to places unknown.
Putting a blob of grease on the tumbler before driving the tumbler out can keep it from escaping.
Of course, this only applies to the few locks that have located their fly between the tumbler and the lock plate.
I usually stick the fly onto a piece of masking tape when it's removed.
That keeps it from escaping and the tape is easy to find when it's time to put the lock back together.
Ditto.....
Or, I just finished doing a late ketland lock without removing the hammer...took some extra time in my brown/glueing age thing process...but I did it just see IF I could do it......
But then, some here say I'm :youcrazy: .....
Ps, found my L&R fly in some cob webs once....dang tiny things! :surrender: :slap:
Marc n tomtom
Col. Batguano
75 Cal.
- Joined
- Feb 10, 2011
- Messages
- 5,038
- Reaction score
- 1,416
Put all your lock parts in a clear separate sealable container like a zip lock bag, and it helps to use tape to keep the parts all together, especially the smaller ones. It may be months between initial disasembly and final assembly, and bigger things like a baggie are easier to re-locate when the time comes than smaller packages.
I disassemble my locks over one of those magnetic parts trays and then leave the parts in it until I reassemble them. Haven't had to chase down or locate parts since using one.
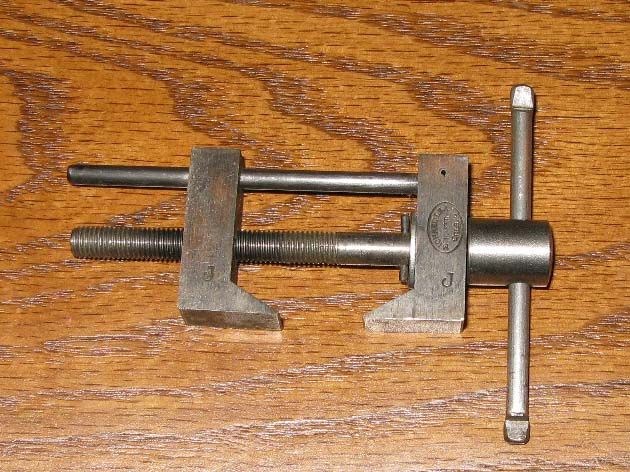
Henry LeBlanc said:Is there a tool that I can use to remove side hammer? Hank
Yes...... Mike Lea sells it. It works but it makes me a tad uneasy. Mainly, the metal the tool is made from is too soft & it bows & you must tap it with a plastic hammer & it will eventually pull the hammer off the tumbler.
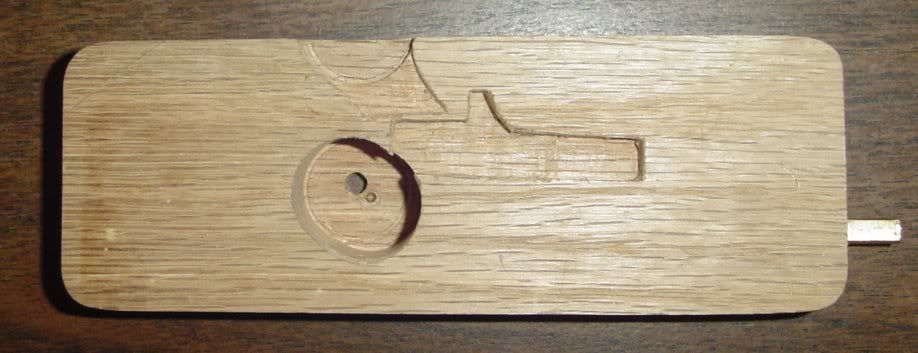
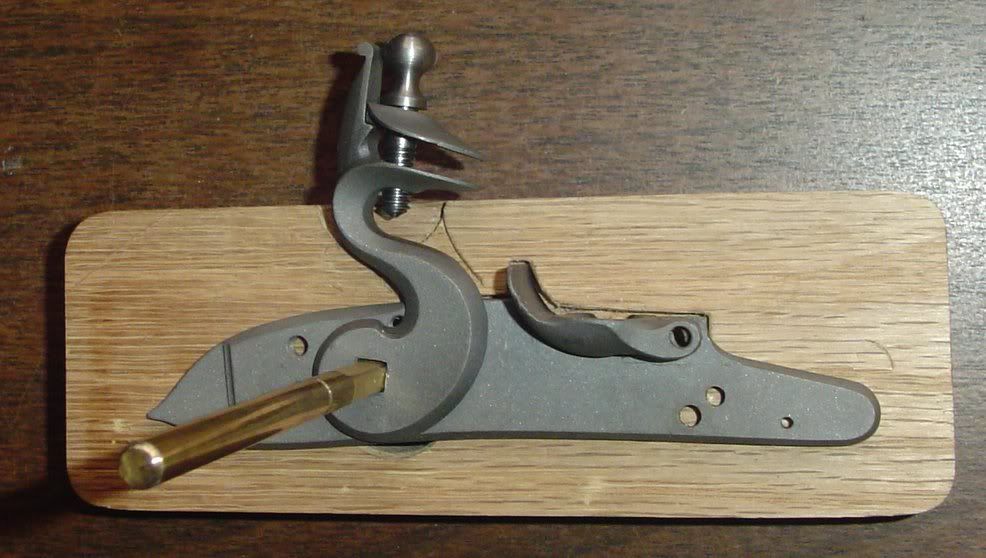
So I don't use it often as I like to punch the tumbler out as Jim Chambers instructed me. I have a oak blocks made to put the lockplate on, to punch the tumbler out. Several of them for different locks.


I keep the brass rod in each block, so I don't have to hunt for them, always know where it is.
Keith Lisle
This is the tool that Mike Lea made.


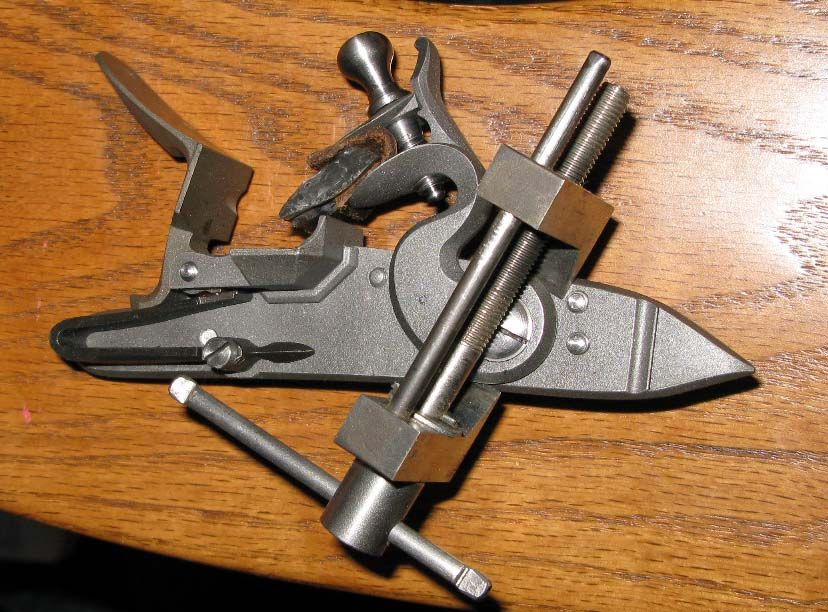
And you install it over the hammer. Course I strip the lock first & take the retaining screw out. But this is how it mounts. The clamp wedges between the hammer & the plate.
My concern is I am afraid it may cock the hammer & break the tumbler shaft. Of the few times I have used it, have not had an issue. But still prefer to punch them out into the oak blocks.
Keith Lisle
B.Habermehl
45 Cal.
- Joined
- Jul 29, 2004
- Messages
- 766
- Reaction score
- 7
Dang Keith, I like your punch jig. Looks like another tool I'll be making. It just shows even after 25 plus years of building these things ya can still find a gem. One BIG plus using this jig on L/R locks the fly is captive. BJH
Similar threads
Latest posts
-
-
FOR SALE Colt 1860 Army - aka "black box" 2nd gen F series Colt
- Latest: Flintlock Whiskey
-
-
-
-
-


