Inlay work

Muzzleloading Forum

Help Support Muzzleloading Forum:

This site may earn a commission from merchant affiliate links, including eBay, Amazon, and others.

Jack Walker

40 Cal.
Joined
Oct 10, 2003
Messages
117
Reaction score
0
I have come into af brass stock that is perfect for inlay. I would like to add some to my trade gun, I know the process and theory behind it but would like some tips on the process and tools prefered by those of you who've done some inlay work.
 
Bull - Here's the Reader's Digest version. You should start by making the design in brass. Once that is complete, slightly bevel the underside with a file. Place the inlay on your work surface and trace around it with a pencil. Some builders prefer to scribe around the inlay with an exacto knife. Either way, remove the inlay and finish the scribe with a sharp knife. It is critical to stay inside the line, otherwise your mortise will be too large.
Using very sharp chisles, remove the material inside your lines. Try your inlay and keep removing material until it fits tightly. Keep it in place with a peened over brass brad or two, then file flush to the surface of the stock. There's more to it than that, like making sure you use a healthy amount of patience, but that's pretty much it in a nutshell. I have also used 5 minute epoxy mixed with sawdust (for color) to hold an inlay in place. Not PC, but does the job. Hope this helps.
Rick
 
Draw your favorite inlay pattern on a piece of paper, whatever you want. Cut it out and spray the underside of the paper with sprayglue....it comes in a Blue/white can... Elmers...look for the cow.
510016.JPG

Anyway glue it onto your piece of sheet brass. Use a jeweler's saw to cut the pattern out of the brass. Clean up the edges with a file.

If you're going to pin in inlay in..... Drill a couple small holes in the inlay, sharpen a couple of brad nails to a very fine point and tack the inlay into the stock, trace around it with a knife, un-"tack" the inlay, inlet the inlay, smooth it flush to the stock with sandpaper.

If you're not going to pin it..... glue it to the stock, trace around it with a knife, brake the glue, inlet, take a engraver and tap nicks in the underside of the inlay (make'em deep), uses Acraglas to bed the inlay, and sand smooth.


SP
 
Regarding pins. I have a pistol with an inlay in the wrist area. I put in two brass pins. These pins tarnish differently than the inlay brass so the pins show up unless I keep the brass polished. Glue is probably the best choice. On a curved surface-how do you get the inlay to contour to the stock? If it is thin enough to bend then it is probably too thin too pin?
 
I cut "pins" out of the material that the inlay is made of. The "pin" is slightly tapered, and doesn't have a head. This is nearly a neccessity when the inlay is silver. Hard to find silver pinstock!

Curve the inlay to the stock shape. Mark and inlet. Then I glue my inlays, and then drill pin holes at angles from the finish surface. The angle of the pin helps hold the inlay tight. I have had good luck with swaging tapered square pins into slightly undersized round holes. I like the inlay material to be thicker then the inlay area. That way I can file the pins and inlay flush to the wood surface.
 
Doc ~ I have gotten my silver pins from Dixon's ML Shop in Kempton. They don't have an online catalogue, but if you called them, they'd be glad to send them to you. He gets a lot of his supplies from Muzzleloader Builders Supply. You may want to try them as well.
Hope this helps. Rick
 
Bull, let me start by stateing that I am not a rifle maker, just a hobbyist. I will try to explain how I do inlays but keep in mind, this is in no way the only way, likely not the best way, to do it but this method works reasonably well for me. For designing the inlay, I draw it on paper actual size. I then make several photocopies so I can try different engraving patterns. The advantage of useing a photocopy rather than the original drawing is that you can draw an engraving pattern and if you don't like it, you can erase it without losing your inlay outline. To cut out the inlay, I take one of my photocopies and put it face down on the sheet of brass/silver and rub the back with a rag with acetone on it. This will transfer the pattern to the metal and is very durable. Then go ahead and cut it out with a jewlers saw. I stay outside the line and do final finishing/shaping with files. I don't file much of a bevel on the edge of the inlay. Perhaps 1-2 degrees. I like the edge to be as close to perpendicular as possible but tilt the file SLIGHTLY, more to ensure that there is no bevel the wrong way rather that to add a bevel the right way. KEEP THE BEVEL TO AN ABSOLUTE MINIMUM. To inlay, I hold the inlay down with my finger an trace around it with a pencil. I use a mechanical pencil for the consistency of lead diameter. To cut the outline, I use a stabbing tool. It is perhaps 1/8" wide with a wooden handle on it. One could be made from a hack saw blade. I stab straight down inside the pencil line and follow around the entire outline. Extra care must be taken with inlays that have piercings to ensure you are on the right side of the line. After stabbing all the way around I use a small chisel to make kind of a bevel cut to remove some wood up to the outline. I then restab the outline deeper to prevent breakout. Then lower the entire area with a flat chisel. It is OK (desireable) to have the stabbed outline deeper than the finished depth of the inlay. The mortice must be deep enough to accept the thickness of the inlay and as flat as possible. If done properly, the inlay should NOT fit. The inlay should be a few thousanths larger than the mortice. I then take the inlay, hold it over the mortice and gently hammer it slightly into the mortice. Remove the inlay and it will leave a slight imprint of its exact outline. Then take the stabbing tool and stab straight down along this imprint. When making the imprint, do not get heavy handed as you can crush the wodd and ruin the edge. After stabbing to the imprint edge and removing the sliver of wood, try the inlay again. This time it shoud go in with some light blows of the hammer. However, don't drive it in all the way, just a bit. take it out and examine the outline carefully for any imprint indicating that more wood needs to be removed. When you are satisfied that the inlay will fit, tap it in all the way. BE ABSOLUTLY SURE THE DEPTH OF THE MORTICE IS RIGHT AND THE FIT IS RIGHT. You will not be able to get the inlay back out. Then carefully file the inlay down to flush, cleaning the file often. If you don't, the file could pick up a piece of brass and score the wood :cry:. As far as pins go, I always use extremely small wood screws. Drill the pilot hole, open the clearance hole in the inlay slightly, very lightly countersink and put in the screw. File the head off. This is all I use to hold inlays in. I've never used epoxy or glue. The screw will hold better than a pin :imo: and I like the effect of steel "pins" in brass or silver inlays. Almost forgot, the inlays alway must be bent to match the contour of the stock. To do this, I have several pieces of maple that I cut different size holes in 2-5". Then cut the piece in half through the hole so you have a U shape. Mount this in a vice and use it as a swage to put the bend in the inlay. I have several scrap pieces of maple (left overs from stock blanks) with various radius's also. Occationally I need to do a compound bend (on some cheak piece inlays) and these can also be done with a ball peen hammer and wooden swage blocks. However you do it, the inlay must be the same contour as the stock.

Cody
 
Hey!
I do the same thing as Cody Tetachuk, except I hold any piece that I'm inletting over a candle, high on the flame, to soot the piece up good.I then set in place and give it a rap. Be sure to set it in the right spot and line it up every time! where ever you see the black soot, remove a the soot and just as little wood as possible. Repeat until you start pulling your hair out, and the piece will settle into the wood. Yes, sounds easier than it is. :m2c:
 
I do my inlet work pretty much like Cody T. I have put an inlay into a vise with a nut on one side and a "donut" washer( you could use several small pieces instead) on the other to put a little bulge in the material. I was afraid a ball peen hammer would put deep dents that I couldn't file out. I also use thick material 1/16" and leave some above the wood and then file flush.
 
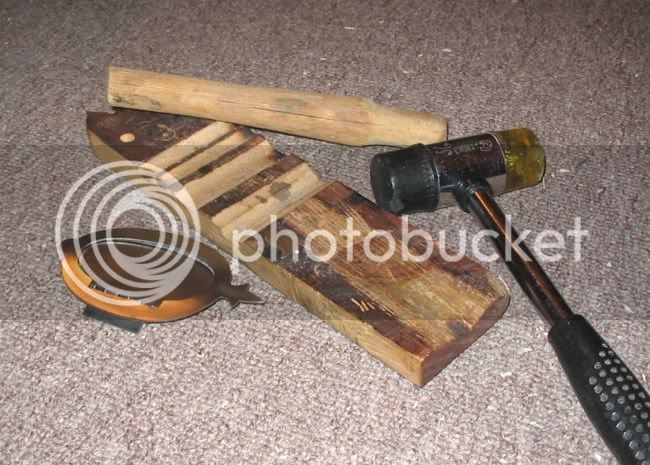
To make a forming block, I used a piece of pine about 4 inches wide.
In the face of the block I formed a trough or valley towards one end of the block. This starts off wide and shallow, and gets progressively deeper and more curved as it approches the end of the block.
Nothing fancy to form this trough. I used a sanding drum on a hand drill.

To form the inlay I lay it into the trough and give it a whack with a rubber mallet. The rubber doesn't mar the inlay, and will deform to match the contour when used in the wide shallow areas.
To use the deeper more curved area of the block, I lay the inlay into the trough and using the side of a piece of an old piece of an axe handle I lay it on top of the inlay.
One whack with the hammer and the inlay is nicely bent.
The nice thing about the axe handle is it is elliptical so I can match the trough curvature by just rotaing the handle a bit.

If I need to bend tighter curves, I just move the inlay down the block to the deeper area and do it again. If I over bend it, I move it to the wider, flatter area and use the rubber mallet.

Using this method, I have been able to get the inlay or patch box finial to fit the stock almost exactly. :)
 
Hey Zonie,

You wouldn't happen to have a digital picture of your forming block, would you? I'd be very interested in seeing it. Thanks

L.B.
 
One of those large magnifing glasses with a light in them comes in real handy too! :m2c:
 
L.B.Myers: I'm not sure how you did it, but as near as I can figure, you lost my block! And my Axe handle.

I'll keep up the search, or build a new one and post a picture but it will take me a little time to do.
:)
 
LBMyers: I sure hope you weren't expecting anything fancy.
The block I made about 10 years ago looks like this:
inlayblock.jpg


It's rude, and crude but it works for me. :)

On another issue, someone asked about a patch box that would be appropriate for a mid 1800s Half Stock.
Something that would work is shown in the picture below the block. I think this one is refered to as a pineapple. This capbox is steel and someday, when I get around to building a Leman or Tryon or Dimick* I'll use it.
Cap Boxes/Patchboxes like this were offered by companys like Tryon in those days, and I suspect he sold more than a few of them. :)

* Why no Hawken? I enjoy being different. ::
 

Latest posts

Back
Top