• Friends, our 2nd Amendment rights are always under attack and the NRA has been a constant for decades in helping fight that fight.

    We have partnered with the NRA to offer you a discount on membership and Muzzleloading Forum gets a small percentage too of each membership, so you are supporting both the NRA and us.

    Use this link to sign up please; https://membership.nra.org/recruiters/join/XR045103

Inlays

Muzzleloading Forum

Help Support Muzzleloading Forum:

This site may earn a commission from merchant affiliate links, including eBay, Amazon, and others.

Glenfilthie

45 Cal.
Joined
Jul 29, 2007
Messages
667
Reaction score
1
Are they supposed to 'poke up' a bit? The book I have says yes, a couple thou of an inch - otherwise ya can't clean 'em.

But every pic I have seen, they look to be flush with the surrounding wood. Your two bits is sincerely appreciated.

Also, how hard is this skill to pick up for a newbie in your experience? Is it harder than carving?
 
Inlaying is basically carving. it's esier in a way because you don't have to figure out the art work.
 
I hadn't heard that they should stick up so I install mine flush with the wood.

I have no problem cleaning them but it isn't a 2 minute job.

Inlays are much easier to install than carving is to do. Carving takes an artistic talent while installing inlays is a mechanical thing.

If you decide to install an inlay or three you will need to either buy the inlay or make it.
Many different shapes are available in brass, German Silver and some in Sterling silver.

The best ones are saw cut but many are stamped from a die. The only problem with the stamped ones is if the die isn't sharp it can slightly round the surface next to the edges.

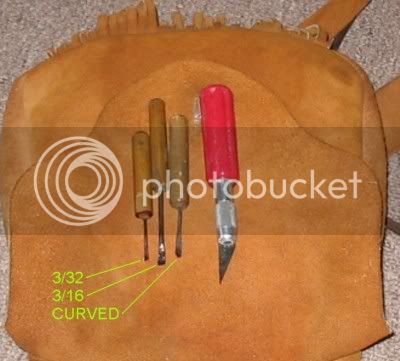
IMO, you also should have a large pointed Exacto Knife although the small one will work. The larger knife will give you a better grip for better control.

If you are installing a inlay with large generous curves like an oval thumbpiece or with a lot of straight edges like a star you can probably get away with using the Exacto knife and a regular 1/4" chisel to remove the wood inside the inlay outline but if you do a lot of inlays or want to use some which have tight pointed curves you might want to make a few tiny chisels like these which are shown along side my #2 Exacto knife.
chiselstext.jpg


To install an inlay first locate it. That includes standing back away from your gun and looking at it to see if it looks out of place.
When it looks right notice if it is laying flat on the surface. The inlay should match the surface so if it isn't laying flat, bend it slightly until it does.

Use a small fine toothed file and file the edges of the inlay at a slight angle so that the "bottom" that will be in the wood is slightly smaller than the "top" which will be flush with the wood.

It is VERY important that the inlay does not move during this next task so place a drop of super glue on the back side and position the inlay on the stock, pressing down for a few seconds.

With the inlay positioned hold your pointed Exacto knife blade almost perpendicular to the surface and resting against the side of the inlay. I say "almost" because it should be pointing slightly inward towards the middle of the inlay matching the angled edges you previously filed.

Press the tip of the blade into the wood about 1/16". Continue moving the tip around the outside of the inlay and pressing the tip of the knife into the wood.
Go completely around the inlay at least twice to make sure the entire edge of the pocket has been cut.
NOTE: At no location should this cut be away from the exact edge of the metal inlay so take your time when you are doing this.

Once the entire circumference of the inlay has been "incised" (that is what this cutting in is called), take a block of wood or a plastic mallet and lightly tap the inlay. This will break away the super glue and the inlay will fall off of the stock.

Now, with a very sharp chisel or with your Exacto knife held at about a 45 degree angle place the cutting edge about 1/16" inside the incised cut so that when it is pressed into the wood it will cut down and intersect the bottom of the incised cut. After doing this around the contour the wood will begin to chip away leaving a nice sharp edged pocket for the inlay to fit.

Once this edging is done use the chisel (or knife) to lower the central area of the pocket to match the thickness of the inlay. Again, take your time.

When you think the pocket is deep enough try to install the inlay.
At this point, it may just start but not go down into the pocket. If this happens, hold the inlay in place and holding your Exacto knife like you did when you incised the form, push it gently down into the wood shaving off just a hair of wood. If your careful, you will be able to enlarge the pocket without creating a gap between the inlay and the wood and eventually the inlay will seat out on the bottom of the pocket.
You may find that the inlay fits so tightly that you won't be able to take it back out of the pocket and usually it will still be sticking up out of the wood slightly. If this happens, carefully take your pointed Exacto knife blade and work it down along side of the inlay to pop it out.
Don't be alarmed if the point breaks off of the knife. That's why you bought those extra blades, right?

Use a light coating of in-letting black or lipstick on the bottom of the metal inlay and press it in place. Then remove it and remove any places on the bottom of the pocket that are causing it to hang up.

When your finished the top surface IMO should be flush with the wood.

If it is slightly under the woods surface cover the inlay with Scotch tape and use your knife to cut the tape away so it matches the edges and covers the inlay. Use some 220 grit sandpaper to gently and carefully sand the wood down to match the surface of the inlay.

After degreasing the inlay and roughing up the back side with sandpaper I have used a 2 part epoxy to hold the inlay in place and after 15 years they are still in place.
A better method is to drill some small holes in the inlay and then install tiny nails thru the inlay to hold it in place. I have used this method as well and I know it will last for a hundred years.

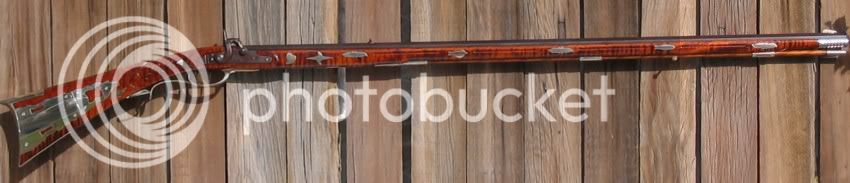
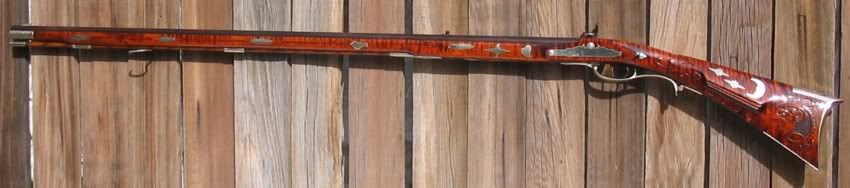
After doing some of these inlays you may get the bug to do more. I did once and I can tell you that after installing over 25 of them on this gun I got damn tired of installing inlays!
rsfrank.jpg

lsfrank.jpg


This method of installing inlays is needed for installing lockplates, sideplates and patchboxes so even if you don't want to install a single inlay if you plan on building a muzzleloader you will need to remember how this is done. :)

Have fun. :)
 
Ok, when does your book come out? I want to buy it. :rotf: :bow:
Seriously, you really could write one. :hatsoff:
Woody
 
Tarl said:
Ok, when does your book come out? I want to buy it. :rotf: :bow:
Seriously, you really could write one. :hatsoff:
Woody

He has, all the chapters are in the Archived pages in this Forum, :thumbsup:
 
Tarl said:
Ok, when does your book come out? I want to buy it. :rotf: :bow:
Seriously, you really could write one. :hatsoff:
Woody

Shhhh. If he writes a book, we'll have to pay for all this free advice. :youcrazy: Bill
 
Thanks Zonie.

I just bought all the checkering tools you recommended, and I have some German silver stock here from TOTW. I already have my gun planned out, I just need the skills to handle what I plan to do.

By the time huntin' season is over I should be ready to build my dream gun...it gives a guy something to work toward and look forward to.

Thanks again for the tips!
 
Wish i had read this a week ago, I just put an inlay in my rifle that looks more like Jeremiah johnsons work than Joe Keeslars
 
Sorry to hear about your inlay. About the only thing that will mask something like that is to work some colored filler down into the gaps.

There are several different brands of these fillers and they are made to fill the holes left by finishing nails when one is building furniture. They are also sometimes advertised as "scratch repairs" for finished furniture.
DAP makes a little stick-like product called a "Blend Stick" and the Color Putty Co. makes a product called "COLOR PUTTY". These come in many different shades of brown to match everything from maple to walnut. They are a hard waxlike product and they do NOT take stains so get something that will match the color of your existing stock.
Ace Hardware and similar hardware stores carry these items.

I mentioned that Sterling Silver inlays are available and these are very close to the original Silver used in the 18th century but if you choose to use inlays made from this material you need to know that silver is a very reactionary material and sulfur will attack it with a vengeance creating a black surface coating.

I mention this because inlays that are installed around the lock or towards the muzzle will be subjected to the sulfur in the black powder smoke and there is a lot of smoke around these areas.

I haven't had a big problem with Sterling Silver inlays installed on the butt of the stock but the silver wrist inlays thumb pieces and those like the little hearts on the Franklin shown above tarnish quickly. I usually cheat and use German Silver on the forestock inlays because German Silver doesn't tarnish easily.
 
Do you inlay first than stain/finish, or do you finish the wood first? What about wire inlays?
 
snowdragon said:
Tarl said:
Ok, when does your book come out? I want to buy it. :rotf: :bow:
Seriously, you really could write one. :hatsoff:
Woody

Shhhh. If he writes a book, we'll have to pay for all this free advice. :youcrazy: Bill


I could live with that if just for the convenience of having it in book form that I can refer to anytime I choose. And in my case, that just may be a lot of the time cause my "skills" need some help.
 
Ppanepinto
If your real careful and take your time you can install a inlay or patchbox on a finished stock but I don't recommend it unless there is no other way. If your successful installing an inlay on a finished gun it is a lot less work than refinishing the whole gun but you will have to be extremely cautious.

If you have a choice of working on a unfinished stock or a finished one do the inlays before you finish the wood.

Lonegun: If you have some printer paper you can poke the "print topic" button at the bottom of the screen.

If you don't want the whole post you can place your mouse cursor at the bottom of my directions and hold the left mouse button down. While holding the button slide the cursor up, highlighting the text until you reach the top of it. Then, right click to open a little window and choose "COPY".
You can then open a "word pad" or other unused text type form and use the right click to open the same window. Then choose "Paste" and you will have a permanent file of the instructions on your PC to save or to print out as you see fit.
 
well, fwiw. i think he should write a book, or a monograph, or a whatever... i for one would be glad to pay for the convenience, and to compensate him for his generously shared knowledge.

I plonked down my God- entrusted, overtaxed and hard earned dollars for Dutch Schoultz' monograph, and it was money very well spent, and Zonie's talent should be paid as well... if he wants to give it away, that's entirely his business, and I'll take all the free advice I can, but fair is fair, after all.

OK- hope i don't twist an ankle getting off my soapbox...
 

Latest posts

Back
Top