• Friends, our 2nd Amendment rights are always under attack and the NRA has been a constant for decades in helping fight that fight.

    We have partnered with the NRA to offer you a discount on membership and Muzzleloading Forum gets a small percentage too of each membership, so you are supporting both the NRA and us.

    Use this link to sign up please; https://membership.nra.org/recruiters/join/XR045103

Northstar West British officer’s fusil

Muzzleloading Forum

Help Support Muzzleloading Forum:

This site may earn a commission from merchant affiliate links, including eBay, Amazon, and others.

Einsiedler

40 Cal.
Joined
Apr 9, 2017
Messages
664
Reaction score
670
Location
Blanco Co. Tx.
Greetings!
A quick question to the learned constituency here. I have a NSW officers fusil I built from one of their kits about 20 years ago.


I have fallen back into the company of questionable individuals here locally, and my kit will most likely require the need of a bayonet. My question is if anyone knows off top of their head if any of these wide variety of Indian made firearm and equipment importers offer anything close that would fit the bill??? Thought I’d attempt this approach first.

Muzzle OD =.795"
Lug OD = .805"
@ nose of stock OD = .817"

Many thanks!

E.
 
Good for you for getting one of those! I dawdled too long and the company went out of business. :(

I don't know whether or not either of these will fit, but here are two you can check out with the companies:

Early 18th Century British Fusil bayonet and scabbard (private contract style). This may be a more common shorter style bayonet and I would suggest asking about that.
https://loyalistarms.ca/bayonets.html

Eliott & Artillery Carbine Bayonet (696). I have not seen this one, though if it follows original British Ordnance Patterns, the blade should be a bit longer than a common fusil bayonet, if you would prefer a longer one.
http://therifleshoppe.com/catalog_pages/socket_bayonets/(socket_bayonets).htm

Gus
 
P.S. The North Star West Officer's Fusil seems to have been patterned as much off the P1756 Artillery Carbine as a real Officer's Fusil, hence the longer bayonet mentioned above (if their bayonet is longer) would be perfectly correct for your Fusil.

Gus
 
Hi E.,

I was strongly contemplating buying one of their kits and turning it into an Artillery/Highlanders/Sergeant's Carbine, as the 42nd Royal Highland Regiment and other Scottish Regiments were armed with these when they came here for the FIW.

Though I didn't and don't have the modern repro barrel stamps for the "View" and "King's Proof," all this fusil really needs to turn it into one of these carbines is a lug added to the barrel for the front sling swivel, and drilling the hole for the front sling swivel screw and maybe for the rear sling swivel screw in "boss" of the trigger guard, the sling swivels AND of course the bayonet. The original bayonets for these were longer in the blade than common fusil bayonets, like (hopefully) the Rifle Shoppe version may be, though not quite as long as a Musket Bayonet.

You are most welcome and best of luck.

Gus
 
BTW, if you do get a socket bayonet for your fusil and you would like information on making the bayonet scabbard and frog for it, please ask, as I have made some of both types and would be happy to give you any information you might need. If you prefer to buy the scabbard and frog, I can suggest some places.

Gus
 
Again, most appreciated Gus. Im no stranger to stitching leather. So a scabbard with hardware would be on the menu.

Once again much obliged!

E
 
I have the same fusil brought it about 20 - 25 years ago and I just order a socket bayonet from Dixie. The bayonet plus socket is 21 inches long.
DSCN2920.JPG
DSCN2921.JPG
 
Again, most appreciated Gus. Im no stranger to stitching leather. So a scabbard with hardware would be on the menu.

Once again much obliged!

E

E.,

For many years, we weren't quite sure of what the British Bayonet Frogs looked like until excavations at Fort Ligonier and a British Supply Ship sunk around 1805 showed originals and the pattern had not changed during those years. Fort Ligonier was actually a treasure trove of information on both the frogs and scabbards, because the ground was such that so many of the leather frogs and scabbards survived mostly intact and we found out things we had never known before.

Below is a link to a repro Bayonet Frog that is mostly correct, though it uses brass or copper rivets. The original rivets were Iron. (I use Stainless Steel Rivets and rough the surfaces up so they look like Iron, but they won't rust near as easily.) The interesting thing about the cross X stitching is it was crossed in front, but not in the back, as you can see in the below link. That is actually some kind of fancy embroidery type stitching I never could get quite right. So I just cross X stitched the front and back as that would have been the most likely way they would have repaired the stitching. Also, please note the hole in the front of the frog for the locket to go through. It should be a sort of horizontal rectangular hole with rounded ends. I wasn't going to buy an expensive bag strap hole cutter for it, so I just punch two holes on each side and cut a straight line long the tops and bottoms of the holes to make that elongated hole. The frog is made from two pieces of leather with a sort of hour glass shape that folds over behind for the belt loop and front piece that has decorative point on the bottom.
http://najecki.com/repro/pouches/Waistbelt.html

However, before you make the Bayonet Frog, you need to make the Scabbard first, as the dimensions of the Frog will vary by the size of the bayonet and thickness of leather you use. I have found 4-4 1/2 oz. Veg Tanned leather about ideal for this and use that weight for both the scabbard and frog, though they sometimes used cheaper/thinner leather, that did not stand up well in use. You also have to know where the Scabbard locket will be, before you cut the horizontal elongated hole in the front of the Frog for it.

The Bayonet Scabbard should be of this type with just a Locket near the throat and a small brass tip. Actually, buying the two brass parts needed and the leather, you probably will not come out ahead doing this job yourself, as long as they make one that will fit your bayonet.
http://gggodwin-com.3dcartstores.com/Scabbard-27-for-the-Brown-Bess-Bayonet-27_p_691.html

If you decide to make your own, here are two of the three pieces you will need;
Locket:
http://gggodwin-com.3dcartstores.com/Bayonet-Scabbard-Locket--FI-419_p_696.html
Tip:
http://gggodwin-com.3dcartstores.com/Bayonet-Scabbard-Tip-16_p_698.html

What is not shown and I've never been able to find a repro of, is the Figure 8 looking plate/washer that goes inside the scabbard and holds the two studs of the locket. I made quite a few of these plates from rectangular sheet brass and rounded the edges so the bayonet point would not catch on it going into the scabbard, before I finally found an original example of the locket with the plate still attached. Honestly, I probably will continue to use a rectangular piece of brass as I don't have the ability to cast brass.
https://www.flickr.com/photos/hiddenhistory/5548525136/in/photostream/

More coming, but will cut this off so I don't lose this post, then will continue more in my next post.

Gus
 
I was EXTREMELY fortunate that on one of my earliest trips to Colonial Williamsburg in the mid 1970's, the Saddlery Shop was making a large number of bayonet scabbards. They showed me the wooden forms they used and also the type of stitching. They used butt seams that require a curved awl and needles. The Seam goes over the triangular point on the "back' of the bayonet with the wide flat side facing forward, that also has the locket mounted there.

Almost any FIW or AWI reenactor can tell you of either losing or seeing a scabbard with a lost tip (shown in the above post).
Even when one sews it on correctly and uses a good deal of thread to wind/secure it, that tip is a bit too easy to come loose/off. This may have also been at least somewhat common in the period as they have also been recovered from excavated camp sites.

However, what we did not know until those original Bayonet Scabbards were discovered/excavated at Fort Ligonier, was those scabbards had an added feature so the brass tip would not come loose/off easily. They had Internal tinned Iron triangular shaped “cones” brazed onto the brass tips and those cones were inside the scabbard leather with only the tip sticking out. (Since Tinned Iron could easily rust to nothing but a stain in the ground over two centuries, this may be why we did not know about them.) Those Internal Cones kept the Brass Tips from coming out and kept the point of the bayonet from sticking through the leather near the bottom of the scabbard.

Tinned sheet Iron is very difficult to get today and expensive when you can find it, so I substituted sheet brass to make the Internal Cones and soldered them onto the brass tips. Though sheet brass would have been too expensive in the period for the Cones, it is still an HC/PC material and it can’t be seen from outside the scabbard anyway. Never had a problem losing the brass tip after that.


Gus
 
Made an inquiry to Loyalist arms concerning the inside diameter of the socket on their private contract fusil bayonets. Here is response;

"Our 18th century British private contract fusil bayonet from front to back
measures .652 -.660 approx."

Hmmmm???? Seems a bit small to me.
 
Made an inquiry to Loyalist arms concerning the inside diameter of the socket on their private contract fusil bayonets. Here is response;

"Our 18th century British private contract fusil bayonet from front to back
measures .652 -.660 approx."

Hmmmm???? Seems a bit small to me.

Muzzle OD =.795"
Lug OD = .805"

Yes, by the time you file grind out enough metal for your barrel, it sounds like the socket will be way too thin.

Perhaps if you check on French Bayonets? The socket may be too large in interior diameter, but you can solder steel or brass shims inside the socket to close it up for a good fit. Might be worth another call to Loyalist to see if another of their bayonets will fit your Fusil better.

Gus
 
Sorry Gus, I meant they even sound waaaaay too small for their fusils of .66 calibre.
http://www.loyalistarms.freeservers.com/british174050carbine.html
I asked them to verify that were were both discussing the correct bayonet.

As you say, one would have to grind the whole socket away to get them to even fit their fusils!!! ( sounds to me like someone measured an Enfield bayonet !).
 
I'm surprised that with the Artillery Carbine and Light Infantry Carbine, both in the correct .66 Carbine bore, that they don't have a bayonet that is closer in size to your Fusil. Maybe these are too new to have bayonets available for them?

Gus
 
Received this correction and further explanation today;

We have 2 options of bayonets for our model British carbine.


1. The Private contract bayonet & scabbard

2. The Brutish carbine military bayonet & scabbard


The Brutish carbine military bayonet measures approx.., front to back .812 - .825


Had a typo in the size of the private contract bayonet I sent yesterday, I do apologize.

Here are the correct measurements

Our 18th century British private contract fusil bayonet from front to back measures .852 -.860 approx.

The Private contract bayonet usually needs reaming to make it fit.

These sound workable. Least the Carbine bayonet does.
 
Hi E,

I hope this answer follows a pattern where you can make sense of what I’m trying to convey and I don’t jump around too much that I become confusing. I don’t mean to be critical of anyone but me when I say that. It is just that when we talk about the “feel” or how tight the bayonet should be on the barrel, different folks like their bayonets to fit differently. So let’s begin there.

I had already learned to hand fit/hand lap modern NM Pistol Slides to Frames, before I fit my first Pedersoli Bayonet to my old Pedersoli Brown Bess Carbine around 1975. I mention this because we fit those Pistol Slides, so they would have almost no movement up and down or side to side when together, but would easily slide off the Bare Frames when pointed towards the ground. A tiny difference of .001” or less between the dimensions, meant the difference between needing a soft dead blow mallet to barely being able to beat/drive the Slides off the Frames to another .001” larger difference and the Slides would fall off the Frames under their own weight. I mention this because it doesn’t take much difference in the Interior diameter of the Socket and the Outer diameter of the Barrel, for the Socket to freely slide correctly over the barrel.

Keeping this in mind, let’s look again at your Officer’s Fusil Measurements: Muzzle OD =.795", Lug OD = .805" and compare that to the India Made bayonet from Loyalist Arms of – “The Brutish carbine military bayonet measures approx.., front to back .812 - .825.” That should be more than enough difference in measurements to have a loose fit on your barrel, if not perhaps a bit too loose.

OK, let’s compare your Officer’s Fusil Measurements: Muzzle OD =.795", Lug OD = .805" and compare that to the India Made bayonet from Loyalist Arms of – “Our 18th century British private contract fusil bayonet from front to back measures .852 -.860 approx.” To me, that is way too much of a difference and believe that bayonet would have to have a shim or shims soldered inside the socket, so it wouldn’t flop around on the barrel and possible fall off the barrel if you do bayonet drill. (Trust me, it gets embarrassing when practicing bayonet drill and your bayonet falls off the barrel, because it is too loose. I’ve see that from reenacting AWI, War of 1812 and UnCivil War periods.)

The next thing we have to consider is the “Reinforcing Collar” on the rear of the Socket. In the following link, it is shown in the bottom drawing of the first illustration as number 15. http://bayonetcollectors.org/default.asp?12

The one problem with that drawing, though, is it doesn’t give you a good rear view of the Reinforcing Collar. To see the upside down “U” shaped Bridge that provides clearance for the Front Sight, go to the following link, click on it to enlarge and you can easily see it just below 3 O’clock on the rear of the Reinforcing Collar.
https://skinnerinc-res.cloudinary.com/images/v1539193377/1205899/detail.jpg

That “U” Shaped Bridge on the Reinforcing Collar provides critical Structural Support, to keep this from happening when it is not there:
http://ww.worldbayonets.com/Bayonet_Identification_Guide/Spain/b1664/b1664_2.jpg

The problem with some India Bayonets and the “U” Shaped Bridge on the Reinforcing Collar, can be the Front Sight may be too tall to go under it. Some folks suggest filing down the front sight, but I strongly advise against it. It is better to perhaps file a little more from the outer edge of the “U” notch, if you can, as long as there remains enough metal in the Bridge to remain sound. If not, then Tig/Mig welding more steel on the Reinforcing Collar around the Bridge and shaping it to fit, is the best fix.

This has taken me a while to type, so I will add Part 2 later.

Gus
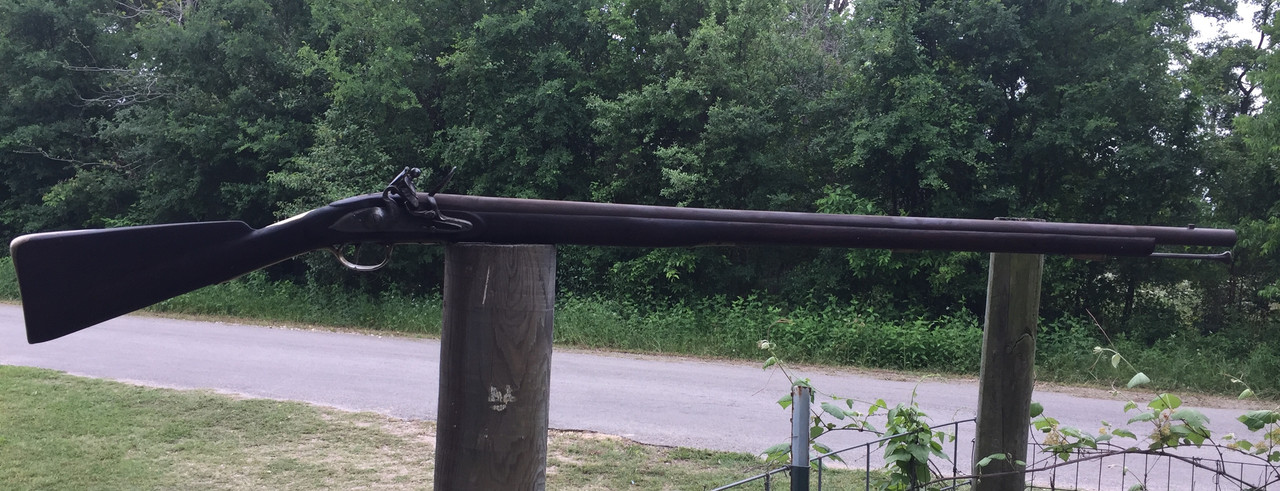
 
Late to the game but may I suggest consulting with Jess or Jane at The Rifle Shoppe? They have a Dragoon carbine and light infantry fusil bayonet, their stock number 592. These bayonets are cast from originals and what you get is a rough casting that requires some work on a grinding stone to remove the sprues, etc. It's not a big deal, but what you get is the most authentic bayonet possible for the buck. The India bayonets are just pieces of junk. They are too heavy and never, ever seem to fit right. I would strongly suggest you follow up on the 17" bayonet!
 
By the way, if anyone is interested, many years ago I bought a brand new Northwest fusil and bayonet for sale. I never even fired the fusil! It has just sat around in my collection for all those years unappreciated and un-used. I can provide pictures and costs if anyone is interested. The sale sale will be my cost of the ten year old Dixie Gun Works catalog price.
 
Back
Top