


We have all been there. You know, got a kit of some kind and found that the finish on it doesn't even come close to what we want.
So, out comes the files, the wet/dry sandpaper and hours later we have something that looks not much better.
Some of us managed to work our way down to the 600 or finer grit paper but it still has a satin finish. From here on we tried everything we could lay our hands on and finely managed to get a nice polished finish.
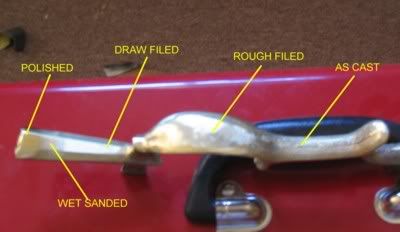
To finish a rough casting a series of steps needs to be taken. These consist of rough filing/grinding, finish filing, sanding and polishing. Nothing can be skipped as each process depends on the completion of the previous one if it is to give the results you desire.
The sanding should be done in steps starting with the course paper and working down to the fine grit paper.
I recommend working down to 600 grit although power polishing requires only going to the 400 grit.
Once the surface is sanded to the 600 grit level and no traces of the rougher grit is left, you can start polishing.
I suggest a course cloth material such as denum although heavy cloth like you use for patching will work well,
For a polishing media, start with something made for cleaning Copper bottomed pans. This is rather course, so if it seems to roughen your sanded surface, go directly to some of the Brass Cleaner your wife has under the sink. Better yet, buy your own.
This Brass Cleaner is just right to finish your guns furniture.
Keep the rag damp with polish or water. When the surface seems to be as good as it gets you may want to use Silver Polish as the last step. The Silver Polish will make the surface bright as a new mirror.
When changing polishes, change rags too. You don't want any of the courser material on the polishing rag.
There has to be an easier way!
For the lucky people with a bench grinder there is an easier way, at least for the last steps of the process. That way is to use a disk polishing wheel and an abrasive.
My local hardware stores carry these items made by a company called Dico.
The disks have an adapter included which is made for a 1/2 inch shaft and they are safe to use up to 4500 RPM for a 6 inch disk. If your grinder has a 3/8 dia shaft or runs faster than 4500 RPM, I would not recommend trying to use a 6 inch diameter disk. They also make a smaller disk which can be run faster but in general, the 6 inch will work on almost all bench grinders.
Dico also makes an adapter for a electric drill and it's worth a thought but because the drill will be running much slower, it won't work quite as well as the bench grinder.
Although using one of these disks and abrasives does remove material, don't count on it removing file marks or deep scratches. It usually just makes them more noticable or worse, the disk will create a rippled surface if used to try to remove them.
WHEEL/DISK:
I suggest getting a 6 inch disk and I prefer the spiral stiched one. The single stich will work, but it seems to wear out faster. The cost for one of these is between $6 and $10, so it won't break the bank.
ABRASIVES:
Dico offers 7 different abrasives and I have tried them all.
That said, to cut to the chase I only use 2, and of these only one seems to do everything well. (These abrasives cost between $3.50 and $4.50 and will last a long time.)
The two I use are STAINLESS (SCR)and CHROME ROUGE (CR1). Of these the STAINLESS (SCR) does everything I need on both Brass, German Silver and Steel. Buy it and you will need nothing else.
Stainless will reduce the polishing time from several hours to a few minutes.
If you aren't satisfied with the Stainless, switch to the Chrome Rouge. NOTE: Do not apply different abrasives to the same wheel. If your going to use the Chrome, you need to buy another disk, just for that material.
POWER POLISHING
WEAR GLASSES AT ALL TIMES WHEN POLISHING!!
After mounting the disk, start the machine and apply some of the abrasive to the spinning wheel.
The first application needs to be moderatly heavy.
Holding the part against the disk with a light to moderate amount of pressure, Move the part back and forth and Rotate it so the disk isn't polishing the surface in one direction only. The very best polish will be the result of the disk working in many different directions on the surface.
ALWAYS polish from the surface towards the edge of the part.
If you polish from the edge to the surface it will round off the edge and after it has done that IT WILL THROW THE PART AT YOU WITH GREAT FORCE!!!! After 9 years, you would think I would learn this lesson but it seems I always try to press the limits and POW! the part that was in my fingers is gone!
Not only is this dangerous but sometimes it is damn hard to find out where it went. It can also bend or damage the part so remember my warning.
As you polish the action will seem to slow down. When it does, apply a LIGHT coat of abrasive and continue polishing.
If you use the "more is better" method and apply too much polish the disk will not polish as well. It will in fact just coat the surface with the abrasive and stop cutting. If this happens, the only method I have found is to polish something which is just laying around until the extra material is worn out and wiped off of the disk.
By the way, remembering that you must polish from the surface towards the edge try using this disk and Stainless on your chisels. It will hone them to a mirror bright razor blade sharpness in seconds! I am talking about so sharp that you rest the blade parallel with the surface of your fingernail and move the chisel forward and it starts cutting into the nail sharp!
Another thing Stainless does well is to polish the nose of the lock sear and the tumbler notch the sear rests against when the lock is cocked. This will make the hammer release so smooth you won't believe it BUT, remember your just lightly polishing the surfaces, do not try to remove ANY materal or you may make your gun unsafe to use.
Happy Building!!
So, out comes the files, the wet/dry sandpaper and hours later we have something that looks not much better.
Some of us managed to work our way down to the 600 or finer grit paper but it still has a satin finish. From here on we tried everything we could lay our hands on and finely managed to get a nice polished finish.
To finish a rough casting a series of steps needs to be taken. These consist of rough filing/grinding, finish filing, sanding and polishing. Nothing can be skipped as each process depends on the completion of the previous one if it is to give the results you desire.
The sanding should be done in steps starting with the course paper and working down to the fine grit paper.
I recommend working down to 600 grit although power polishing requires only going to the 400 grit.
Once the surface is sanded to the 600 grit level and no traces of the rougher grit is left, you can start polishing.
I suggest a course cloth material such as denum although heavy cloth like you use for patching will work well,
For a polishing media, start with something made for cleaning Copper bottomed pans. This is rather course, so if it seems to roughen your sanded surface, go directly to some of the Brass Cleaner your wife has under the sink. Better yet, buy your own.
This Brass Cleaner is just right to finish your guns furniture.
Keep the rag damp with polish or water. When the surface seems to be as good as it gets you may want to use Silver Polish as the last step. The Silver Polish will make the surface bright as a new mirror.
When changing polishes, change rags too. You don't want any of the courser material on the polishing rag.
There has to be an easier way!
For the lucky people with a bench grinder there is an easier way, at least for the last steps of the process. That way is to use a disk polishing wheel and an abrasive.
My local hardware stores carry these items made by a company called Dico.
The disks have an adapter included which is made for a 1/2 inch shaft and they are safe to use up to 4500 RPM for a 6 inch disk. If your grinder has a 3/8 dia shaft or runs faster than 4500 RPM, I would not recommend trying to use a 6 inch diameter disk. They also make a smaller disk which can be run faster but in general, the 6 inch will work on almost all bench grinders.
Dico also makes an adapter for a electric drill and it's worth a thought but because the drill will be running much slower, it won't work quite as well as the bench grinder.
Although using one of these disks and abrasives does remove material, don't count on it removing file marks or deep scratches. It usually just makes them more noticable or worse, the disk will create a rippled surface if used to try to remove them.
WHEEL/DISK:
I suggest getting a 6 inch disk and I prefer the spiral stiched one. The single stich will work, but it seems to wear out faster. The cost for one of these is between $6 and $10, so it won't break the bank.
ABRASIVES:
Dico offers 7 different abrasives and I have tried them all.
That said, to cut to the chase I only use 2, and of these only one seems to do everything well. (These abrasives cost between $3.50 and $4.50 and will last a long time.)
The two I use are STAINLESS (SCR)and CHROME ROUGE (CR1). Of these the STAINLESS (SCR) does everything I need on both Brass, German Silver and Steel. Buy it and you will need nothing else.
Stainless will reduce the polishing time from several hours to a few minutes.
If you aren't satisfied with the Stainless, switch to the Chrome Rouge. NOTE: Do not apply different abrasives to the same wheel. If your going to use the Chrome, you need to buy another disk, just for that material.
POWER POLISHING
WEAR GLASSES AT ALL TIMES WHEN POLISHING!!
After mounting the disk, start the machine and apply some of the abrasive to the spinning wheel.
The first application needs to be moderatly heavy.
Holding the part against the disk with a light to moderate amount of pressure, Move the part back and forth and Rotate it so the disk isn't polishing the surface in one direction only. The very best polish will be the result of the disk working in many different directions on the surface.
ALWAYS polish from the surface towards the edge of the part.
If you polish from the edge to the surface it will round off the edge and after it has done that IT WILL THROW THE PART AT YOU WITH GREAT FORCE!!!! After 9 years, you would think I would learn this lesson but it seems I always try to press the limits and POW! the part that was in my fingers is gone!
Not only is this dangerous but sometimes it is damn hard to find out where it went. It can also bend or damage the part so remember my warning.
As you polish the action will seem to slow down. When it does, apply a LIGHT coat of abrasive and continue polishing.
If you use the "more is better" method and apply too much polish the disk will not polish as well. It will in fact just coat the surface with the abrasive and stop cutting. If this happens, the only method I have found is to polish something which is just laying around until the extra material is worn out and wiped off of the disk.
By the way, remembering that you must polish from the surface towards the edge try using this disk and Stainless on your chisels. It will hone them to a mirror bright razor blade sharpness in seconds! I am talking about so sharp that you rest the blade parallel with the surface of your fingernail and move the chisel forward and it starts cutting into the nail sharp!
Another thing Stainless does well is to polish the nose of the lock sear and the tumbler notch the sear rests against when the lock is cocked. This will make the hammer release so smooth you won't believe it BUT, remember your just lightly polishing the surfaces, do not try to remove ANY materal or you may make your gun unsafe to use.
Happy Building!!
")
