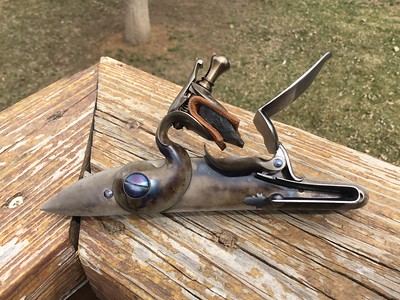
Questions on finishing technique on Kibler lock

Muzzleloading Forum

Help Support Muzzleloading Forum:

This site may earn a commission from merchant affiliate links, including eBay, Amazon, and others.
Joined
Oct 1, 2022
Messages
891
Reaction score
1,916
Location
AL
Getting a reasonable poor-to-fair finish on the trigger guard casting for my Woodsrunner was not a good experience. It makes me approach the finishing of the lock plate, cock, and frizzen with mucho fear and trepidation. Can someone give me a Cliffs Notes quickie on what they did to smooth out the as-cast finish on their Kibler lock? I have seen several Kiblers that were just left in the as-cast condition. Although I probably can't leave it alone, I am tempted to, based on my incompetence on the trigger guard (of course the trigger guard casting was really crummy compared to the lock casting). Any help and mentoring will be GREATLY appreciated, I assure you.

edited to add: particularly worried about the tail of the lock plate where it tapers to a point. The factory inletting is superb and I dont want to mess it up.
 
I used a very small file to smooth out the rough spots, followed by progressively finer grits of sandpaper up to 400, if I remember correctly. I finished it with a buffing wheel and polishing compound on my dremel. It’s not a shiny finish but it’s nice and smooth.
 
Read everything you can. Watch the videos. You will need some special tools for proper disassembly. If you do not have what you need, do not try to make do. Get or make what you need. Then you can go about it in different ways. Files, sandpaper, stones, etc. Be cautious when polishing any metal contact points like the sear.
 
Kibler locks are machined then bead blasted, you should not touch the interior parts or the edges that touch the wood. Use hard backed abrasives to polish across the machine marks then the next finer grit at 90 degrees to that to keep the contours. I use EDM stones but the average guy will do well with sand paper with a hard backer. Use the black wet or dry paper with plenty of water to make the job easier.
AA0149F3-4E50-45BB-8CAC-B4D4D9909E96 by Oliver Sudden, on Flickr
 
Getting a reasonable poor-to-fair finish on the trigger guard casting for my Woodsrunner was not a good experience. It makes me approach the finishing of the lock plate, cock, and frizzen with mucho fear and trepidation. Can someone give me a Cliffs Notes quickie on what they did to smooth out the as-cast finish on their Kibler lock? I have seen several Kiblers that were just left in the as-cast condition. Although I probably can't leave it alone, I am tempted to, based on my incompetence on the trigger guard (of course the trigger guard casting was really crummy compared to the lock casting). Any help and mentoring will be GREATLY appreciated, I assure you.

edited to add: particularly worried about the tail of the lock plate where it tapers to a point. The factory inletting is superb and I dont want to mess it up.
You don't want to hear this BUT , go back in the assembly pamphlet an see exactly what Jim the assembler in chief says ! Do not touch the lock unless your extremely competent and now everybody knows your (NOT) due to your comment on finishing brass . I'm surprised you ignore the maker (strongly suggested) don't and then go on a forum loaded with builders and folks with years of experience ,(again your not) and say how do I do this . Your not getting this is showing ,my advice is way better than most cause I am ignorant as I look at my Woods Runner I'm assembling in the fanciest walnut Jim could find in 4 months and I never put a limit on the (cost) , but I am smart enough to pick up the phone and ask (not my 1st Kibler) and then go back here and watch how the experts do it !
 

Attachments

  • IMG_0881[1].JPG
    IMG_0881[1].JPG
    4.4 MB
I used a very small file to smooth out the rough spots, followed by progressively finer grits of sandpaper up to 400, if I remember correctly. I finished it with a buffing wheel and polishing compound on my dremel. It’s not a shiny finish but it’s nice and smooth.

sleepingbulldog, Thanks, that's very similar to what I did in my ignorance on the trigger guard:

IMG_20230611_120727392.jpg


I'm not inexperienced with firearms, but I've never built a kit before and never polished up a rough casting.
 
Last edited:
And you will need a mainspring vice to disassemble the lock. Watch Jim's video.

58 Caliber, Thanks for the reply. I have owned several muzzleloaders over the years and worked on a few locks, and have one:
IMG_20230611_120756208.jpg


Yep, those videos are super helpful. I have watched every video Jim has made multiple times - watched them even before I bought the kit, and had the Woodsrunners parts 1,2,3 running on my cell phone on my bench as I was working - step by step. A great set of videos trumps written instructions every time.
 
Last edited:
You don't want to hear this BUT , go back in the assembly pamphlet an see exactly what Jim the assembler in chief says ! Do not touch the lock unless your extremely competent and now everybody knows your (NOT) due to your comment on finishing brass . I'm surprised you ignore the maker (strongly suggested) don't and then go on a forum loaded with builders and folks with years of experience ,(again your not) and say how do I do this . Your not getting this is showing ,my advice is way better than most cause I am ignorant as I look at my Woods Runner I'm assembling in the fanciest walnut Jim could find in 4 months and I never put a limit on the (cost) , but I am smart enough to pick up the phone and ask (not my 1st Kibler) and then go back here and watch how the experts do it !

Thanks for the kind words of encouragement! I will endeavor to persevere!
 
Last edited:
I agree with Phil 100%.

Files are a bad idea. Kibler locks and parts are so close that you do not need to file anything. Use abrasive papers backed by something hard. Do not use your fingers. Once you get to the 320 grit level you can blend the marks with maroon scotchbrite.

Or, just brown it as made. It will look good.

I will add that Dremil tools and buffing wheels are tools of destruction for this kind of work. Unless you have years of experience and very specialized buffing equipment buffing any gun is a mistake. And then only certain parts, not muzzleloaders, are suitable for machine polishing.

Machine buffed brass looks wrong. The super hihg shine with the edges rounded off is amateurish. Originally the brass was scraped and filed. The edges and contours were crisp. To achieve that today, file, then hard backed abrasive paper, never free hand. For wedding bands and little delicate features Gesswin make friable abrasive sticks that quickly match the contour and do a great job.

And again, for gosh sake do not mess with the internal parts. Kibler locks are perfect as made.
 
Last edited:
You don't want to hear this BUT , go back in the assembly pamphlet an see exactly what Jim the assembler in chief says ! Do not touch the lock unless your extremely competent and now everybody knows your (NOT) due to your comment on finishing brass . I'm surprised you ignore the maker (strongly suggested) don't and then go on a forum loaded with builders and folks with years of experience ,(again your not) and say how do I do this . Your not getting this is showing ,my advice is way better than most cause I am ignorant as I look at my Woods Runner I'm assembling in the fanciest walnut Jim could find in 4 months and I never put a limit on the (cost) , but I am smart enough to pick up the phone and ask (not my 1st Kibler) and then go back here and watch how the experts do it !
Sorry, I disagree, I've experienced numerous examples where the manufacturer's instructions were deficient if not downright misleading. I have no experience with Kibler, so I can't say if that general experience applies in this case. But I'd suggest that the FIRST step, if the instructions don't seem clear and correct to you, to go to a forum and ASK QUESTIONS. Learn to filter the BS from the knowledge and wisdom. Don't bother calling the manufacturer support line unless you can't get an answer the first way. Most likely you'll just end up on indefinite Muzak hold, and then get some flunky that can't answer, anyway. There's people here that already know the answer, and are happy to educate. That, I think, is the better, and more general advice. My apologies to Kibler if it doesn't apply to them.
 
Sorry, I disagree, I've experienced numerous examples where the manufacturer's instructions were deficient if not downright misleading. I have no experience with Kibler, so I can't say if that general experience applies in this case. But I'd suggest that the FIRST step, if the instructions don't seem clear and correct to you, to go to a forum and ASK QUESTIONS. Learn to filter the BS from the knowledge and wisdom. Don't bother calling the manufacturer support line unless you can't get an answer the first way. Most likely you'll just end up on indefinite Muzak hold, and then get some flunky that can't answer, anyway. There's people here that already know the answer, and are happy to educate. That, I think, is the better, and more general advice. My apologies to Kibler if it doesn't apply to them.
I have found Kibler to be very responsive! Jim has been on this forum with helpful information and has said, if you run into an issue with his product contact them.

But that said, your idea of seeking information from multiple sources is not a bad idea!
 
Sorry, I disagree, I've experienced numerous examples where the manufacturer's instructions were deficient if not downright misleading. I have no experience with Kibler, so I can't say if that general experience applies in this case.

It does not. I have build several Kibler kits. For those with no first hand experience, Kibler kits are completely different than any others. I can assemble an in the white rifle from a kibler kit in a few hours. There are no inletting gaps or ill fitting parts. There are no mysteries , need for deep thoughts or any special processes. Every part is ready to go. The metal and wood is all made by CNC and to the tightest tolerances ever done on an ML kit. IT all fits together perfectly with no inletting needed. You mihgt find a spot here or there that might be helped with a scrape cut or sliver removed, that is about it. Kibler's instructions are excellent. IF you read an follow the provided instructions you will be OK. He also has dozens of youtube videos to watch. The videos explain every operation from start to finish. IF you call Kibler they will answer the phone and any questions. About the only way to mess up a Kibler kit is by not following Kibler's instructions.
 
Last edited:
Back
Top