• Friends, our 2nd Amendment rights are always under attack and the NRA has been a constant for decades in helping fight that fight.

    We have partnered with the NRA to offer you a discount on membership and Muzzleloading Forum gets a small percentage too of each membership, so you are supporting both the NRA and us.

    Use this link to sign up please; https://membership.nra.org/recruiters/join/XR045103

Second Bag Completed

Muzzleloading Forum

Help Support Muzzleloading Forum:

This site may earn a commission from merchant affiliate links, including eBay, Amazon, and others.
Joined
Jul 7, 2017
Messages
805
Reaction score
341
Location
Michigan
Hello guys. I completed my second bag on Sunday, and I'm pretty pleased with the finished product. In other posts, I've asked questions and have been so grateful for advice and recommendations, but I decided to put the pics here in a separate post because I wasn't sure which of the other "help me out" posts I'd put these in!

Some of you may know that I'm totally new to leatherworking, and ANY sort of sewing. I'm using TC Albert's book and patterns. My first bag attempt was the "double" pattern in that book, but I decided that it was too small to serve as my primary shoulder bag, so I turned that one into a belt bag.

This second bag follows his primary pattern for a single bag, but I modified it as follows: I added hair-on Axis hide from my first ever deer, shot years ago, with professionally tanned hide sitting around in a closet waiting for a use! I expanded the pocket using Albert's optional expansion piece (I forget what he calls it). And I did use welt, but cut from a thicker strip of leather, so that was a challenge to sew.

Here's a picture of the whole bag, with the companion belt bag beside:
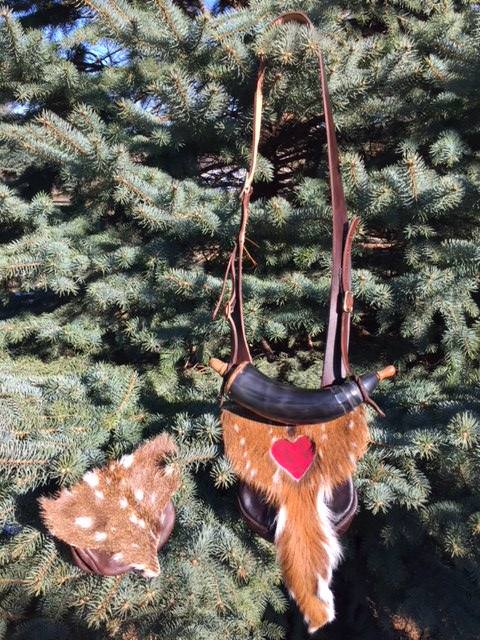
JfCGwRE.jpg


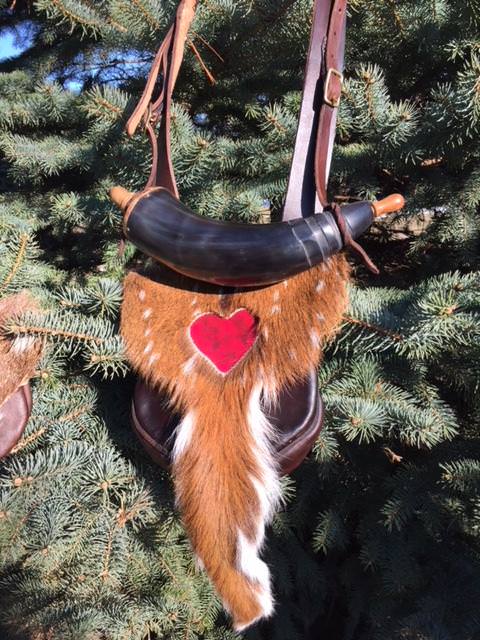
A little closer up, you can see that I carved out a heart in the Axis hide. I did this for three reasons--first, there was a hole in the hide there from overly aggressive skinning. Second, I wanted to go as period as possible, and not use glue to attach the middle of the soft/supple tanned Axis hide to the stiffer leather underneath. It was recommended that using a cutout shape could enable this (thanks!). Third, I see a lot of references to the heart shape in these bags, so thought it would be neat.
4LBEtOy.jpg


Rather than inserting a piece of red flannel, I dyed the leather red and then "muddied" it a bit with a little of the dark brown dye I had. In person the heart is not as RED as it appears here...
pEH7D1h.jpg


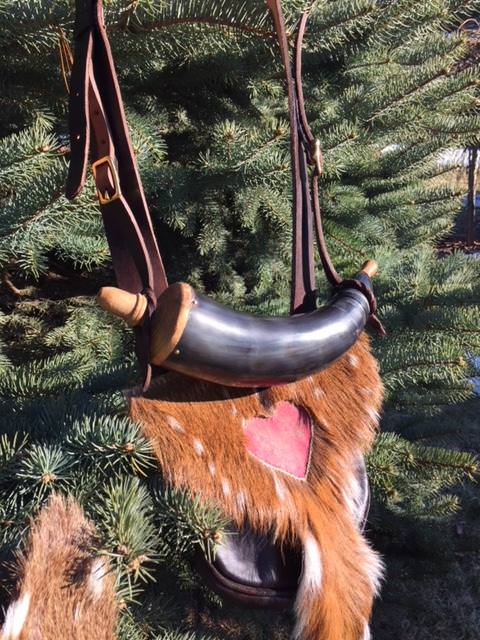
You can see the inner-flap stitch work here, and get an idea of the welting. My craftsmanship is by no means professional, but I can see progress even from just the first bag. I did not use a stitching wheel for the heart, or for attaching the shoulder straps.
ZNzlYJD.jpg


Here are a couple close ups of the buckle work.. again following TC Albert's guidance.
0mH6umP.jpg

pjL3esU.jpg


Learning how to work with leather has been a fun journey this Winter. I'm not sure what my next project will be, but I do enjoy this work.

Huge thanks to several on this forum who have followed my posts and taught me much. And I have to post another plug for TC Albert's book. If anyone out there is like me, with a curiosity about this work and a wee bit of craftiness in them, buy his book and give it a whirl! The cost of the leather and hand tools is not huge, though not insignificant, but it's totally worth it for the custom piece.
 
You're well and thoroughly launched! Judging by this and your prior work, I'd say your winter has been very well spent. Excellent!
 
IMO, it's a great-looking bag, with excellent workmanship - CONGRATS ! :bow:

The natural pelt flap is a non-starter for me, though - because I'm fairly sure it'd get me shot at by one of the yahoo's who hunt the public land hereabouts, that I have to frequent. :surrender:
 
TXFlynHog said:
Rather than inserting a piece of red flannel, I dyed the leather red and then "muddied" it a bit with a little of the dark brown dye I had. In person the heart is not as RED as it appears here...

I really like the fact you used a piece of leather, instead of a piece of flannel, for the heart shaped cut out on the flap. I never cared for cutting the leather flap and then sewing in a cloth piece. It can look very nice, but I would rather not risk the fact that rain can get through the cloth and then possibly down into the pouch. Also, I would probably cut or tear a cloth insert the first time or two I used it, knowing how "Murphy" can play heck with one at the worst times. :haha:

I agree with Brown Bear, you are well on your way in leather working. If you decide to do more, please keep us posted as I'm sure we and others would like to see how you progress from here.

Gus
 
It doesn't take much wear for a flannel insert to wear. Then it looks ragged. I do like the heart motif. My bag has the bottom tip of the heart pulled to the back of the pouch.

A matter pouch has a star motif with thin leather as the insert. Much better.
 
horner75 said:
but that hair flap looks to cover-up a very nice bag under it.
Agreed.

What's an Axis? New one to me! :confused:
It's an Indian sub-continent deer that was brought to the USA in the 1930's as an exotic venison.
They "escaped".
It's now an "invasive species" in some parts of the southwest and can be harvested/killed without license like wild hog.
 
Yup, that’s it. They have those fawn-looking spots as adults. Their antlers only grow 6 points, but they can grow very long. My buck was on the small side at 195 lbs. The meat, so I’m told, tastes like elk. I enjoyed it immensely, but haven’t tried elk, so I can’t verify the resemblance.
 
The work looks well done. The flap, eh, to each their own, not my personal taste. But, it looks like you did a good job putting it on and of cutting the heart shape out of it without making the hair around the edge look weird.

Good job. Keep at it.
 
Nice work, uniform, straight stitching is often difficult to new leatherworkers, you are doing a great job. I used a coyote face on an early bag flap and learned that it was not the best choice for me. It seemed to catch on brush and burrs in the woods and presented a visable target for other hunters. You will find that "making it yourself" is as enjoyable as using it. :bow:
 
Thanks...

You and others who have replied have given me ideas for my next project... another bag without the fur flap? I do love the fur flap, though I admit that it may not be as practical as plain leather for hunting purposes.

Hmm..
 
TXFlynHog said:
I do love the fur flap, though I admit that it may not be as practical as plain leather for hunting purposes.

Guys might have a point about making yourself a target with other hunters around, but I gotta point out one thing:

Bare leather sounds like a brass band when you drag it through brush, while fur/hair is as silent as nature intended it to be. Fur was also used as a waterproofing of sorts back in the day.

Lotta good pracitcal reasons to use fur, long as it doesn't get you poked by idiots.
 
I built several of that design from TC's book but I did change the shape of the flap a bit. I gave both of these away and really do need to make one just for me! :haha:

I'm thinking of doing it in a double bag configuration.

tbagg1.jpg


NorthHampton%20bag.jpg
 
TXFlynHog said:
Hello guys. I completed my second bag on Sunday, and I'm pretty pleased with the finished product. In other posts, I've asked questions and have been so grateful for advice and recommendations, but I decided to put the pics here in a separate post because I wasn't sure which of the other "help me out" posts I'd put these in!

Some of you may know that I'm totally new to leatherworking, and ANY sort of sewing. I'm using TC Albert's book and patterns. My first bag attempt was the "double" pattern in that book, but I decided that it was too small to serve as my primary shoulder bag, so I turned that one into a belt bag.

This second bag follows his primary pattern for a single bag, but I modified it as follows: I added hair-on Axis hide from my first ever deer, shot years ago, with professionally tanned hide sitting around in a closet waiting for a use! I expanded the pocket using Albert's optional expansion piece (I forget what he calls it). And I did use welt, but cut from a thicker strip of leather, so that was a challenge to sew.

Here's a picture of the whole bag, with the companion belt bag beside:
JfCGwRE.jpg


A little closer up, you can see that I carved out a heart in the Axis hide. I did this for three reasons--first, there was a hole in the hide there from overly aggressive skinning. Second, I wanted to go as period as possible, and not use glue to attach the middle of the soft/supple tanned Axis hide to the stiffer leather underneath. It was recommended that using a cutout shape could enable this (thanks!). Third, I see a lot of references to the heart shape in these bags, so thought it would be neat.
4LBEtOy.jpg


Rather than inserting a piece of red flannel, I dyed the leather red and then "muddied" it a bit with a little of the dark brown dye I had. In person the heart is not as RED as it appears here...

pEH7D1h.jpg


You can see the inner-flap stitch work here, and get an idea of the welting. My craftsmanship is by no means professional, but I can see progress even from just the first bag. I did not use a stitching wheel for the heart, or for attaching the shoulder straps.
ZNzlYJD.jpg


Here are a couple close ups of the buckle work.. again following TC Albert's guidance.
0mH6umP.jpg

pjL3esU.jpg


Learning how to work with leather has been a fun journey this Winter. I'm not sure what my next project will be, but I do enjoy this work.

Huge thanks to several on this forum who have followed my posts and taught me much. And I have to post another plug for TC Albert's book. If anyone out there is like me, with a curiosity about this work and a wee bit of craftiness in them, buy his book and give it a whirl! The cost of the leather and hand tools is not huge, though not insignificant, but it's totally worth it for the custom piece.

Very nice. :thumbsup:
 
marmotslayer said:
I built several of that design from TC's book but I did change the shape of the flap a bit. I gave both of these away and really do need to make one just for me! :haha:

I'm thinking of doing it in a double bag configuration.

tbagg1.jpg


NorthHampton%20bag.jpg


Another. :hatsoff:
 

Latest posts

Back
Top