• Friends, our 2nd Amendment rights are always under attack and the NRA has been a constant for decades in helping fight that fight.

    We have partnered with the NRA to offer you a discount on membership and Muzzleloading Forum gets a small percentage too of each membership, so you are supporting both the NRA and us.

    Use this link to sign up please; https://membership.nra.org/recruiters/join/XR045103

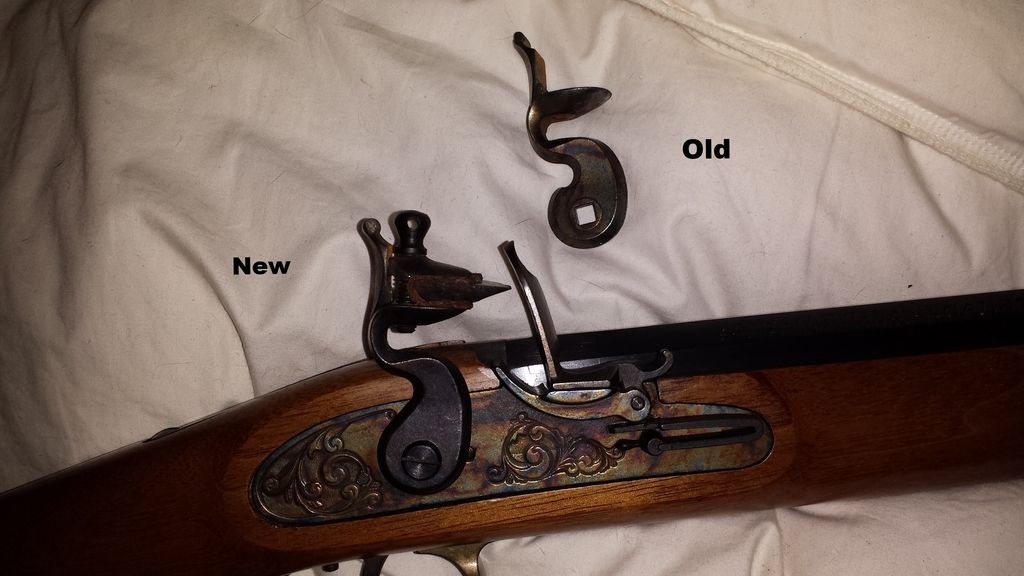
T/C Hawken, Installing "new" style hammer

Muzzleloading Forum

Help Support Muzzleloading Forum:

This site may earn a commission from merchant affiliate links, including eBay, Amazon, and others.

amcmullen

40 Cal.
Joined
Dec 27, 2013
Messages
182
Reaction score
48
I got the flintlock bug and I am now looking at my T/C with the old style hammer. My Frizzen has developed a decent gash in it so I am going to replace it and the hammer. I found a new style however, the description says that 'some fitting may be necessary.' Has anyone on here converted theirs? What exactly do they mean be fitting?

Finally, what is the going rate for the hammer? This guy wants $37 for the hammer.

Thanks all, you guys have really helped me with some other issues with other guns and I really appreciate it.
 
Before you spend the money, try heating and bending the neck of the hammer down a bit to lower the angle of the flint strike. It will strike lower on the frizzen, but may make more sparks. Do a little at a time. Can't hurt and you can always buy the replacement. There is also a complete replacement lock available for approx. $150. Also check the frizzen spring tension and timing. Too strong a frizzen spring will cause the gouge also. The frizzen should snap open when the flint is about to the bottom of the frizzen face.
 
I should also ask, am I overthinking this? I am always looking for an 'edge' are there other tips and tricks that I could do.

I did check the frizzen like you stated and it does in fact snap open at the end
 
Also check how strong the spring is in the down position. If it is too heavy, it will cause the gouge. As a test I have shot guns with no frizzen spring and they worked fine. Long term use can break the frizzen and can cause a bounce back into the flint. I have never had a production flintlock. I did have a Dixie Ashmore lock that had a casehardened frizzen. It would wear through the casehardening, and I would install another one out of my box and keep shooting. I even had one of the radioactive waste half-soles they sold years ago. Really sparked but was hazardous. I had a job with a nuclear scanner company and sent it to the disposal dept. before I started glowing.
 
TC replaced my frizzen and lock a few years ago. I offered to pay, but they replaced them free. I don't know what a fair price is. When I got the replacement lock back from TC, it was a little tight going into the mortise, but I removed a tiny bit of wood to fit it. There is always a chance the hammer could be tight or even loose, on the tumbler. Same goes for the frizzen. Productions parts can always have a tiny bit of variation, but I wouldn't be too concerned about that.

I think TC was having complaints or they would have never changed the design.

Some people probably think that problems with the lock, is just normal, but once you shoot something like a Siler, your mind set changes, and you will have a higher expectation.
 
stack a piece of leather boot lace or two under the bottom back of your flint and mess around that way. its not a permanent fix but it might let you find the right angle your flint needs to be before you start bending things. and or if it sparks at all.
 
I bought one of those "extra" hammer/cocks in the newer style (flea-bay). After trying to install it I noticed that the square hole was WAY TOO BIG. It did fit but it wobbled a bit. I did shrink the hole and it works fine. In my opinion it was way too much money but where else would I get one to see how it should work? At least now I can compare the two to see how to modify the original/older hammer/cock and use it for a spare.

BartSr
 
PaulTBarton said:
I bought one of those "extra" hammer/cocks in the newer style (flea-bay). After trying to install it I noticed that the square hole was WAY TOO BIG. It did fit but it wobbled a bit. I did shrink the hole and it works fine. In my opinion it was way too much money but where else would I get one to see how it should work? At least now I can compare the two to see how to modify the original/older hammer/cock and use it for a spare.

BartSr
Hmmm, well I did end up getting the new style hammer, we'll see how the fit is. How did you "shrink the hole" ? I had thought about that and the only thing I could come up with is to make some steel shims out of some thin sheet metal I have here. I also got a new vent liner and will probably get a new frizzen.

Between this and my Traditions (my other topic from a few weeks ago) I hope I am not making chicken soup with chicken poop. I just spent a lot on new springs, hammers, vent liners and breech scrapers, HA! I do love shooting these things, though. I am positive within five years I will own a custom 50 and either a 32 or 36
 
First off, don't worry about shrinking the hole until you find out how it fits.

The square hole in the hammer should be a light press fit with the square peg on the tumbler.

Without a press to install it, light tapping with a hammer or mallet should drive it onto the tumbler square all the way down until it stops on the shoulders of the tumbler square where they stop.

The hammer screw is there only to keep the hammer from working back off of the tumbler square. It should not be expected to keep the hammer from moving.

If the hole in the hammer is too large, peening both ends of the square hole where it meets the back and front face of the hammer will move steel into the hole making it smaller.

One of the best tools for doing this is a small ball peen hammer.

This should not be done with one or two mighty blows. A series of light taps all around the square hole to move the material into the hole is the best approach.
 
"If the hole in the hammer is too large, peening both ends of the square hole where it meets the back and front face of the hammer will move steel into the hole making it smaller.

One of the best tools for doing this is a small ball peen hammer.

This should not be done with one or two mighty blows. A series of light taps all around the square hole to move the material into the hole is the best approach."


Zonie...Thank you for the excellent description of how this kind of thing gets done. :hatsoff:
Peening metal is a delicate operation and the reason we have "Ball Peen Hammers" in the first place. Very few people are aware of that.
 
Zonie said:
First off, don't worry about shrinking the hole until you find out how it fits.

The square hole in the hammer should be a light press fit with the square peg on the tumbler.

Without a press to install it, light tapping with a hammer or mallet should drive it onto the tumbler square all the way down until it stops on the shoulders of the tumbler square where they stop.

The hammer screw is there only to keep the hammer from working back off of the tumbler square. It should not be expected to keep the hammer from moving.

If the hole in the hammer is too large, peening both ends of the square hole where it meets the back and front face of the hammer will move steel into the hole making it smaller.

One of the best tools for doing this is a small ball peen hammer.

This should not be done with one or two mighty blows. A series of light taps all around the square hole to move the material into the hole is the best approach.
That makes perfect sense, thanks!
 
I guess I should add, when peening to close down the square, do NOT hit the edge of the square hole with the peen.
The blows should be 1/32 to 1/16 inch outside the opening.
The idea is not to hammer the edge of the hole inward. It is to make the material outside the actual hole flow inward.
 
Part came in, it fit with only a slight wobble, very slight. I tightened it with the locking screw and it's gone. I did need to file down the back where the top flint jaw slides when the top screw is turned. I didn't get to shoot, however, I did dry fire and the sparks have definitely improved. I also switched to real flints from TOW. The flint strikes the frizzen almost 1/4" higher! The angle of the jaw is also different. I'm happy with the upgrade
 
You were more successful than I was. I've called customer service twice in the last month, spoke to different people. Their answer to me was that they have none of the improved locks on hand, nor hammers nor frizzens. Stated all they can supply now are a few screws and the like. I realize they are now owned by S&W, but I guess the takeaway is that one should take "lifetime warranties" with a grain of salt.
 
Life time warranties are only as good as the lifetime of the company it seems in most cases. Although, I ended up with a number of alternators from the parts store for an old car I kept for 17 years and 250,000 miles.
 
Got mine on ebay, I probably should pick up a frizzen too. What is going to happen when all the parts are gone? You would think that with the popularity of the TC hawken they would make parts. I guess in the future your only option will be to buy a replacement lock.
 
On another question on the flintlock forum there used to be pictures of the old and new style of TC Hawken hammer and frizzen, to compare. The form now says that those pictures are not available. Does anyone have those pictures that they could post? It would be a great help in determining if I have an old or new style lock.
 
Usually when pictures are gone it's because the guy that posted them removed them from his photo hosting service (the forum doesn't do that) or his time expired for the service.
Contact the feller that posted them through a PM and see if he still has'm.
 
As an update the new hammer install was definitely worth it. Instead of one spot on the frizzen being gouged, there is clear evidence of that the flint is traveling the entire length of the frizzen. The contact on the frizzen is also considerably higher.

I will take a picture of both hammers in a few hours when I get home.
 

Latest posts

Back
Top