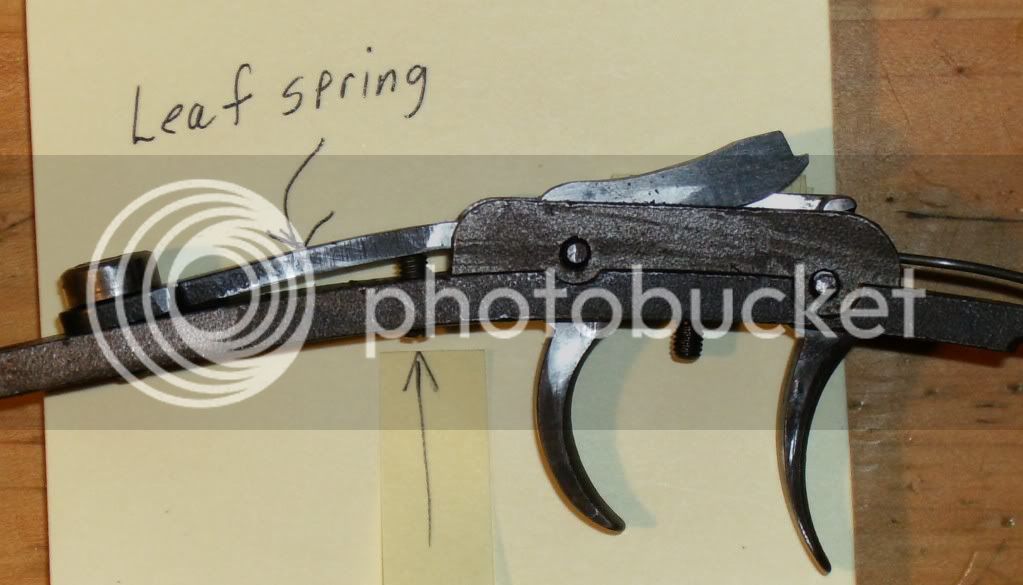
When you pull the rear trigger to set it and you hear the little "click", that is the front trigger latching the rear trigger in the set position.
The rear trigger should now be noticably back towards the rear of the trigger guard.
So far so good.
When you lightly pull the front trigger and you hear the "snap" sound that is the sound of the front trigger releasing the rear trigger.
At this point, your hammer should fall to the fired position.
Because the hammer didn't fall, pulling the front trigger much harder causes the front trigger to release the hammer just as though you had never set the rear trigger.
Obviously the rear set trigger isn't doing its job.
There are a couple of reasons that this can happen but before getting into those you need to have an idea of how one of these triggers works.
The rear set trigger is spring loaded and it has a blade sticking up out of the top of it. It is the job of this blade when the front trigger releases it, to hit the sear arm with a good "whack" to knock it upwards.
The lock's sear, the thing that holds the tumbler and hammer at the half **** or full ****, has an arm that sticks out away from the lock towards the left hand side. When this arm is pushed upward it causes the nose of the sear to disengage from the full **** (or the half ****) notch in the tumbler allowing the hammer to fall.
Now, to the possible problems with the rear set trigger:
Sometimes there is a small piece of wood in the way so rather than hitting the sear arm the rear triggers stored energy is spent making the blade hit the wood rather than the sear arm.
To check this, first remove the lock from the stock. At the rear there is a hole in the wood for the sear arm to stick into.
Look down this hole while you push the rear set trigger
forward . You should see the set triggers blade move up so it covers at least 3/4 of the hole. If it does, then this is not the problem.
The next thing that can cause the set trigger not to work is that someone has been in there messing with the set triggers spring pressure.
Some folks attempting to reduce the amount of force needed to set the rear trigger will reduce the spring pressure using either the small headless screw that is located behind the rear trigger or by loosening the screw that holds the spring in place.
When trying to adjust this little screw (if your trigger has one like my Lyman GPR does) out.
By screwing this screw out you are increasing the spring pressure that is applied to the trigger blade.
Also, look at the large head screw at the rear of the trigger plate. If this screw has been unscrewed, screw it back in until it is tight.
Reassemble your rifle and try it. It should work properly.
If the set trigger still doesn't work like it should remove the trigger assembly again.
If your trigger assembly is like mine on my GPR it has a unique feature not found on most set triggers.
This feature is a 'hook' that is a part of the front trigger and it hooks behind a little catch that is a part of the rear trigger.
The hooks job is to prevent accidental release of the set rear trigger.
It is possible that this hook is catching or interfering with the ability of the rear trigger to fully release when the front trigger is pulled.
To check this, with the trigger assembly removed from the stock, set the rear trigger.
Keep your fingers away from the upper area of the trigger assembly and slowly pull the front trigger. You should see the hook raise clear of the rear triggers catch at the same time that the rear trigger snaps upward. If it doesn't you can grind off some of the bottom of this hook so that it doesn't interfere with the rear triggers blade during release.
You can remove up to 1/8 inch of the hook without causing other problems and your modified trigger will not be any more dangerous than 90 percent of the double set triggers sold today.
Let us know what the problem was and if you got if fixed.


