• Friends, our 2nd Amendment rights are always under attack and the NRA has been a constant for decades in helping fight that fight.

    We have partnered with the NRA to offer you a discount on membership and Muzzleloading Forum gets a small percentage too of each membership, so you are supporting both the NRA and us.

    Use this link to sign up please; https://membership.nra.org/recruiters/join/XR045103

turning down ramrod ends for tips?

Muzzleloading Forum

Help Support Muzzleloading Forum:

This site may earn a commission from merchant affiliate links, including eBay, Amazon, and others.

erbeckerdite

32 Cal.
Joined
Nov 8, 2007
Messages
10
Reaction score
0
Any hints/tips or is it just a case of using a sharp knife and trial fitting?

Do you really "drive" it on (looking for a press fit) or do you want more of a slip fit and count on the pin to hold it?

Have some good Hickory rods and want to put some shotgun (tulip) ends on them.
 
I usually mark a line on the rod and use a knife to remove some of the material and a file and sand paper. Then I glue and pin the tip on. Pinning is very important.
 
Put a radius on the wood rod with a file and then chuck up the ramrod tip in a drill motor and drill it on there. This will raise a curl of wood ahead of the tip which you can file off as you true up the wood flush with the tip. Works great and quick and easy. Tight fit too.

Chuck the ramrod up close to the end you are working on in a padded bench vise so you don't have to try to hold the rod square with the drill motor while yer working. :hatsoff:

Oh yeah, use two tube pine pitch and glue it on and then pin it with 1/16th inch dia. welding rod stock and peen it.
 
ssettle said:
I usually mark a line on the rod and use a knife to remove some of the material and a file and sand paper. Then I glue and pin the tip on. Pinning is very important.

I do the same. I use epoxy. However, I don't pin them. I keep range rods handy in case I have to pull something with a rod.

HD
 
I like to use a 1" belt sander tape the index line and carefull sand to a tight fit then pin and epoxy.You can do it by hand with sandpaper on a small file, working your way around the rod.
 
2 part epoxy.

"tooth" the inside cavity of the tip, scratch the surface with heavy sandpaper or a round file to give the adhesive something extra to grab on to.

Pin the tip across the end grain of the ramrod.
 
The only good ramrod is a ramrod with NO grain runout & preferrably made of hickory. I have some I have used for 30 years & they are still going strong.

To install the RR tips securely..........

I take the rod to a belt sander & sand on the measured end of the rod as I rotate it against the belt sander til I have it sanded down to where it will barely go all the way into the RR tip. Then I take a piece or emery cloth & roll it up & put it in the tip & twist the emery cloth in the tip to roughen the insides a bit.

Next I take a countersinking tool & I bevel the inside of the RR tip edges just a tad.

I take a round wood file & I make a couple light file marks in a spirial form (like a barber pole stripe) on the sanded wood surface where the tip goes over the ramrod.

Now take a piece of posterboard & cut a small dot/circle out of it & put the small dot of paper into the end of the RR tip to block the end of it where the threads start. Mix up some epoxy or Microbed & put some in the hole & some on the sanded ramrod end. Push the ramrod end into the tip & twist it on tight forcing the excess glue out. Wipe off excess & let dry overnight. Stand on end with tip down.

After setting all night, take a auto centerpunch & make a punch about 3/8" from the wood/brass edge in the center of the tip. Drill it with appropriate sized drill for same size hole as a #3 finish nail. Drill it thru & then take a countersinking bit & bevel the edges of the holes you just drilled. Insert #3 finsih nail & tap it in snug & clip off excess with a pair of sidecuts or needlenose pliers. File excess on same side til you have about 1/32" of nail sticking out. Put the nail head on your vice & on side sticking up peen it over carefully with a small hammer, rounding the nail slightly as you peen it. File flush turn over & file down nail head flush.

This tip Will Not come off. You may break the rod or twist it in half abusing it, but the tip is Not gonna come off.........


:thumbsup:
 
I use a tubing cutter to cut a shallow cut around the rod, then just scrape with a knife till the end fits, I use epoxy and drill and pin all my ends too. chuck
 
That works, but it is not as strong. Reason being you cut a straight cut & butted a straight RR end to it. It is Very easy to cut too deep with the tubing cutter also, thus making it weaker at the joint. A joint with a rounded or chamfered edge & chamfered tip make a stronger connection. How much ? who knows.
I do know there is a dif. on a small RR like a 5/16" rod as I have broken a couple of them right at the tip on the straight cut ones in 5/16" and since I started beveling the edges & rounding them about 10 years ago I have not broken any.

Also I have rounded them on a belt sander, cut the bevel on the inside of the tip, chuck the tip in a drill & spin it on the RR & that makes a superb fit too & contours the wood to a Exact fit to the RR tip.

:thumbsup:
 
I don't quite know what the question means but the tip opposite of the brass end I finish by cutting a groove about 3/8" from the end deep enough so I can wrap a leather thong in it to get a little "grab" on it if the rod gets stuck in the rifle while in the field.
 
Sorry, I was referring to the iron end cap were the threads are located and the pinning takes place. I was wondering if you did anythnig to it, blued, rust browned...Just looking to see what people do.
 
I get the RR pipes on the forestock & entrypipe in, then I make sure I have the RR hole into the stock the depth I need it & insure I am clear of all obstructions (such as front lock bolts). Once the RR will go in & out easily, I get the rifle to the sanded & ready to stain condition, then I make the ramrod & put the tips on.
I sand the tips parallel with the RR as I don't like seeing circular sanding marks on the RR tips, stain the RR when I stain the stock so it matches the stock, apply the finish to the RR when I apply it to the stock.

Regardless of the finish I put on the stock, I always seal the RR with 2 thin hand rubbed coats of Tru-Oil or Permalyn to seal it after it is stained the color I want it. Then I apply more coats of whatever I am going to finish with & make it gloss, semi-gloss or dull looking to match the stock wood.

I also seal the RR hole down in the stock, inside the barrel channel & in the slots for the RR pipe lugs, barrel underlugs, lock inlet, trigger inlet, under sideplate, under buttplate, under toeplate, etc. with Tru-oil or Permalyn, and mop out any excess sealant.

To seal the RR hole I put a swab on the end of a old .22 cal RR and dip it in the sealant & swab it liberally several times turning the swab as I do it, then put a dry swab on & mop up the excess.

I would be severely ticked off if I was deer hunting & couldn't get the RR out of the stock ! :cursing:

:thumbsup:
 
Thanks for the overview. I cannot imagine how I might feel if the ramrod was stuck in the stock!
 
On almost all of my RR's I put tips on both ends, as this way if you do get a RR stuck in the barrel or it is hard to pull out, you can easily thread a jag or a small pocket T handle into the end & get a good grip on the RR. I don't like seeing a guy use a pair of pliers on his RR.... :shake:

If you look at the ML vending places they usually have brass RR extensions that are about 3" long . I take one of those & cut it off about 1" long, then cut the cutoff piece to about 1" long, braze it to the first piece in the shape of a small T handle & drop it in my possibles & forget it. And you can drill & tap one other end, insert a allenhead shaft & now have it fit a 10-32 and a 8-32 thread so it will screw into either size RR tip hole.

:thumbsup:
 
You can use a knife to pare down the rod, or chuck it in a drill as has been mentioned. Or, if you have access to a small metalworking lathe, you can turn it very accurately after measuring the inside of the tip. Then using your favorite glue or epoxy, slip it on and drill crossways for a 1/16" pin. I use 1/16" brazing rod. I lightly countersink the holes in the tip and peen the ends of the pin to fill the countersink. Then I rechuck it in the lathe and turn it until the excess pin ends are flush with the tip. Most of the time you can't tell there is a pin even if you look real hard. While in the lathe, you can polish with ScotchBrite or 0000 steel wool. As a matter of fact, while in the lathe, you can finish up the entire rod with the steel wool and get a very smooth finish before staining or oiling.
 
I just happen to have acces to a very well equiped machine shop,so this is how I do it.
I like to use ramin wood as I found it to be very strong.Straight grain is a must. I turn on the lathe both ends with a bit of rad so they dont break and make both ends out of brass.On one end I make a jag for cleaning in the field , and on the other I make it the same diameter as the rod, but finish it with a 1/2 ball nose endmill (chuked on the lathe) and thread the end 10-32.That is the end that I use for loading a PRB, so I don't have to rotate ends to load.
Both caps are epoxyed and pinned.Sometimes I thread both ends.
Once I made one out of aluminum arrows jointed together with a piece of aluminum turned like the inserts used on arrows and a collar in the middle the same diameter as the shafts.
It is indestructible, but it makes noise in the field so I had it replaced and now is my range rod.
 
Ramin is a tropical wood, like Teak. It can be used for many things, but its not well known for its strength, or stability, or for its ability to survive cold dry winters in the Midwest and northern tier states. You would be better off finding better woods, even those from Africa, like Cocobola, or ebony, to make ramrod ends from, than to use tropical woods like Mahogany, or Ramin. Teak is used in boat decking because boats stay around water, and high humidity is the norm. In those conditions, boat decks made of teak last a long time. Hard wood grown in more dry climates do not last so well in wet climates, as then eventually take on water, and swell. The swelling weakens the grain structure, and they deteriorate rapidly thereafter. Pick your woods for projects based on where they are going to be used, and what kind of climate conditions exist there.
 
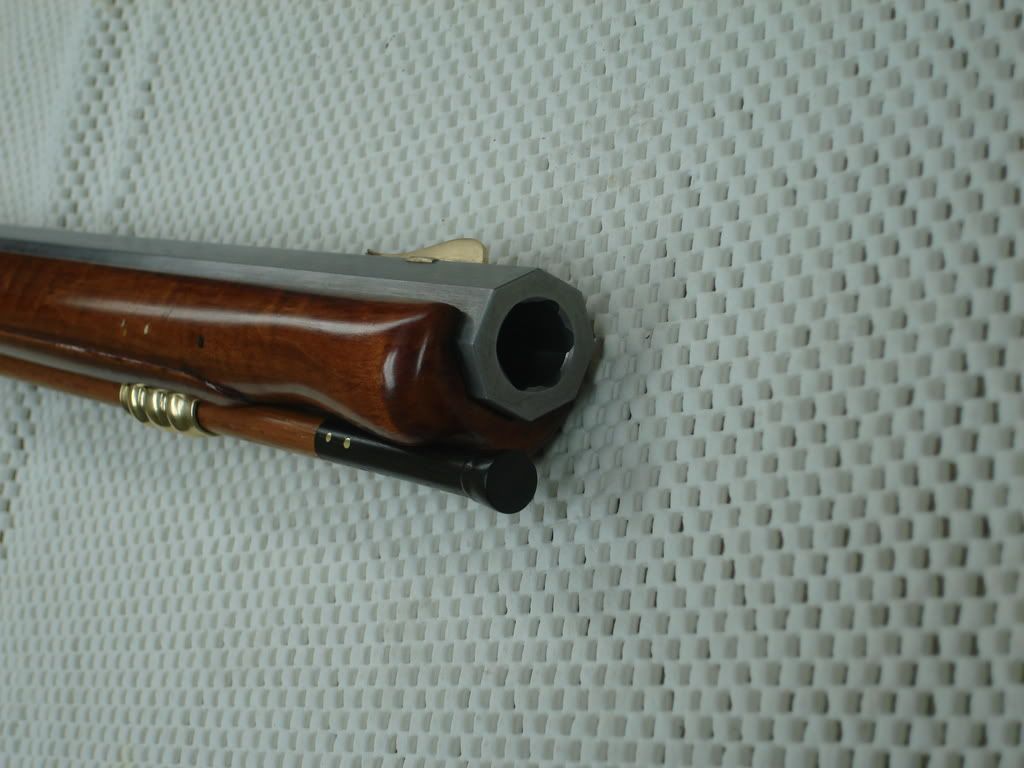
Hickory rod, Ebony tip, brass pins through an open mortise and tenon joint.

Front sight on backwards as noted by Mr. Brooks,
(that was a long night) :redface:

DSC01754.jpg
 
Back
Top