OK, not strictly fur trade or "old", but some might be interested.
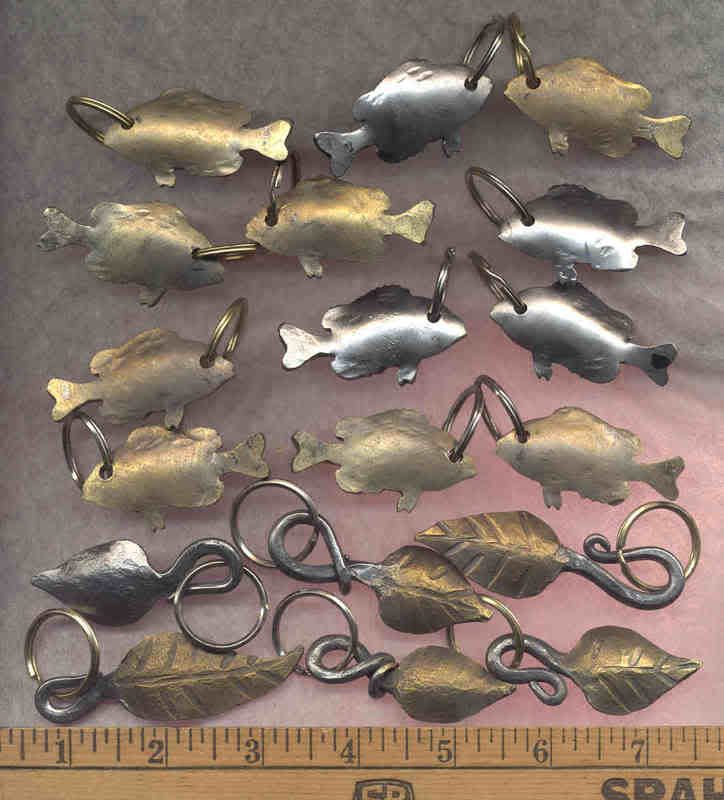
OK, I decided to tinker around at the forge today. So I made up a number of keyrings. (I've got a small town festival coming up that needs a few little "prizes" to hand out.)

The leaf keyrings are forge up from around 1 1/2 to 2 inches off the end of a 3/8 inch diameter rod. They are a fun project to demo also. You can generally get one made up in 10 to 20 minutes - depending upon how much you show/explain what you are doing to people. So the attention span doesn't get stretched too far. And the little kids are really amazed when you spreat out the leaf from that blob of metal.
At one steam engine/threshing show, a small girl somewhere around 5 or 6 years old, was intently watching and listening as I made up a leaf keyring. I showed and explained each step to her and the rest of the crowd. And when I had finished it, I handed it to her to look it over. And then I told her she could have it. She beemed a smile, thanked me, and went "bubbling" off over to where her parents were. A minute later, she came back and handed it back to me saying: "I don't have any keys." Well, I gave it back to her and told her that maybe her mom had some keys and would like it. She smiled and thanked me again, and went "bubbling" back over to show it and give it to her mom. A kid's point of view.
The fish are an interesting little project. A friend used his computer guided plasma torch to cut them out. I then cleaned up the cut-outs, and then forged them a bit for more depth and dimension.
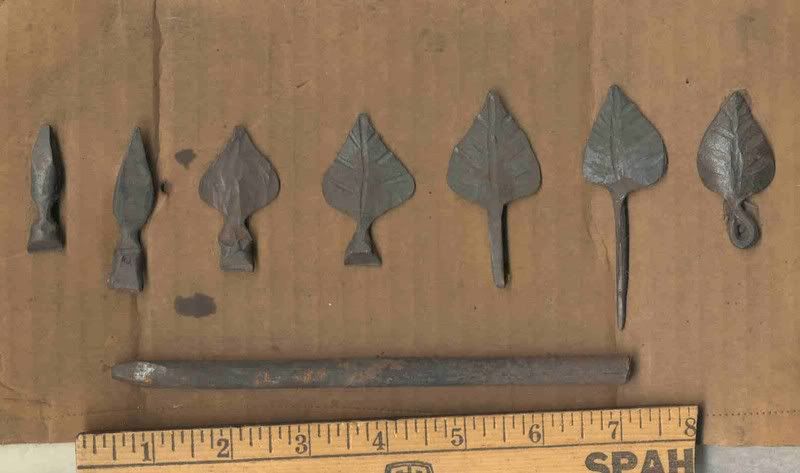
About a dozen years ago, I made up this little ... story board ... of the various steps to forge up a leaf keyring. I made it up for a young lad who was doing a school report on the old crafts, and he chose blacksmithing (because he knew somebody who did that kind of work - not just because I is OLD!)

The bottom is just that 3/8 round rod I start with. I then point it.
- Neck in to isolate a "lump" of metal at the end of the rod - to become the leaf
- Flatten that lump
- Stretch the metal out to the two sides to form the leaf
- Mark in the veins in your leaf if you want them. I use a dull/rounded chisel. And then cut it off of the main bar.
- Hammer that "lump" left from cutting it off. You hammer it square, and then start tapering it out to become the stem of your leaf.
- Round out the stem.
- Curl your stem however you want it, and "dish" your leaf by hammering it down into a slight depression in a wood block - to give it some depth and dimension.
- Wire brush it, use a stone to smooth over any sharp edges or points, cool it, and add that keyring.
The brass/bronze look comes from brushing the leaf with a Brass brush as it cools. While the iron is still aroung 900 to 700 degrees, it will melt the brass and "plate" it on a little. If the iron is too hot, it won't stick. If the iron is too cool, it won't melt the brass. You are doing a simple version of brazing. And you can use one of those brass brushes they sell to clean the grill on your bar-b-que. But the welding supply shops also have some.
To little kids, putting the brass finish on makes it look like ... magic! Turning Iron to Gold!
But that brass finish does wear off in time. It lasted about 2 months bouncing around in my pocket with all the coins. But my iron leaf now has developed its own semi-polished patina.
Of course, you can always use those leaves to create whole bushes and trees. Just weld bunches of them together. And you can spend extra time forming/filing/chiseling the leaves to very closely resemble real leaves - like oak or maple. Jay and I did a "grapevine" project for one couple's bathroom - frame around the mirror, brackets to support the sink, even a free-standing TP holder - all with grapevines and leaves. It's what they wanted, and they paid well. (The paid $200 USD just for the TP holder! They especially loved it!)
You can see a bunch of Jay's and my work on Jay's web site. www.bigriverforge.com
He did the main design stuff, and most of the modern cutting/welding. I did most of the traditional blacksmithing stuff.
Fun projects.
Mikey - yee ol' grumpy German blacksmith out in the Hinterlands
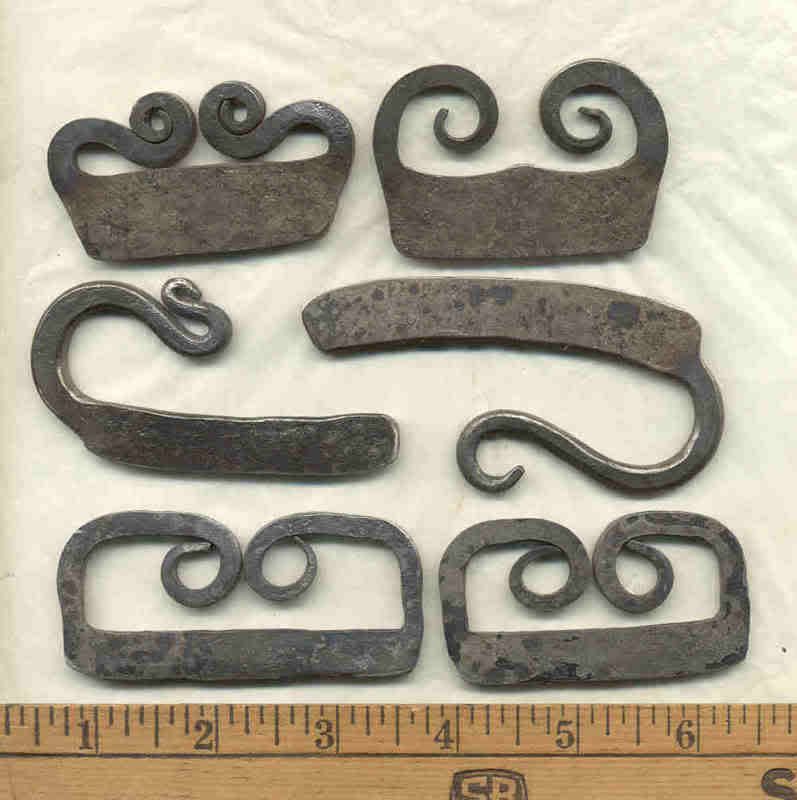
p.s. OK OK, I confess. I also made a half dozen flint strikers. There, happy now? It's an ... obsession. I can't start the forge without making at least ONE flint striker!
OK, I decided to tinker around at the forge today. So I made up a number of keyrings. (I've got a small town festival coming up that needs a few little "prizes" to hand out.)

The leaf keyrings are forge up from around 1 1/2 to 2 inches off the end of a 3/8 inch diameter rod. They are a fun project to demo also. You can generally get one made up in 10 to 20 minutes - depending upon how much you show/explain what you are doing to people. So the attention span doesn't get stretched too far. And the little kids are really amazed when you spreat out the leaf from that blob of metal.
At one steam engine/threshing show, a small girl somewhere around 5 or 6 years old, was intently watching and listening as I made up a leaf keyring. I showed and explained each step to her and the rest of the crowd. And when I had finished it, I handed it to her to look it over. And then I told her she could have it. She beemed a smile, thanked me, and went "bubbling" off over to where her parents were. A minute later, she came back and handed it back to me saying: "I don't have any keys." Well, I gave it back to her and told her that maybe her mom had some keys and would like it. She smiled and thanked me again, and went "bubbling" back over to show it and give it to her mom. A kid's point of view.
The fish are an interesting little project. A friend used his computer guided plasma torch to cut them out. I then cleaned up the cut-outs, and then forged them a bit for more depth and dimension.
About a dozen years ago, I made up this little ... story board ... of the various steps to forge up a leaf keyring. I made it up for a young lad who was doing a school report on the old crafts, and he chose blacksmithing (because he knew somebody who did that kind of work - not just because I is OLD!)

The bottom is just that 3/8 round rod I start with. I then point it.
- Neck in to isolate a "lump" of metal at the end of the rod - to become the leaf
- Flatten that lump
- Stretch the metal out to the two sides to form the leaf
- Mark in the veins in your leaf if you want them. I use a dull/rounded chisel. And then cut it off of the main bar.
- Hammer that "lump" left from cutting it off. You hammer it square, and then start tapering it out to become the stem of your leaf.
- Round out the stem.
- Curl your stem however you want it, and "dish" your leaf by hammering it down into a slight depression in a wood block - to give it some depth and dimension.
- Wire brush it, use a stone to smooth over any sharp edges or points, cool it, and add that keyring.
The brass/bronze look comes from brushing the leaf with a Brass brush as it cools. While the iron is still aroung 900 to 700 degrees, it will melt the brass and "plate" it on a little. If the iron is too hot, it won't stick. If the iron is too cool, it won't melt the brass. You are doing a simple version of brazing. And you can use one of those brass brushes they sell to clean the grill on your bar-b-que. But the welding supply shops also have some.
To little kids, putting the brass finish on makes it look like ... magic! Turning Iron to Gold!
But that brass finish does wear off in time. It lasted about 2 months bouncing around in my pocket with all the coins. But my iron leaf now has developed its own semi-polished patina.
Of course, you can always use those leaves to create whole bushes and trees. Just weld bunches of them together. And you can spend extra time forming/filing/chiseling the leaves to very closely resemble real leaves - like oak or maple. Jay and I did a "grapevine" project for one couple's bathroom - frame around the mirror, brackets to support the sink, even a free-standing TP holder - all with grapevines and leaves. It's what they wanted, and they paid well. (The paid $200 USD just for the TP holder! They especially loved it!)
You can see a bunch of Jay's and my work on Jay's web site. www.bigriverforge.com
He did the main design stuff, and most of the modern cutting/welding. I did most of the traditional blacksmithing stuff.
Fun projects.
Mikey - yee ol' grumpy German blacksmith out in the Hinterlands
p.s. OK OK, I confess. I also made a half dozen flint strikers. There, happy now? It's an ... obsession. I can't start the forge without making at least ONE flint striker!
Last edited by a moderator:


