-
Friends, our 2nd Amendment rights are always under attack and the NRA has been a constant for decades in helping fight that fight.
We have partnered with the NRA to offer you a discount on membership and Muzzleloading Forum gets a small percentage too of each membership, so you are supporting both the NRA and us.
Use this link to sign up please; https://membership.nra.org/recruiters/join/XR045103
You are using an out of date browser. It may not display this or other websites correctly.
You should upgrade or use an alternative browser.
You should upgrade or use an alternative browser.
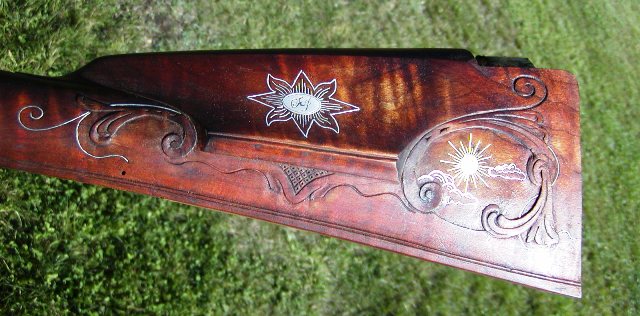
Wire inlay hunter's star?
- Thread starter Ceannt
- Start date

Help Support Muzzleloading Forum:
This site may earn a commission from merchant affiliate
links, including eBay, Amazon, and others.
Phil Coffins
69 Cal.
It’s hard to say what all has been done over the last 200 years or so, but it sounds like a good idea to me.
The Appalachian
Feral American
- Joined
- Jan 26, 2022
- Messages
- 861
- Reaction score
- 1,629
Try it on a piece of scrap wood.
1. You'll determine if you like it.
2. You'll figure out what to do and not do when you get to your rifle.
3. Your backup plan can be inlet a solid star over the wire inlay carvings if you end up botching the job.
1. You'll determine if you like it.
2. You'll figure out what to do and not do when you get to your rifle.
3. Your backup plan can be inlet a solid star over the wire inlay carvings if you end up botching the job.
I was thinking of doing exactly that. I have a piece of scrap cherry around somewhere...
I was just wondering if anybody else ever had the same idea.
The rifle project is a few months out, but I like to have everything planned out well in advance.
I was just wondering if anybody else ever had the same idea.
The rifle project is a few months out, but I like to have everything planned out well in advance.
Wire inlay isn't as hard as it looks. Make a couple of cutting chisels out of Hack saw blades 3 mm to 5 mm wide. The hacksaw pieces should be 3" long and are to be tapped with a light ball peen hammer. To draw the outline of the wire inlay insertion , make a brass sheet metal inlay and draw around it with a #4 hard lead pencil , then start with the hacksaw chisels and ball peen. Once the outline trench is cut , slightly deeper than the width of the inlay ribbon, begin gently inserting the wire inlay into the trench using a Small ball peen hammer. Shape the wire as you go. I put epoxie in the trench as I go , and continue the insertion with glue. I prefer putting brown dye in the epoxie , so the trench with the wire are one. There are a couple how to do it books , showing how folks do wire inlay. Nothing is written in stone.
bldtrailer
Pilgrim
I cut the Wire from the brass I used for inlets .cut into strips and hammered into the groves I cut with very narrow chisals some made from old hack saw blades then wetted to swell wood . after drying I sanded filed to shape .The stars are made from brass rod and hammered into drilled holes


- Joined
- Nov 26, 2005
- Messages
- 5,223
- Reaction score
- 10,881
Hi,
Here is one I did. It is modeled after a solid start done by Christian Oerter.

dave
Here is one I did. It is modeled after a solid start done by Christian Oerter.

dave
- Joined
- Nov 26, 2005
- Messages
- 5,223
- Reaction score
- 10,881
Hi and thanks,
Ceannt, wire inlay is a nice alternative particularly if you don't engrave. Any large solid brass or silver inlay looks a bit naked without some engraving. Wire works with the wood to create a pleasing decoration that is not a big block of one color and needs no engraving.
dave
Ceannt, wire inlay is a nice alternative particularly if you don't engrave. Any large solid brass or silver inlay looks a bit naked without some engraving. Wire works with the wood to create a pleasing decoration that is not a big block of one color and needs no engraving.
dave
Stunning.Hi,
Here is one I did. It is modeled after a solid start done by Christian Oerter.

dave
Using thin silver wire the parts catalogs sell, try it in walnut wood. Works like a dream. , cuts easily , and wire can be inserted easily. Don't forget to anchor the wire in with dark stained epoxie.
Similar threads
- Replies
- 55
- Views
- 6K


