I have had this Paterson for a number of years, but have never had a holster for it. Anytime I wanted to pack it very far, I ended up stuffing it in my belt. After conversing with Swampy, he offered the suggestion of making up a holster for it. Since he did not have that particular model in which to make a pattern from, he gave me directions on how to make the pattern. I used a brown paper grocery bag for the pattern and then I sent it off to him. The result was that my Paterson now has an outstanding piece of leather to ride in.
The following pics will show how I made the holster pattern as well as the finished product. However, I used copy paper instead of a grocery bag just for for these demo pics.

For starters I folded the paper in half length wise and then traced the crease line with a pen to highlight it. The line serves as a reference point for placing the pistol on the paper to ensure consistant trace marks on either side of the holster pattern.

Then I laid the pistol on the paper with the front sight and the hammer spur dead even with the center line. I made sure that I was looking directly over top of the pistol and straight down on the paper to line the pistol up with the line.
I then used a pencil to trace around the pistol.

Then I flipped the pistol over to the opposite side of the paper and repeated the steps. I also retraced over my pencil line with a pen to clean up any uneven and sloppy lines that I made during the initial trace. (Note- The hammer spur doeas not appear to be against the crease line but that is due to the camera angle).

The last step was to make a dotted line on both sides of the crease line to indicate where I wanted the leather to end on the opening. From this point, Swampy took over once he received the pattern in the mail. He will add to the pattern to allow for the stitching seam and muzzle clearance at the bottom of the holster.

This is the holster that I got sent back to me. Keep in mind that the both of us had planned for me to form fit the Paterson to the leather. Also note that the holster received a coating of light brown dye from Swampy.

To form fit the holster, I soaked the leather by running it under warm water from the tap. I then wrapped the Paterson in Saran wrap and began working in down into the holster, all the while stretching the leather out aroung the frame and cylinder. Once I had the pistol pushed down into the holster to the depth that I wanted, I rubbed the exterior of the leather with my thumbs to shape the holster around and into the curves and recesses of the pistol. I pulled a lot of the dye out of the leather during the wet shaping, so I went ahead and gave it a good recoating of leather dye while it was still wet. My dye happend to be of a darker shade though. I then tossed the pistol aside to let the leather dry. Every couple of hours, I removed the pistol and reset it into the wet leather until it started getting quite dry. At that point, I left the pistol in the holster over night. By morning it was dry and good to go.

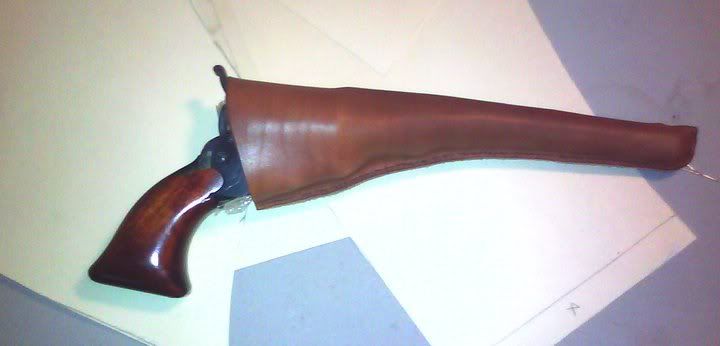
The next day, I rubbed some bear grease into the leather and the rest is history. The Paterson has a nice snug and perfect fit. It will not fall out on its own. I have never seen a holster like this for a Paterson and am proud to have it.

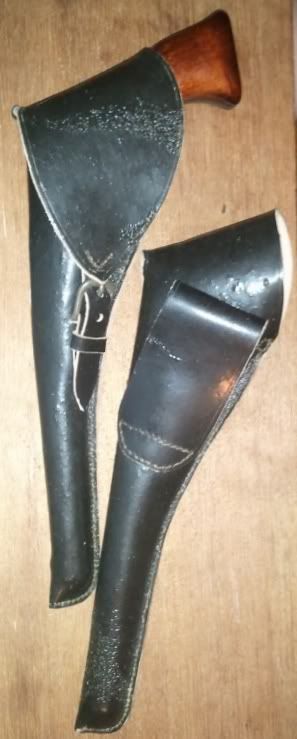
Here is the holster compared to a run of the mill mass produced holster that I pack my 1861 colt model in. Note the difference in how slim the Paterson holster is.

I wanted the holster to hang straight and the belt loop is of a solid piece constuction incorporated with the rest of the leather.

This is his touch mark that is placed on the bottom back side of his holster.
So, if you want a holster for one of the percussion models that are not common, they can be had by following these steps. That goes without saying that one for the common models can be had as well. Gonna try and talk him into making one for my Walker now :hmm:
The following pics will show how I made the holster pattern as well as the finished product. However, I used copy paper instead of a grocery bag just for for these demo pics.
For starters I folded the paper in half length wise and then traced the crease line with a pen to highlight it. The line serves as a reference point for placing the pistol on the paper to ensure consistant trace marks on either side of the holster pattern.
Then I laid the pistol on the paper with the front sight and the hammer spur dead even with the center line. I made sure that I was looking directly over top of the pistol and straight down on the paper to line the pistol up with the line.
I then used a pencil to trace around the pistol.
Then I flipped the pistol over to the opposite side of the paper and repeated the steps. I also retraced over my pencil line with a pen to clean up any uneven and sloppy lines that I made during the initial trace. (Note- The hammer spur doeas not appear to be against the crease line but that is due to the camera angle).
The last step was to make a dotted line on both sides of the crease line to indicate where I wanted the leather to end on the opening. From this point, Swampy took over once he received the pattern in the mail. He will add to the pattern to allow for the stitching seam and muzzle clearance at the bottom of the holster.
This is the holster that I got sent back to me. Keep in mind that the both of us had planned for me to form fit the Paterson to the leather. Also note that the holster received a coating of light brown dye from Swampy.
To form fit the holster, I soaked the leather by running it under warm water from the tap. I then wrapped the Paterson in Saran wrap and began working in down into the holster, all the while stretching the leather out aroung the frame and cylinder. Once I had the pistol pushed down into the holster to the depth that I wanted, I rubbed the exterior of the leather with my thumbs to shape the holster around and into the curves and recesses of the pistol. I pulled a lot of the dye out of the leather during the wet shaping, so I went ahead and gave it a good recoating of leather dye while it was still wet. My dye happend to be of a darker shade though. I then tossed the pistol aside to let the leather dry. Every couple of hours, I removed the pistol and reset it into the wet leather until it started getting quite dry. At that point, I left the pistol in the holster over night. By morning it was dry and good to go.
The next day, I rubbed some bear grease into the leather and the rest is history. The Paterson has a nice snug and perfect fit. It will not fall out on its own. I have never seen a holster like this for a Paterson and am proud to have it.
Here is the holster compared to a run of the mill mass produced holster that I pack my 1861 colt model in. Note the difference in how slim the Paterson holster is.
I wanted the holster to hang straight and the belt loop is of a solid piece constuction incorporated with the rest of the leather.
This is his touch mark that is placed on the bottom back side of his holster.
So, if you want a holster for one of the percussion models that are not common, they can be had by following these steps. That goes without saying that one for the common models can be had as well. Gonna try and talk him into making one for my Walker now :hmm: