Adjusting trigger pull

Muzzleloading Forum

Help Support Muzzleloading Forum:

This site may earn a commission from merchant affiliate links, including eBay, Amazon, and others.

JackAubrey

45 Cal.
Joined
Dec 5, 2004
Messages
586
Reaction score
5
I have an Armisport 1861 Springfield and the trigger almost requires two fingers to fire it.It does not have a set screw as does my GPR.I assume the problem is in the lock not the actual trigger mechanism.Is it possible to adjust the pull and from a kitchen tabletop "gunsmith's" perspective and abilities or is this something that needs professional attention?
 
I had similar probs with DP 1816 & 1861 Springfields. I am looking at a book (Muzzle Loading Shooting and Winning with the Champions) and this particular section deals with your very question; it refers to lead soldering shims under the full cock notch of the tumbler and other foreign/alien words. My 1816/1861 solution was simple; I sent the locks to a trusted BP gunsmith who fixed them for next to nothing.
Jim.
:m2c:
 
There are two variables to the equasion of trigger pull: location of the pivot point on the trigger in relationship to the pivot point of the sear and the distance the sear nose must move to be free of the full cock notch.

The single trigger can be regarded like a teeter totter. There is a fulcrum andit is the pin that holds the trigger to the plate.

The sear is also a teeter totter and it's fulcrum is the screw securing it to the lock plate. I have found that the closer together these to fulcrums are the more equal is the leverage between these two items. When I make a gun and use a single trigger, I get the pivot points directly under one another, and as close as possible.

The other part that I refered to is the distance the searnose must travel by means of leverage until it disengages the full cock notch of the tumbler. I stone with a diamond hone the tumbler and decrease the angle of the notch. Alexander's book " Gunsmith of Grenville County" illustrates and describes this very clearly.

I have found that in observation, that these two principles dictate the amount of force needed for trigger pull.
 
Most likely, your problem is with the angle of the sear notch and the way it engages the sear.
This angle of the surface on the tumbler and sear really shouldn't be frinkled with unless you know what your doing.
There may be a few things you can look at though.

The locks sear arm is held in place and pivots on the sear screw. I have seen cases where someone was apparently concerned with the screw being too loose so they tightened it up real good. The net result of this is that the sear would just barely move from the spring pressure on the top, or the trigger from the bottom.
With the lock uncocked, check to see that the sear moves freely against up and down against the spring load. If it doesn't loosen the screw just a little until it does move easily.

The tumbler notch and the nose (end) of the sear should be very smooth surfaces. If they are rough, the sear nose will not slide easily across the notch surface.
Some people take a very fine grinding (whet) stone and try to smooth the surfaces. While this can be done, it is not without it's dangers.
If the angle of these surfaces is changed by overuse of the grinding stone it can make the lock and gun a hazard because the sear can slip releasing the hammer all by itself.

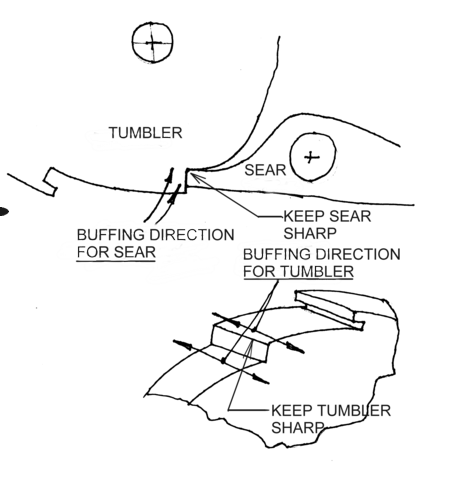
If you have access to a buffing wheel, the surfaces can be buffed using "stainless" compound (or equivalent) to get a mirror like surface.
This also should be done with the buffing done only in the direction shown in these sketches:
LAPPINGTEXT.png

Note that the direction of buffing is always in a direction that will not round off the critical sharp edges.

This buffing will remove less than .001 of the material which is often enough to really smooth out the lock but it will not change the critical angles or remove the sharp edges.
 
Thank you all for the replies.As I suspected, this is something I will let a gunsmith handle.Zonie, that was a very well done illustration!
 

Latest posts

Back
Top