• Friends, our 2nd Amendment rights are always under attack and the NRA has been a constant for decades in helping fight that fight.

    We have partnered with the NRA to offer you a discount on membership and Muzzleloading Forum gets a small percentage too of each membership, so you are supporting both the NRA and us.

    Use this link to sign up please; https://membership.nra.org/recruiters/join/XR045103

Blanket Capote...

Muzzleloading Forum

Help Support Muzzleloading Forum:

This site may earn a commission from merchant affiliate links, including eBay, Amazon, and others.
YOu can buy a pattern from several suppliers. Check with October Country, and Crazy Crow. Dixie has the patterns, too.
 
Basically, the body and arms are rectangles.
For the body you would take a tape measure and measure the distance around your stomach allowing for an appropriate overlap(the amount is basically up to you) The hight is one inch from the base of the neck down to where you want it, but I would recommend it ending above or right at the knee. Then you'll measure the distance from center armpit around the back and back to the center of your other armpit. Take this distance, and divide it by two, this is length A. Then take the top of the body piece and find and mark the center. From this, use measure A and mark on either side.
Your next step is to measure from the edge of your shoulder to about an inch from your neck, this length B. Then find the mark made from length A and go down 2in. If you're a big guy 2.5 and if your really big 3. From this, you will take length B and find the angle on both sides of the mark where it ends up being 1 in from the top. Then draw this, making a straight line from the endpoint up to the edge of the body piece(which should be one inch) Do this on both sides of each mark. Next, measure the circumference of your arm from the top of your shoulder, divide by half and add about 4 in. This is length C. Length C starts from the top of the body piece at each marker that was found from length A, and goes straight down. Please look at the pic.

capote1.jpg


This completes the body portion. Next, the arms.
The arms are measured from the edge of your shoulder to where ever you would like to end and add at least one inch for seams. You can add more if you would like cuffs. Then take a tape measure and at your wrist, make a loop that seems comfortable and hangs loosely (about 3-4 in down from your wrist). Add 1in. for seams and this is the width of your sleeve. If you ended here, you wouldn't have enough sleeve for your shoulder, so you will have to add a triangle called a gusset that will go underneath your armpit.
So, do the same thing for the shoulder as you did the wrist, making the loop dangle loosely. Take this measurement and subtract the width of the sleeve. Add two inches to the difference and that is the width of your gusset. The length is however long you would like it, but probably a little shorter than the distance from your shoulder to your elbow. Make a T shape with the width and the length and connect to make a triangle. This is your gusset.
Now you can continue to cut the hood, or you could sew the body together. Its getting late, so I'll tell you how to cut the hood tomorrow. To sew the body, you'll first sew one of the sides of the gusset(its an isosceles triangle so sew one one the congruent sides) to one end of your sleeves. The point of the triangle should be pointing towards the other end of your sleeve. Next, sew the other side of the gusset to the other sleeve, starting from the end of the sleeve moving in. When you get to the end of the side and meet the other side of the gusset, continue up the sleeve until you make a tube.

capote2.jpg


Then take the body, and cut out the triangle shaped pieces you marked out, and cut the line you drew for length C. After this, fold the ends until the cut for length C are on the fold. Sew the edges from the top all the way to the cut for length C on both sides. Then insert the sleeve from the inside(so when you turn it inside out you wont see the seams). You may have to extend the cut for length C to get the sleeve to fit, but that's normal. Then go ahead and sew the sleeve in.


I hope this makes sense. I always go to the thrift shop to buy some sheets to cut up first for a pattern. I pin that together and adjust it until I'm happy. I'll write about the hood tomorrow. If there's any questions, just ask
Scouter

Oh, btw, I normally do 1/2 in seams.
 
My suggestion, is you do as Paul said!... Also, a good full size pattern is best, especially if your going to use an expensive wool blanket like a Hudsons Bay or Whitney etc...TOW and Jas Townsend are a couple more source's.
 
Sorry I couldn't post the rest about the hood, too much homework.
I'm in college right now so the easiest thing for me is the cheapest, but if you don't care about spending the money then it might be easiest to go with a pattern. Pattern or not, I would definitely not use a nice blanket the first time, just because you'll want to make changes and you don't know exactly what you want until you've worn it a few times.
As for the difficulty in making your own pattern. That's how I have the 15 + 16 year old boy scouts do it, and most have never seen a needle. They turn out pretty good if they have the patience to sew it well!
Anyways, let me know if you want the rest of the directions.
Scouter
 
That is a good suggestion. Use an old tarp or bedsheet to use to make a " coat" from the pattern, and wear it around a bit to see where you want to make adjustments. Its doesn't matter that the tarp has paint stains on it, or holes in it. Its not going to be kept, anyway, NO? If you have to use some store bought cloth for this education , then buy the cheapest stuff on sale. The idea is to make a " prototype " of what you think you want, and then make the adjustments before using an very expensive Wool Blanket. I have at least one member of my BL club who used a surplus army blanket he bought for $3.00 to make a capote for himself. He liked how it turned out so well, that he still wears. Its not exactly period correct, being olive green, but it keeps him warm. No one seems to want to tell him he's not PC when they are all standing out in 10 degree temperatures!d

I have a capote made from a costly Whitney Blanket, that a friend sewed up for me, using his pattern. Its a little tight in the arm pits, but otherwise quite serviceable.
 
As advised, I used a bed sheet cut to the pattern and basted together to get an idea of how my actual point blanket capote would fit. It paid off as there needed to be some changes made to get a good fit. You also need to be concerned with the size of the blanket you use. A four point blanket won't leave much room for error if your a bigger guy, at least mine didn't. The second one I made was even skimpier in material. Part of the reason was I washed and shrank the blanket before making the capote, but it didn't shrink all that much.

My next one will start as a six point blanket washed in hot water and dried on high heat a couple of times to shrink and felt it a bit, then made into a capote, with enough material left over for other items.

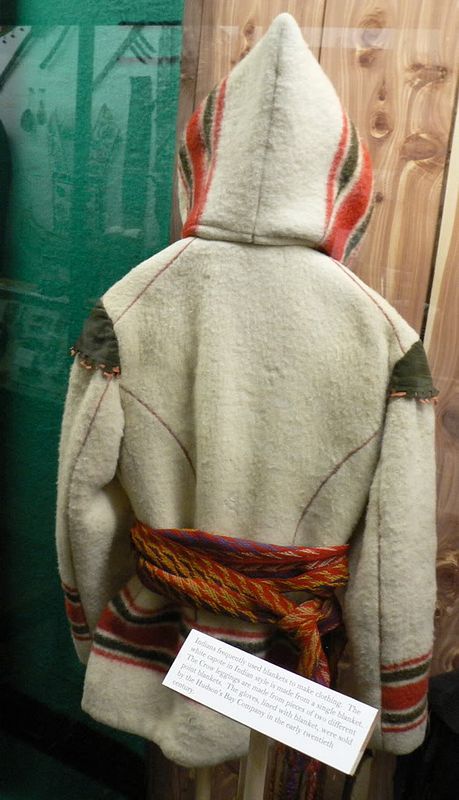
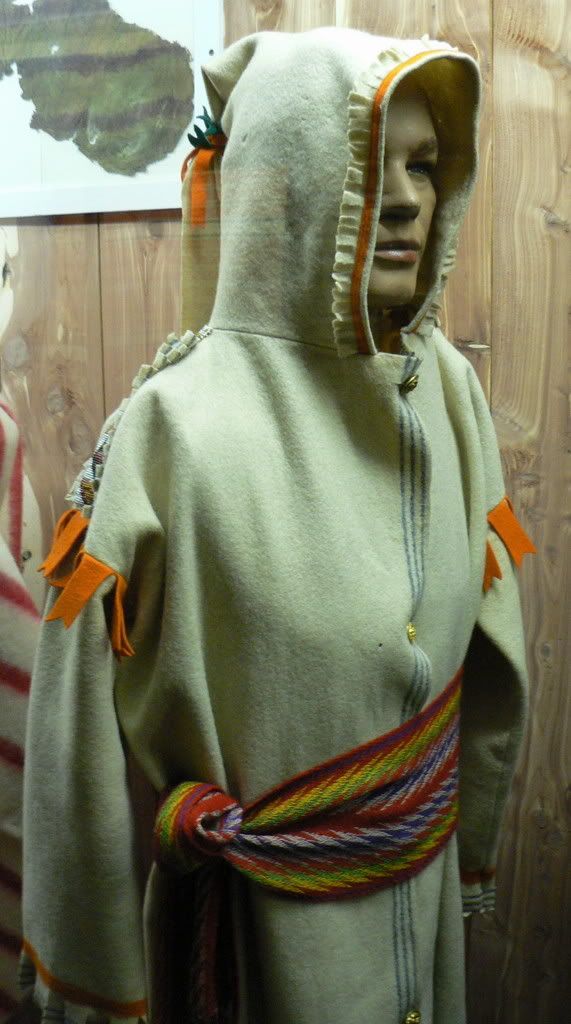
At the Museum of the Fur Trade you can see capotes made about car coat length. I made mine about knee length. The x-tyle stiching you see on many capotes is basically an NDN thing and somewhat crude. White man capotes were better made

Here's a link:
http://inquiry.net/outdoor/winter/gear/capote.htm
 
Last edited by a moderator:
Thanks a lot! This is what I wanted. A couple guys have the Capotes that look like they came from Saxs Fifth Avenue, I just wanted the " Poor Boy, but kinda nice look" and I think this will work. Again, thanks for all the replys.... :thumbsup:
 
Also, alot of guys have capotes that appear really really loose. I wouldn't recommend it. Depending on the area and time period, it might be slightly correct, but remember that a snugger fit will keep you warmer. I have the boys making them wear the clothes they might wear underneath it to get a better idea of how big to make the pattern and allow for growth also.
Using a cheap blaket first also allows you to practice your sewing skills, especially since cheaper blankets often will fray or fall apart etc. so your stitching has to be good. Then it'll be a treat to work with a good blanket and it'll turn out even better.
I also agree with the shorter capote statement. Shorter capotes are easier to sit down in. I personally will make my next capote shorter for simple non-wet events. (having one that covers your thighs is nice in wet brush) The one I took a picture of has a slit about 12 in up the back so that I don't feel restricted when I sit down. Although looking like your wearing a skirt when you sit will provide entertainment for everyone else!
Anyways, good luck and have fun!
Scouter
 
I just checked out the site posted-man I wish I had seen that before attempting to write the directions!
Scouter
 
pictures of Museum of the Fur Trade Capotes.

ShortcapotefromMuseumoftheFurTra-1.jpg


This one is only sport coat length and Euopean tailored

CapotefromMuseumoftheFurTrade-1.jpg


This one is car coat length and has a single row of buttons up the front, and bead work on the shoulders.
 

Latest posts

Back
Top