Brown or not to brown?

Muzzleloading Forum

Help Support Muzzleloading Forum:

This site may earn a commission from merchant affiliate links, including eBay, Amazon, and others.
BC is not a true brown. Look at Laurel Mountain Forge Browning solution. Comes in a kit. Just need to build some kind of a "humidity" box to let the barrel sit in between coats. Makes an attractive true brown finish that will last! There are other true brown solutions out there, as well, that others may prefer.
 
I am going to start building a Pecatonica River NW Trade Gun Northwest or Trade Gun, Pecatonica River Long Rifle Supply
My question is, should I Brown the Barrel (use Birchwood Casey browning) or leave it "in the white"? I am after a 1780-1812 period look for the Shawnee along the Ohio valley.
I am also open to other ways of finishing the barrel.
Thanks
Jeremy Bays
When I eventually finish my French Fusil I'm keeping it in the white as would have been historically correct. As for your NW Trade Gun, I think that would be personal preference. I believe the trade guns were all made in the white but I'm not 100% sure, someone else here with much more knowledge of trade guns could tell you if that's correct or not.
I have long guns that have barrels that are rust patinaed (aged), browned, rust blued and in the white. Basically do what you like, if you like the browned look go for it, if you like the white look that's fine also.
 
Last edited:
According to surviving fur company records (Trade Guns of the Hudson's Bay Company 1670-1970 by S. James Gooding), barrels on trade guns were ordered bright, blue, and brown in the period you are interested in. Bright was probably most common followed by blue, then brown.

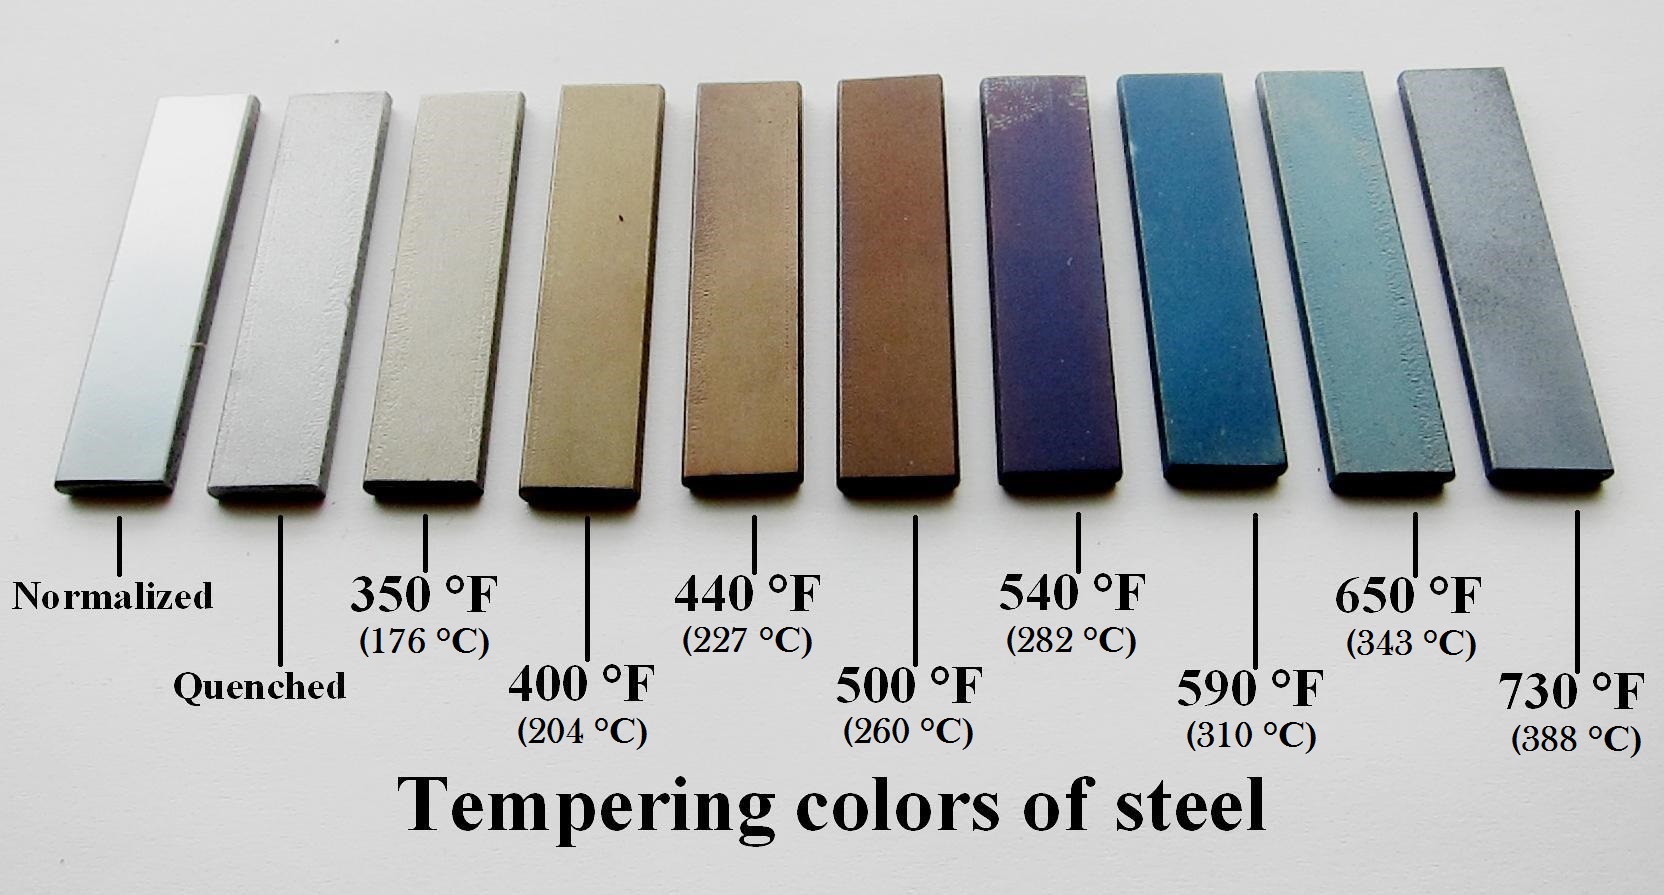
The blue that the English gun makers put on their trade guns was not rust blue, but rather temper, heat, or fire blue. The barrels were heated over a fire--often the barrels were placed on a iron plate with the fire under the plate--until they reached the desired temperature to yield the deep translucent blue color. Some where around 590 degrees F in the image below.

Tempering_standards_used_in_blacksmithing.JPG


This temper blue is not a very durable finish, but was popular with the Natives.

It's a little outside your time period but below is a portion of a letter dated February 17, 1829 from Ramsey Crooks of the American Fur Co. to J. Joseph Henry discussing the latest order of Northwest guns that Henry had delivered to the AFC. Note that Crooks was not satisfied with the blue on Henry's trade guns. Crooks writes, "I do not think them of that bright lively blue which distinguishes the English and on which I trust you will bestow your most particular attention until your Guns are really of as fine a color as those we have been in the habit of importing when I shall readily pronounce them every way equal."

Correspondence-1829-1836 pg 7 color.jpg


Crooks also mentions in the letter an incidence where the barrel burst on one of Henry's trade guns and describes the metal at the rupture as "not thicker than letter paper" and blames it on the barrel not being straightened prior to boring (reaming).
 
The colors I've seen at around the 590°F temperature is a brilliant, vivid blue. Almost, in my opinion, to bright for a barrel finish although you might like it.

I often use heat bluing for the screw heads on the guns I've built and like the color that is between the purple 540° and the bright blue around 590°.
Around 560° - 570° a very dark, rich blue color emerges.

I have had problems trying to heat blue very large things like gun barrels with a propane torch. It is all too easy to slightly overheat an area with a torch and end up with a mottled assortment of dark and light areas. Even if you heat the barrel very slowly, creeping up on the color you want, it's hard to stop the color change at exactly the same blue color.

The factories that use heat bluing on their guns do it in furnaces with every exact heat control systems on them.

Anyone interested in using heat bluing should try it on a button head screw. Make sure the surface is lightly sanded and totally oil free. Then, working under a bright light, very slowly heat the metal while you hold the screw with a set of locking pliers. Watch the surface constantly and carefully as it changes color.
The instant it changes to the color you want, quench the metal in a light oil.
If you don't like the color, sand it off and try again. :)
 
I nitrate blue with tree stump remover, which is a type of steel tempering and for small parts I color harden with blueing solution.
 

Attachments

  • B475E99D-C2A9-48E0-B4DC-FBCD3BFF86D3.jpeg
    B475E99D-C2A9-48E0-B4DC-FBCD3BFF86D3.jpeg
    46.2 KB
  • 3E31766B-7A43-4B3C-A4F9-084479E185EB.jpeg
    3E31766B-7A43-4B3C-A4F9-084479E185EB.jpeg
    51.7 KB
I understand if you use Homer Dangler's brown you have the option of converting it to Rust Blue anytime in the future by simply degreasing it then boiling it in water a few times.

Do I understand that correctly?
That's true with any surface that has been browned with the cold browning method but in order for it to work ALL, and I do mean ALL of the oil that's embedded in the brown rust must be removed. If an area still has oil in it, the water won't be able to make intimate contact with the brown ferrous oxide, into the black ferro-ferric oxide.

Also, it's a good idea to use distilled water to do the conversion. Some water contains elements that can cause problems during the process.
 
Ive used BC plum brown and Ive used Laurel Mountain Forge. In my opinion Plum Brown is mich easier to use and produces a much nicer finish. If given the choice again, Im going with Plum Brown all the way. I couldnt care less if its historically correct or not. It looks good and thats all I care about.
 
According to surviving fur company records (Trade Guns of the Hudson's Bay Company 1670-1970 by S. James Gooding), barrels on trade guns were ordered bright, blue, and brown in the period you are interested in. Bright was probably most common followed by blue, then brown.

The blue that the English gun makers put on their trade guns was not rust blue, but rather temper, heat, or fire blue. The barrels were heated over a fire--often the barrels were placed on a iron plate with the fire under the plate--until they reached the desired temperature to yield the deep translucent blue color. Some where around 590 degrees F in the image below.

Tempering_standards_used_in_blacksmithing.JPG


This temper blue is not a very durable finish, but was popular with the Natives.

It's a little outside your time period but below is a portion of a letter dated February 17, 1829 from Ramsey Crooks of the American Fur Co. to J. Joseph Henry discussing the latest order of Northwest guns that Henry had delivered to the AFC. Note that Crooks was not satisfied with the blue on Henry's trade guns. Crooks writes, "I do not think them of that bright lively blue which distinguishes the English and on which I trust you will bestow your most particular attention until your Guns are really of as fine a color as those we have been in the habit of importing when I shall readily pronounce them every way equal."

View attachment 49057

Crooks also mentions in the letter an incidence where the barrel burst on one of Henry's trade guns and describes the metal at the rupture as "not thicker than letter paper" and blames it on the barrel not being straightened prior to boring (reaming).

That's one of the best posts I've ever read on the finishes and how they came to be. Well done.

Gus
 
The colors I've seen at around the 590°F temperature is a brilliant, vivid blue. Almost, in my opinion, to bright for a barrel finish although you might like it.

I often use heat bluing for the screw heads on the guns I've built and like the color that is between the purple 540° and the bright blue around 590°.
Around 560° - 570° a very dark, rich blue color emerges.

I have had problems trying to heat blue very large things like gun barrels with a propane torch. It is all too easy to slightly overheat an area with a torch and end up with a mottled assortment of dark and light areas. Even if you heat the barrel very slowly, creeping up on the color you want, it's hard to stop the color change at exactly the same blue color.

The factories that use heat bluing on their guns do it in furnaces with every exact heat control systems on them.

Anyone interested in using heat bluing should try it on a button head screw. Make sure the surface is lightly sanded and totally oil free. Then, working under a bright light, very slowly heat the metal while you hold the screw with a set of locking pliers. Watch the surface constantly and carefully as it changes color.
The instant it changes to the color you want, quench the metal in a light oil.
If you don't like the color, sand it off and try again. :)

FWIW, the fire/heat/charcoal bluing of the period must have been very difficult to learn in the period, even when they had a large enough furnace or forge to heat the entire barrel at once.

In one of the Volumes of the "Journal of Historical Armsmaking Technology," they translated an 18th century German gunsmithing treatise. In that section, it talks of how what was a very large gun shop of over a dozen gunsmiths and blade smiths. Only TWO of them did all the charcoal bluing of gun barrels and heat treatment of blades and bayonets. So it seems it was done by a small specialized portion of the blade or gun making trades, though there doesn't seem to have been a special name for it as there was for "lock filers" for example.

Gus
 
I understand if you use Homer Dangler's brown you have the option of converting it to Rust Blue anytime in the future by simply degreasing it then boiling it in water a few times.

Do I understand that correctly?

Hello Brother,

That is exactly how Mark Lee's Express Browning and Bluing solutions work. I met Mark years ago at a SHOT Show and he informed me there really was no reason to buy both solutions, for exactly that reason. It was he just found most people liked him to put the solutions into different bottles for browning and bluing.

Gus
 
Yes please do.
DL

For this frizzen I heat the part to cherry red, then let it bake in carbon powder / kasinite / true spark by TOW works well. Then I quench in a mixture of ice water and diluted tree stump remover (spectrad only works bc of its Potassium Nitre content) around 1 cup of stump remover to 2-3 cups of water fully diluted and mixed, drop in some ice cubes.

For the heat treating part I heat with a Propane Torch and I use a graphite crucible for the part. Graphite is an excellent heat moderator and will maintain an extremely high temperature.

Just to note, this is a mild type of case hardening, its not actual case hardening that you would get from a gunsmith that uses a air tight container in a furnace.

I learned this method from Jess Mellot of the Rifle Shoppe.
 

Attachments

  • 250DB249-FB29-4DE3-B137-4F7C04DD6761.jpeg
    250DB249-FB29-4DE3-B137-4F7C04DD6761.jpeg
    46.2 KB
  • 67A35605-D5E5-4615-9679-5EF6D8D6DE5D.jpeg
    67A35605-D5E5-4615-9679-5EF6D8D6DE5D.jpeg
    51.7 KB
  • 98E01A03-21B7-43E3-87B8-8051FD6C0415.jpeg
    98E01A03-21B7-43E3-87B8-8051FD6C0415.jpeg
    29.4 KB
Last edited:
For this frizzen I heat the part to cherry red, then let it bake in carbon powder / kasinite / true spark by TOW works well. Then I quench in a mixture of ice water and diluted tree stump remover (spectrad only works bc of its Potassium Nitre content) around 1 cup of stump remover to 2-3 cups of water fully diluted and mixed, drop in some ice cubes.

For the heat treating part I heat with a Propane Torch and I use a graphite crucible for the part. Graphite is an excellent heat moderator and will maintain an extremely high temperature.

Just to note, this is a mild type of case hardening, its not actual case hardening that you would get from a gunsmith that uses a air tight container in a furnace.

I learned this method from Jess Mellot of the Rifle Shoppe.
FlinterNick, how long do you bake in carbon powder / kasinite / true spark
thanks, Joe
 
FlinterNick, how long do you bake in carbon powder / kasinite / true spark
thanks, Joe

Doesn't look like FlinterNick has been back to this thread to answer your question.

There are two aspects that influence the answer to your question.
  1. Whether you are working with a modern frizzen made of high carbon steel
  2. Whether you are trying to case harden mild steel or just trying to get the color but not necessarily case harden.
Products like Kasenit, Cherry Red, or Tru-Spark are typically used on modern frizzens made of high carbon steel to prevent decarbonization of the frizzen face. This is especially important if the frizzen is being heat treated in a furnace. Without it, carbon can be burned out of the surface of the steel during a prolonged heat cycle. The case harden compound will provide a carbon rich environment on the face of the frizzen that prevents carbon burn out.

FlinterNick appears to be using the case harden compound on the back of the frizzen to achieve the color only, as this part of the frizzen doesn't need any wear resistance. In this case, the bake time or soak time is not critical and doesn't need to be very long--just a few minutes.

The key to the color and pattern that FlinterNick is getting is the potassium nitrate in his quench water. Without the potassium nitrate, the part treated with Kasenit would just have a dark gray finish.

The master gunmaker, Jack Brooks, uses the same technique as FlinterNick with Kasenit and potassium nitrate in the quench water when he wants to color case a gun part. Below is a picture of the lock on one of Jack's Leman Indian rifles that has been case colored this way.

IMG_2899.JPG
 
Back
Top