• Friends, our 2nd Amendment rights are always under attack and the NRA has been a constant for decades in helping fight that fight.

    We have partnered with the NRA to offer you a discount on membership and Muzzleloading Forum gets a small percentage too of each membership, so you are supporting both the NRA and us.

    Use this link to sign up please; https://membership.nra.org/recruiters/join/XR045103

Chisel "Dammit" Moment In Walnut Stock

Muzzleloading Forum

Help Support Muzzleloading Forum:

This site may earn a commission from merchant affiliate links, including eBay, Amazon, and others.

azsixshooter

36 Cl.
Joined
Feb 16, 2019
Messages
58
Reaction score
58
Location
Pinckney, MI
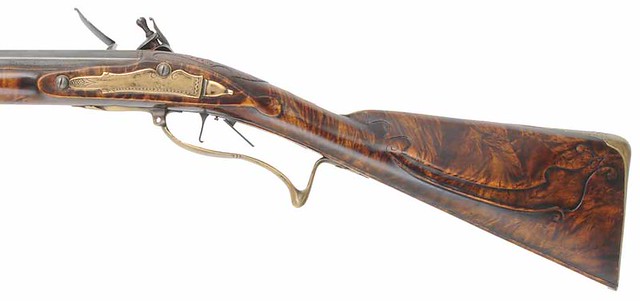
Well, I thought I was done with the rough sanding on my GPR stock this weekend and ready to get to finish sanding. I noticed that underneath the lock boss there was a lot of extra wood that didn't blend with the forestock and buttstock after I thinned out each of them. So I started getting after it with some 100 grit wrapped around a small metal block to keep nice square edges.

I was making slow progress when I got the bright idea to tap a chisel through that area and speed up the process. It wss going fine until I got a little impatient and rushed one little tap and caught the grain wrong and splintered a big ugly chunk right out of the raised boss that the lock sits in. I'm sure many of you know exactly how I felt at that moment!

So now I'm trying to fix this goof-up and I am taking the thinned portion of the stock below the boss higher up than I would have liked and I'm also having to sand down the boss more than I originally intended to in an attempt to remove this unsightly chip-out.

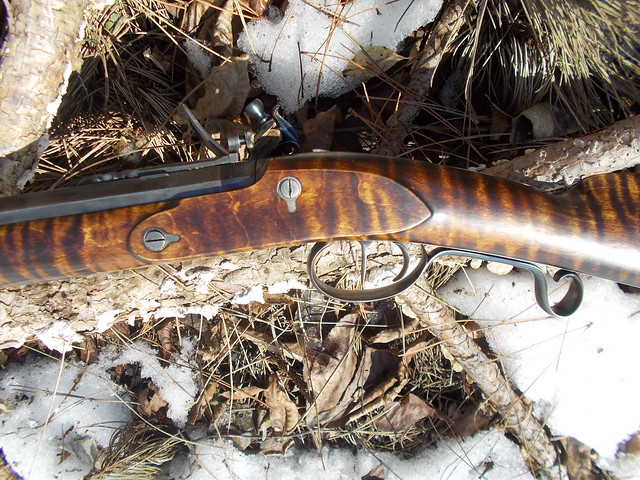
Today I _carefully_ chiseled the other side and it worked out the way I wanted the lock side to (because I took my time and didn't rush).

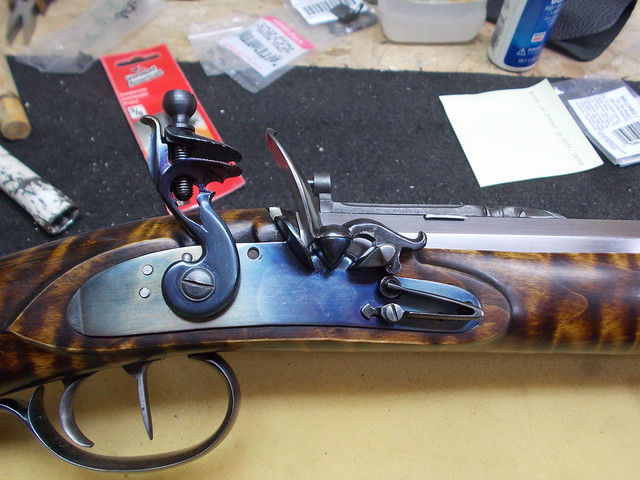
I think I will be able to sand out the ding but now I'm concerned that when I put my lock on it won't sit far enough down into the mortise to be flush with the boss. The only thing I can think to do to fix that is to deepen the mortise. But then that seems risky because there are a lot of very fine little thin walls in there and I'm afraid I might inadvertently break something and make it even worse. Or make it too deep and have the pan not line-up with the touch hole. Or some other unforeseen problem I haven't even considered.

I'm mainly just asking if I should bother trying to fix this anymore than I already have and if deepening the lock mortise is a bad idea. Also, if I do deepen the mortise what are the best tools for that kind of delicate work? I was thinking an extremely sharp and small chisel weilded very carefully and maybe a custom hacksaw blade scraper tool like I have seen others mention on here.

This is the first time I've ever worked with walnut and it sure seems like a fussy wood to carve. It seems to want to splinter and chip-out if you look at it the wrong way. It's probably just my inexperience, I imagine skilled gunmakers wouldn't have been using it if it wasn't a good choice. Seems like maple would be a lot easier to work though.

I'll post a few pictures, thanks for any thoughts and God bless,

Steve
20201005_000357.jpg
20201005_000407.jpg
20201005_092444.jpg
 
Last edited:
I would leave it be, if I am looking at the right place forward under side of the moulding, if this is going to be a hunting rifle there are more dings along the way, after you stain the stock and oil it or whatever I do not think it will be that noticeable. The other thing (never seen one as I will say ) could you bevel the edge. Might want to wait on more input as to the fix before doing that.
 
Leave it as is. While you're at it, think about reshaping the lock panels at the rear. Look at pictures of original Hawkens to get the idea.
I have Hershel House's DVD set on building Hawken rifles. In the beginning he has a collector show some originals that were actually made by the Hawken brothers I believe. I'll check those out and see if I can tell what you mean.

I put the lock in and took a breath of relief as it is still sitting slightly deeper than the lock panel, moreso in the rear than in the front where the chip is, but I think I'm in pretty good shape. I can sand it down flat and flush and it should look nice when it's all done. I'll always know that chip is there, but also it will always remind me to slow down and take pleasure in whatever I'm doing at the moment and quit letting my mind get ahead of my hands.

20201005_125113.jpg
20201005_125124.jpg
 
Last edited:
Steve, the bottom of the lock mortise and the side plate area aren't "carved" in. If you look closely at pictures, you'll see that the bottom of the stock IS the bottom of the mortise.

Here are a couple of pictures. Note that the bottom of the mortise is all the way down to the bottom of the stock. While this is a Virginia style rifle and the overall shape of the mortise is different than a Hawken or Plains Rifle, both would have the bottom of the stock and mortise as one.

38395588212_22058c97b2_z.jpg


38395588382_7cf684947a_z.jpg


Here are the same views from a Hawken I built:

16540126067_2ae0b7fcd3_z.jpg


16729529896_a784f9f021_z.jpg


My apologies if I am misinterpreting your pictures.

If you are referring to that small chip toward the front of the lock mortise, I think a little reshaping could eliminate that.

The real issue with many production guns and kits is way too much wood. I'm not recommending this because I have no idea where your ramrod hole is relative to the bottom of the stock, but IF it was high enough up, and the trigger set could still be worked being closer to the lock, I'd be removing a lot of wood off the bottom. That would, however, entail re-inletting the trigger plate and guard and reworking the trigger bars to interact correctly with the lock sear. So one thing just leads to another, which may be more than you want to take on.
 
Spikebuck-

I completely know what you mean and you are seeing the pictures correctly. I got looking at it and assumed the fore stock and the butt stock sections should flow together at the same thickness below the lock mortise and side plate and went ahead and "carved it in" as you said. I understand what you mean about taking wood off the bottom and raising it up to meet the mortise and lock plate again to fix my error, but I don't know if I want to open that particular Pandora's box at this point in my gunbuilding career. I'd hate to screw it up to the point where it's not mechanically functioning as well as it is now. At this point my goof is pretty much just aesthetic and I can probably live with the "carved in" look for now. But thank you so much for the pictures and that Hawken you built looks like a beauty from what I could see.

PeteG-
I watched the first part of the House DVD where he goes to see Art Russell in St. Louis and Mr. Russell goes over a real Hawken rifle and points out many typical features found on a Hawken. I think I see what you mean about reshaping the lock panels as the rifle he is displaying has much more pointed ends both fore and aft than the way mine currently look. I like that because if I reshape the front of the lock panel where I put that chip in with the chisel I think I'll be able to eliminate that area completely and have something that looks more like an actual Hawken Brother rifle. So thanks a million for that tip, I feel a lot better about that now!

In watching Mr. Russell point out some of the subtleties of Hawken rifles he draws the viewers attention to the beaver tail cheekpiece and how the line curves around it and continues right up the wrist into the mortise area gracefully. I realized that not only am I not finished with the rough sanding as I thought I was, but now I have to go back and chisel a lot more wood off to blend the cheekpiece into the comb area. At least I am hoping there will be enough material there to make it look good. I should have done it that way from the beginning.

I don't know why I thought it should be sticking out so much up by the comb and I never liked the way I messed up and made it kind of teardrop shaped. Now I see that I can slant the beavertail inwards to the comb and have a nice smooth transition rather than a hard ledge as I have it now. I started working on that tonight but I thought I'd snap a few pics to show what I'm now going to be altering. I traced out some of the lines I want to get with a pencil and I think the pictures will show better than I can explain what I need to do to better blend the cheekpiece into the comb.

As always, I appreciate and invite any comments or advice on how I can improve this build. Thanks for everyone's help, I know someday this will be a great rifle to hand down to my daughter and maybe, someday, she'll have a son or daughter who will appreciate a family heirloom like this.
20201007_015456.jpg
20201007_015503.jpg
20201007_015510.jpg
20201007_015520.jpg
20201007_015525.jpg
 
20201007_025738.jpg
20201007_031726.jpg
Here is a pic of the beavertail cheekpiece on the original Hawken shown in Hershel House's DVD and the small progress I made tonight working towards making mine blend like that.
 
Careful mate
It is easy to remove wood. Hard to replace. You can always take more off.
I think the back of the lock mortise should point down the wrist. Seriously have a good look at as many piccies as you can before you take off wood.
Make sure to note the frame of the mortice around the lock both in thickness, shape and profile.
I have found the gun building youtube videos really good in particular from Bill Raby and Michael Bellevue.
 
One thing I notice is a mistake I made when I started building; cutting out the lock and sideplate bosses at a 90 degree angle around the edges. Instead, get a 4-way 1/2 round rasp and remove wood with it around the boss, letting it flow into the stock, instead of standing abruptly proud. Don't feel bad, I screwed up a p++ maple full stock back in the '80s when I tried to 'chisel' it in. If you are careful, you may be able to correct your bosses with a rasp, but go slowly and take your time. The beauty of this hobby is it gets you away from the madness that rushes our modern existence. Congratulations on learning to build; it takes a form of courage to jump in and do it. Things will go better as you gain experience; something no one can take from you. You will also become a philosopher, LOL! I agree that black walnut is sometimes chippy. So is maple if it is kiln dried too much. Too bad the bugs are eating up all the ash trees, it is good to work and when stained walnut is almost indistinguishable from it. Good luck in your building and don't give up! George.
 
... letting it flow into the stock, instead of standing abruptly proud.

Think of these areas as "transition" areas from one level of the stock to another. It's kind of like a geological plain and a plateau with a sloping hill in between them vs a cliff. One way you get the crisp edge on your mortise edge is the last step in your final sanding by using a sanding board to be sure you have a perfectly flat sandpaper base and with a fine sandpaper just do a few light strokes holding it down flat on the entire mortise. This will cause the top edges on the "plateau" to become very distinct.

My experience is that it's not easy to look at guns made by the masters and just automatically pick up on all the features that make them look so great. Over my time on this forum, I have learned SO much from the many great builders that frequent this space. I cannot thank them enough for taking time to spread their building knowledge here. There are also some great books out there where one can learn a lot about the building process and how to build a pretty fine looking traditional firearm.

Regarding my point on just how much excess wood is on production guns/kits, below is a link to a Flickr album I put together when I completely re-vamped a Pedersoli Frontier. Once in the album, if you double click a picture, it enlarges and you can see my comments below it. Then you can move from picture to picture in that mode. This was a fun project I did to just see what could be done with a production gun. Lots of before and after pics.

https://www.flickr.com/photos/100435142@N08/albums/72157650877821348
 
Wow! I went through all 377 pictures and that was awesome! You must be really happy with how that came out, I love the pictures of it outside on the logpile with the snow. Looks like she's in her perfect environment!

I got home late from work tonight but managed to put in an hour or so working on my stock. It's coming along, but I have more work to do to get the blends right. I like the angled look and I might try to get some of that back around the lock panels if I haven't messed them up too bad.

I'm much happier with the way the beavertail is coming out. I never liked the way it looked before, I am so happy that I chipped my lock panel with that chisel! If I hadn't done that I wouldn't have created this thread. I probably would have finished sanding and gone right on to do the stain and finish and end up with something I wouldn't really like.

Thanks for all the tips, you guys are great and really helped me pull my bacon out of the fire!

20201010_041435.jpg
20201010_041456.jpg
20201010_041509.jpg
 
Steve, the bottom of the lock mortise and the side plate area aren't "carved" in. If you look closely at pictures, you'll see that the bottom of the stock IS the bottom of the mortise.

Here are a couple of pictures. Note that the bottom of the mortise is all the way down to the bottom of the stock. While this is a Virginia style rifle and the overall shape of the mortise is different than a Hawken or Plains Rifle, both would have the bottom of the stock and mortise as one.

38395588212_22058c97b2_z.jpg


38395588382_7cf684947a_z.jpg


Here are the same views from a Hawken I built:

16540126067_2ae0b7fcd3_z.jpg


16729529896_a784f9f021_z.jpg


My apologies if I am misinterpreting your pictures.

If you are referring to that small chip toward the front of the lock mortise, I think a little reshaping could eliminate that.

The real issue with many production guns and kits is way too much wood. I'm not recommending this because I have no idea where your ramrod hole is relative to the bottom of the stock, but IF it was high enough up, and the trigger set could still be worked being closer to the lock, I'd be removing a lot of wood off the bottom. That would, however, entail re-inletting the trigger plate and guard and reworking the trigger bars to interact correctly with the lock sear. So one thing just leads to another, which may be more than you want to take on.
In the last picture the "washers" have a tab. On my rifle it too has a tab. Why did they go to the effort of a tab?
 

Latest posts

Back
Top