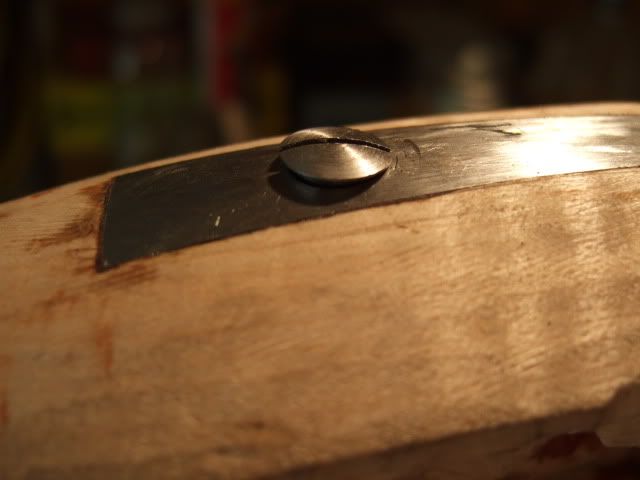
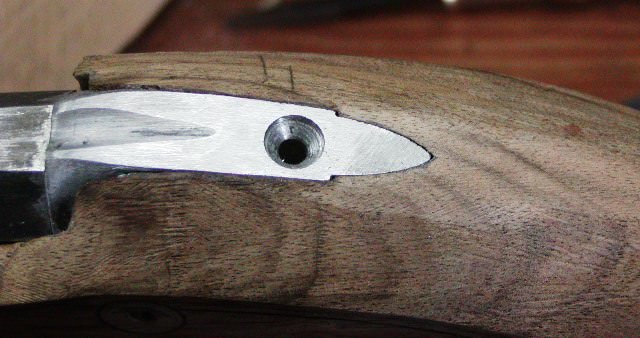
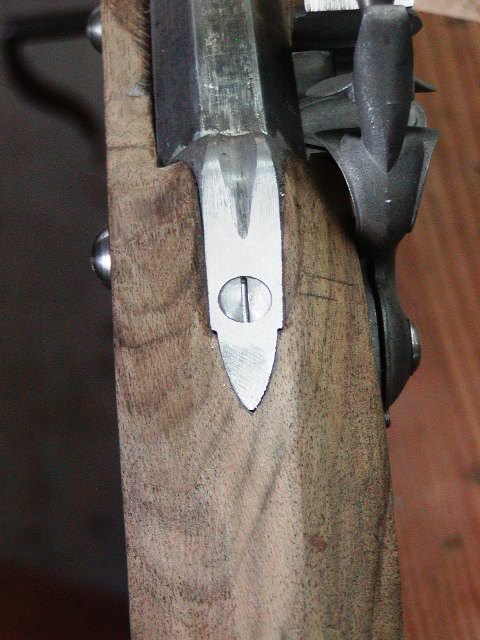
countersinking tang bolt head into tang

Muzzleloading Forum

Help Support Muzzleloading Forum:

This site may earn a commission from merchant affiliate links, including eBay, Amazon, and others.
joehenz

Sorry for assuming there was more material in the trigger plate. I see why you did what you did.

With that trigger plate there is not much room to move the location of the thru hole around so if you choose to redrill the hole you will need a new trigger plate.
Redrilling will also locate the screw head very close to the end of the tang and that will look a bit odd too.

Perhaps the easiest way out would be to just increase the depth of the countersink in the tang so the head of the screw is flush at the rear and slightly under the surface at the front.
That may require a fairly large countersink diametrer so you may want to consider reducing the diameter of the screw head a bit.

To reduce the diameter of the screw head, chuck the screw in a electric drill to provide some rotating power and carefully filing the coned area of the underside of the head.
If you maintain the same angle and are careful not to undercut the body of the screw the size of the countersink in the tang won't need to be as large.
The smaller head will also make the misalignment of the head with the tang less obvious.

Just a thought. :hmm:
 
Were it me, I'd just buy a new plate. As cheap as I am sometimes though, I might drill out the hole to a common size of brass rod, rivet the hole shut, remove the screw boss, then hard silver solder a new boss on it, and start over.
 
Thanks to everyone for their input. TANG really is a four-letter word, isn't it?

At this point I'm going to just turn down the head as Zonie suggested and live with a countersink divot upstream of the head. I looked on my factory-made Cabelas Hawken and that's the way it is on that piece. I don't have the skills and equipment to weld, and I'm sure not going to replace the breech plug to fix a small cosmetic defect.
 
I agree with your decision as to how you are going to continue. In my opinion, the problem is only a cosmetic one that the average person would probably not even notice. If you can live with it, leave it as it is and chalk it up as a lesson. I'm sure you will want to build another rifle again, and you'll know then not to make the same mistake.
 
I'm doing my first-ever build. Half the time I'm making newbie mistakes, the other half I catch myself before I do something stupid. So far - knock on curly maple - I haven't done anything that would cause me to have to scrap the stock.

I have a question on the tang bolt. With much trepidation, I successfully drilled the hole through the tang and trigger plate (that center-to-center drilling jig in a drill press actually works!) and threaded the trigger plate.

I countersinked the tang some, but not enough. My question is how do you guys get the screw head to be flush all the way around the tang? I aligned the tang bolt hole such that it wouldn't go through the trigger guard at an angle, and I was successful at achieving that. However, that leaves me not exactly tangent with the arc of the tang. The photo below may make more sense:

DSCF4554.jpg
I just screwed my tang screw (8-32) into the newly tapped--did it this morning-- trigger plate. I had previously hand filed a bevel under the domed screw head and hand "did" ( hand cranked old thing)a corresponding bevel in the hole in the tang. I used a 90 degree "sink" and have an 82 degree one on standby. I could go a little deeper. Darn it if my head is canted like yours. What to do? Maybe use a screw with a different shaped head side and counter bore? I probably have a large drill bit around here. Right now the slot is parallel to the barrel when the current screw is tight. I could live with it.
 
Hi,
The solution is to counterbore the hole. It is not always possible to drill the bolt hole perfectly perpendicular to the tang. I do what good British gun makers have done for centuries. There are special counterbore bits you can buy but I simply select a drill slightly smaller than the diameter of the head of the bolt. Then I drill down into the existing bolt hole just sufficient to have vertical sides on the hole. Then I take a 5/16", 3/8", 1/4", etc counter sink whatever size fits the enlarged hole and countersink the bottom of the larger drilled hole so it matches bottom of the bolt head. Then I turn the head of the bolt to the size of the hole making a square shoulder on the head. Now the top of the bolt head has some depth that can be filed perfectly flush with the tang. Here is an example showing the counter bored hole, note the vertical sides. The bolt head is then turned to fit the vertical sides and the top filed to whatever shape I want.

YMHMiId.jpg

NT2NEIM.jpg


It is far superior to simple counter sinking because you can file the screw driver slot almost as deep as the vertical sides of the bolt head and you can fit your trigger plate wherever it is best rather than be forced to position it wherever your "perpendicularly" drilled tang bolt comes out the bottom of the stock.

dave
 
Don't countersink the bolt hole but rather radius the head of the tang screw with your drill and a file*. You can adjust both the head diameter and the depth with this method. Sorry if it's already been mentioned, as I didn't read the whole thread. I just thought the simple remedy was obviously the best solution. If it doesn't work, starting with a new tang screw, easiy replaced, is a whole lot better idea than dealing with a machined tang, NOT easily replaced, IMO.

* This is, BTW, Jim Kibler's method for dealing with screw heads that don't quite fit their screw holes.
 
Last edited:
I'm doing my first-ever build. Half the time I'm making newbie mistakes, the other half I catch myself before I do something stupid. So far - knock on curly maple - I haven't done anything that would cause me to have to scrap the stock.

I have a question on the tang bolt. With much trepidation, I successfully drilled the hole through the tang and trigger plate (that center-to-center drilling jig in a drill press actually works!) and threaded the trigger plate.

I countersinked the tang some, but not enough. My question is how do you guys get the screw head to be flush all the way around the tang? I aligned the tang bolt hole such that it wouldn't go through the trigger guard at an angle, and I was successful at achieving that. However, that leaves me not exactly tangent with the arc of the tang. The photo below may make more sense:

DSCF4554.jpg

You’re a little off target, to remedy i would counterbore instead of courter sink, make sure your counterbore has extra room to accommodate the 7-10 degrees extra this way the entire screw head will be below the tang surface, leave a little extra so you can file it flat and flush.

1720475404306.png
 
Hi,
The solution is to counterbore the hole. It is not always possible to drill the bolt hole perfectly perpendicular to the tang. I do what good British gun makers have done for centuries. There are special counterbore bits you can buy but I simply select a drill slightly smaller than the diameter of the head of the bolt. Then I drill down into the existing bolt hole just sufficient to have vertical sides on the hole. Then I take a 5/16", 3/8", 1/4", etc counter sink whatever size fits the enlarged hole and countersink the bottom of the larger drilled hole so it matches bottom of the bolt head. Then I turn the head of the bolt to the size of the hole making a square shoulder on the head. Now the top of the bolt head has some depth that can be filed perfectly flush with the tang. Here is an example showing the counter bored hole, note the vertical sides. The bolt head is then turned to fit the vertical sides and the top filed to whatever shape I want.

YMHMiId.jpg

NT2NEIM.jpg


It is far superior to simple counter sinking because you can file the screw driver slot almost as deep as the vertical sides of the bolt head and you can fit your trigger plate wherever it is best rather than be forced to position it wherever your "perpendicularly" drilled tang bolt comes out the bottom of the stock.

dave

Ah Dave you beat me to it !

follow Dave’s advice.
 
Easy fix. Don't need to re drill anything. I did a video showing exactly how it is done. Don't have a link right now. Go to Rumble and look up 4 Bore Rifle Build #2. Click on one of the more recent ones. Then click on Show More in the description. There will be table of contents. Find the one with tang bolt. It goes into plenty of detail on how to make it flush no matter the angle.
 
Hi,
The solution is to counterbore the hole. It is not always possible to drill the bolt hole perfectly perpendicular to the tang. I do what good British gun makers have done for centuries. There are special counterbore bits you can buy but I simply select a drill slightly smaller than the diameter of the head of the bolt. Then I drill down into the existing bolt hole just sufficient to have vertical sides on the hole. Then I take a 5/16", 3/8", 1/4", etc counter sink whatever size fits the enlarged hole and countersink the bottom of the larger drilled hole so it matches bottom of the bolt head. Then I turn the head of the bolt to the size of the hole making a square shoulder on the head. Now the top of the bolt head has some depth that can be filed perfectly flush with the tang. Here is an example showing the counter bored hole, note the vertical sides. The bolt head is then turned to fit the vertical sides and the top filed to whatever shape I want.

YMHMiId.jpg

NT2NEIM.jpg


It is far superior to simple counter sinking because you can file the screw driver slot almost as deep as the vertical sides of the bolt head and you can fit your trigger plate wherever it is best rather than be forced to position it wherever your "perpendicularly" drilled tang bolt comes out the bottom of the stock.

dave
Excellent tip Dave! Thanks for posting this.
 
Hi,
The solution is to counterbore the hole. It is not always possible to drill the bolt hole perfectly perpendicular to the tang. I do what good British gun makers have done for centuries. There are special counterbore bits you can buy but I simply select a drill slightly smaller than the diameter of the head of the bolt. Then I drill down into the existing bolt hole just sufficient to have vertical sides on the hole. Then I take a 5/16", 3/8", 1/4", etc counter sink whatever size fits the enlarged hole and countersink the bottom of the larger drilled hole so it matches bottom of the bolt head. Then I turn the head of the bolt to the size of the hole making a square shoulder on the head. Now the top of the bolt head has some depth that can be filed perfectly flush with the tang. Here is an example showing the counter bored hole, note the vertical sides. The bolt head is then turned to fit the vertical sides and the top filed to whatever shape I want.

YMHMiId.jpg

NT2NEIM.jpg


It is far superior to simple counter sinking because you can file the screw driver slot almost as deep as the vertical sides of the bolt head and you can fit your trigger plate wherever it is best rather than be forced to position it wherever your "perpendicularly" drilled tang bolt comes out the bottom of the stock.

dave
I put in an order for a 3/8" diameter counterbore with a 90 degree slope. Did that just after I posted this. It already has a shipping number. I have one extra tang screw that I have not messed with. 3/8 inch diameter round head slotted and no bevel under the head. Maybe I can locate an 8-32 screw with a larger head or one that has straight sides. Thank you. I took a nap an have just looked at that problem screw. It could be passable with just a tad of lowering, I don't have a 3/8" diameter bit. Wish I had ordered one today.
 
Last edited:
Thanks to everyone for their input. TANG really is a four-letter word, isn't it?

At this point I'm going to just turn down the head as Zonie suggested and live with a countersink divot upstream of the head. I looked on my factory-made Cabelas Hawken and that's the way it is on that piece. I don't have the skills and equipment to weld, and I'm sure not going to replace the breech plug to fix a small cosmetic defect.
I'll say this I have several Original English double barrel shotguns. And a few of them have a combination of filed screw head on a angle to match the tang and also a larger countersink hole. And diameter of the head made smaller. But if the wood was to srink That does create a problem tighten the screw ? But the guns I have are made 1860's and screw driver slot is still in line and correct. So not sure if that is a issue.They were like that from the builder
 
Wow, only took 15 years to come up with the right answer. Original post is from 2009. Hope this guy hasn’t been waiting that long.
Thanks to a word search of this site I was able locate this old thread. The counter bore arrived today, but I won't try it until an oval head tang bolt gets here from Track of the Wolf. It already has a beveled head base. Could not find a 2 " long Fillister head 8-32 screw with a beveled base.
 
I put in an order for a 3/8" diameter counterbore with a 90 degree slope. Did that just after I posted this. It already has a shipping number. I have one extra tang screw that I have not messed with. 3/8 inch diameter round head slotted and no bevel under the head. Maybe I can locate an 8-32 screw with a larger head or one that has straight sides. Thank you. I took a nap an have just looked at that problem screw. It could be passable with just a tad of lowering, I don't have a 3/8" diameter bit. Wish I had ordered one today.
19 July 2024 Used a combination of the 3/8 diameter 82 and 90 degree counterbores and tidied up the tang head angle so it isn't so obvious. This time I held the bits 90 degrees to the tang even though the screw is angled towards the muzzle. I sure wish I had not previously held that 82 at a slant towards the muzzle. I think I have a screw with a slightly larger head A small triangular file is being delivered this afternoon. That is for redefining lines in the brass trigger guard, not inlet yet. I was fooling around with the double triggers (installed and screw down). Wouldn't you know it? When rifle is cocked, and the set trigger set, a slight forward push on the set trigger will let down the ****. That was last night. This morning I can **** the Davis lock and set the rear trigger, but neither trigger will let down the **** no mater which way they are pushed.
 
What we have here is... not a failure to cah mune na cate. After more filing of the rear trigger leaf blade there was no solution. I tightened the big spring's screw. Now I have a situation/adjustment I can live with. Now the rear trigger must be set before cocking to half way or fully cocked. When the **** is at 1/2 the shooter cannot fire the rifle in any way. Set trigger, being set ahead of time, can be unset by pulling the front trigger. But being in the half ****, the **** won't move. The only option for the shooter is to go to full ****. The rear set trigger cannot be pushed forward, which was the initial unsafe problem. The forward trigger can be used to fire the rifle. Or the **** can be held back while the front trigger is pulled and the **** lowered. Next is to put on the trigger guard and then drill and install the touch hole.
 

Latest posts

Back
Top