• Friends, our 2nd Amendment rights are always under attack and the NRA has been a constant for decades in helping fight that fight.

    We have partnered with the NRA to offer you a discount on membership and Muzzleloading Forum gets a small percentage too of each membership, so you are supporting both the NRA and us.

    Use this link to sign up please; https://membership.nra.org/recruiters/join/XR045103

CVA Hawken lock / hammer issue, HELP!

Muzzleloading Forum

Help Support Muzzleloading Forum:

This site may earn a commission from merchant affiliate links, including eBay, Amazon, and others.

PeteA

36 Cal.
Joined
Dec 13, 2015
Messages
50
Reaction score
0
I have a 50 cal CVA Hawken that I've just started shooting. It has preformed well at the range the last 4 outings. But it has developed a lock / hammer / trigger issue.

At half **** the hammer is solid. But when pulled back to full **** the hammer will sometimes not even engage to the full lock possition. If it does engage it will go off with the slightest pressure to the back of the hammer. It never did this before and it seems it is to the point of being unsafe.

I'm new to firearms so have no idea of how to make the any adjustment needed. I'm not even sure how to take off the lock! I'm hoping I can get the issue identified and some insight as to how I might correct it. HELP!!!!

Thx
PeteA
 
there is a small screw in the tumbler of the lock that adjusts sear engagement it is likely adjusted too far in, not allowing enough sear engagement or the trigger bar is not allowing enough room for the sear to fully engage. loosen the tang screw and see if that makes it solid in full ****, if it does, remove some metel from the trigger bar, if it dosen't help, back the sear adjustment screw out a little and check it again
 
Hey Khufu,

Do I take the barrel off to get to tge lock mechanisum? Or do I have to take thd lock completely off? If so how do I do that?
 
Well you probably have a couple thing going on.
You need to dis-assemble your gun.
*Pull the barrel.
Don't worry these things are simple 400yr old technology. Simple levers and cams. No parts are going to go flying around.
*Look in that hole in the barrel channel near the lock, there's a small flat spring that helps hold the ramrod in,, it's held in place with the front lock bolt. Just note it's position, pull the front lock bolt and don't loose that flat spring.

*There are two bolts opposite the lock that hold the lock in,(you've already removed one) remove the other bolt (sometimes it's handy to just loosen them both a few turns and tap the bolt heads to help push the lock out), grab the lock and wiggle it around to get it out.
*Now you can clean and lubricate the lock internals, there's no need right now to dis-assemble the lock. Just use soapy water and a brush, or spray it down real well with one of the cleaners or brake cleaner, it needs to be clean.
If your using water, then it needs to be dried, right(?) no rocket science here.(heat helps, blow dryer?)

Goof around with the lock, **** the hammer, push on the sear lever with your thumb, work it back an forth, squirt a bunch of oil on those moving parts, shake off/wipe off the extra (yes you can use too much)
Now that oil you just put on will get old and gummy in just a few months, gummy oil will slow the movement down. The lock internals need to be cleaned and re-lubed at least 2-3 times a year.

*There's a screw in the tumbler of that lock that adjusts sear engagement, with your lock it should be backed off a bit; Play with it.
Untitled-6.jpg


There's a trigger issue too, I'll be back in a bit,,
 
just loosen the tang screw a few turns and see if the hammer is solid in full ****, that will tell you if its yhe trigger or the sear, no need to disassemble till you pin the problem down a bit further
 
Hey Necchi, cowboys1062 said you were the man to contact on this. Thanks for jumping in. I'm going to give this a try later this afternoon and will report back. Thanks for the clear explaination.
 
Loosen the tag screw and it seemed to fix the problem. But the tang screw is very loose. One I tightened up it becomes an issue again.
 
that means the sear adjustment screw is fine, you need to remove a small amount of metal from the triggrt bar at a time till the sear arm is not being pushed as the screw is tightened likely only a 32nd or 2
 
if you do not have set triggers, rhis is pretty straight forward, if they are set triggers as you pull the front trigger notice which bar rises, estimate where the bar touches the sear arm and remove a little metal from the trigger bar, and retry with tang screw tightened, repeat till there is lo play in the trgger at full **** and the sear is fully engaged
 
The Triggers;
Now one of the problems with these older rifles is people(previous owners) think all the screws have to be Gorilla tight! It's not the case, we're dealing with an old dry wood stock here not a modern steel one.
Over tightening of the screws through the years can(and does) squish the wood (compressed) and it's damaged. Sometimes shimming and or re-bedding the trigger inlet is needed (easy).
* Leave the lock out.
* Look in that round hole inside the lock inlet and work the triggers, see those "bars" moving? Those are the trigger cams/levers.
* Pull the trigger guard(2 screws) and set it aside.
The trigger plate is held in with one screw (in back under the trigger guard) and one tang bolt.
* From the top of the rifle, remove the front tang bolt, it's long, it goes all the way through from top down to the triggers, but once it's loose from the trigger plate it'll pull out.
* Remove the screw in back of the trigger plate, grab the triggers and wiggle it out.
This is your triggers;
Untitled.jpg


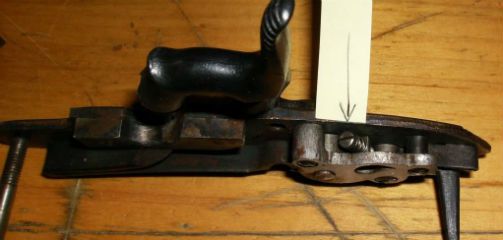
What you see here is the rear trigger cam in the unset position. The trouble with an older stock like I said is compression of the wood. What happens is folks over tighten that tang bolt, squishing the wood, and the trigger plate ends up too deep in the inlet,, that leaves the rear cam too high and it actually contacts that sears trigger arm of the lock(the rod that sticks out inside the lock),It shouldn't touch there, there needs to be a tiny gap so the sear arm can move freely.
* Clean and oil the triggers like you did the lock.
Everyone seems to know about the screw between the triggers adjust how far you pull the front before the rear releases when set, right(?)
But there more;
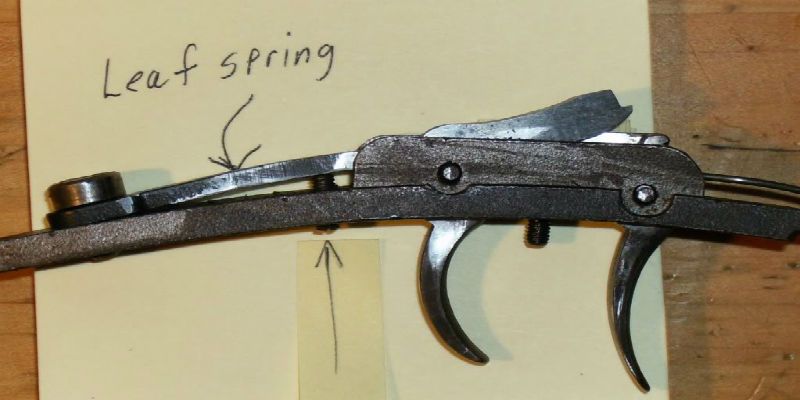
The big screw in back holding the leaf spring in adjusts how hard the leaf spring pushes on the rear trigger cam (I like it set pretty stiff), and that little screw underneath the leaf adjusts how far the leaf spring travels as it pushes the rear.
IF, you find out the rear cam is indeed too high to clear the sear arm,, you can turn that screw underneath in and the rear cam will ride a little lower.
You can go too far, the rear cam still needs to strike the sear arm with force.

What you describe in your first topic post is usually the compressed wood issue, but we did/do need to address the clean and oiled issue first.
So you got everything out, cleaned and oiled right?
The simple fix for compressed trigger inlet wood is to shim the front of the trigger plate where that tang bolt goes in, you can use folded up paper/cardboard, tiny washers, a piece of wood from a Popsicle stick,, what ever comes to mind and you may have to in-out with trigger a few times to get it right.

Put the lock in first, and don't forget that flat spring on the front lock bolt you took out first, it faces forward, curvy part down.

Come on back if you get hung up.
 
OK, here's the report from a not mechanically inclined person.

I took the lock off as you indicated, cleaned it and adjusted the tumbler screw a bit moving it out. It engage perfectly in both half **** and full **** while off the stock. As soon as I remount on the stock with the trigger mechanism the hammer does not engage. It's a bit sporadic, sometimes it engages in the half **** position. Full **** is not engaging at all. So, now that means its the trigger cam issue. Did I say I'm by no means mechanically inclined! - If I'm understanding your last post correctly I need to shim up two areas of the trigger, One on the front screw - between the trigger mechanism and the wood and the second in the rear. Is this correct?
 
Well kinda, but usually just a shim under the front will do the trick.
The trouble is caused by the Gorilla tightening of the Tang bolt in the front of the trigger plate.
It can take up to an 1/8" of solid shim, if you use paper/cardboard it's OK but keep in mind it'll squish too, just use enough.
Don't forget to clean an oil the triggers too.
 
OK gents here's the latest report.

Used a small piece of plastic milk container cut to fit in the tang slot as the shim. One layer did the trick.

Cleaned and oiler trigger. Previously cleaned and oiled the lock and adjusted tumbler screw.


Got everything back together and she seemed to be working pretty well. Made one final adjustment of the small set screw behind the set trigger. A turn at most. Betsy is now rock solid and back in action!

6 whole days until I can get to the range. Can't wait.

This process sure gave me a whole new look at all the working parts. I never had the rifle broken down to this extent. What a beautiful weapon.

Thanks very much to everyone for all the help and information. I'm hooked!
 
Cool, Cool :thumbsup:
These things are simple aren't they, olde school timeless simplicity.

There's instructions around here for full dis-assembly of the lock and triggers and polishing the moving parts of both,, if done properly and with proper lube these Spanish locks and triggers that so many speak poorly of can match the speed of nearly any lock out there.

Khufu said:
estimate where the bar touches the sear arm and remove a little metal from the trigger bar,
Yup, that can work too, if you go back and look at the photo of my triggers you can see where I did just that, I took quite a bit off.
But in my case the inlet of my Mountain Rifle was too far gone for that to work. I had to bed it with epoxy to help the wood and bring it back to the right height.
 

Latest posts

Back
Top