• Friends, our 2nd Amendment rights are always under attack and the NRA has been a constant for decades in helping fight that fight.

    We have partnered with the NRA to offer you a discount on membership and Muzzleloading Forum gets a small percentage too of each membership, so you are supporting both the NRA and us.

    Use this link to sign up please; https://membership.nra.org/recruiters/join/XR045103

CVA Kentucky Pistol Trigger Guard

Muzzleloading Forum

Help Support Muzzleloading Forum:

This site may earn a commission from merchant affiliate links, including eBay, Amazon, and others.

deanscamaro

45 Cal.
Joined
Mar 13, 2008
Messages
735
Reaction score
3
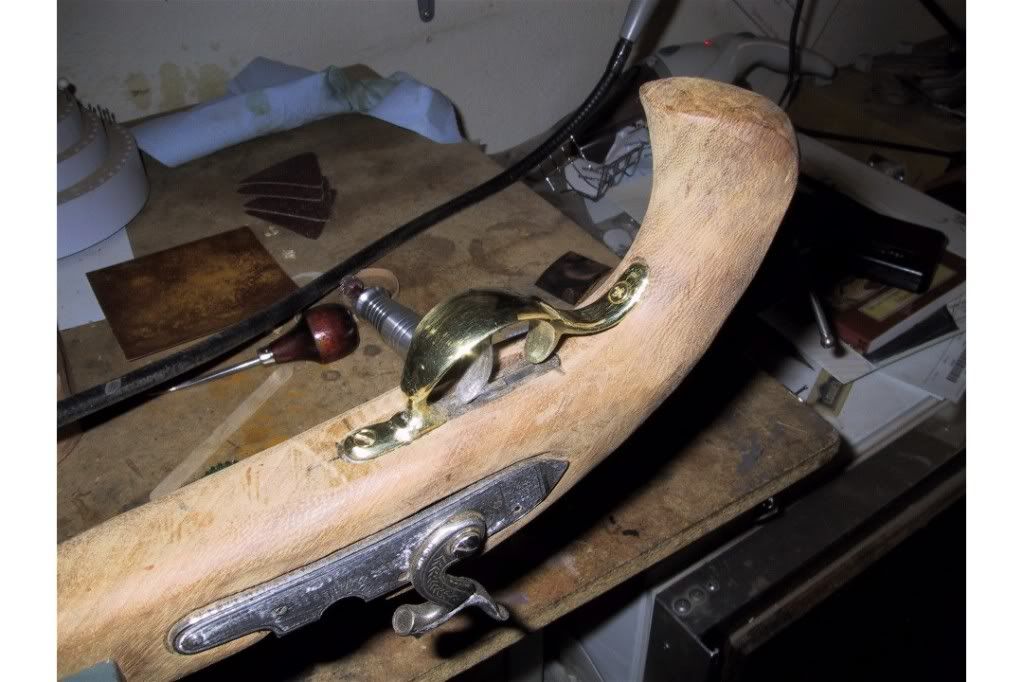
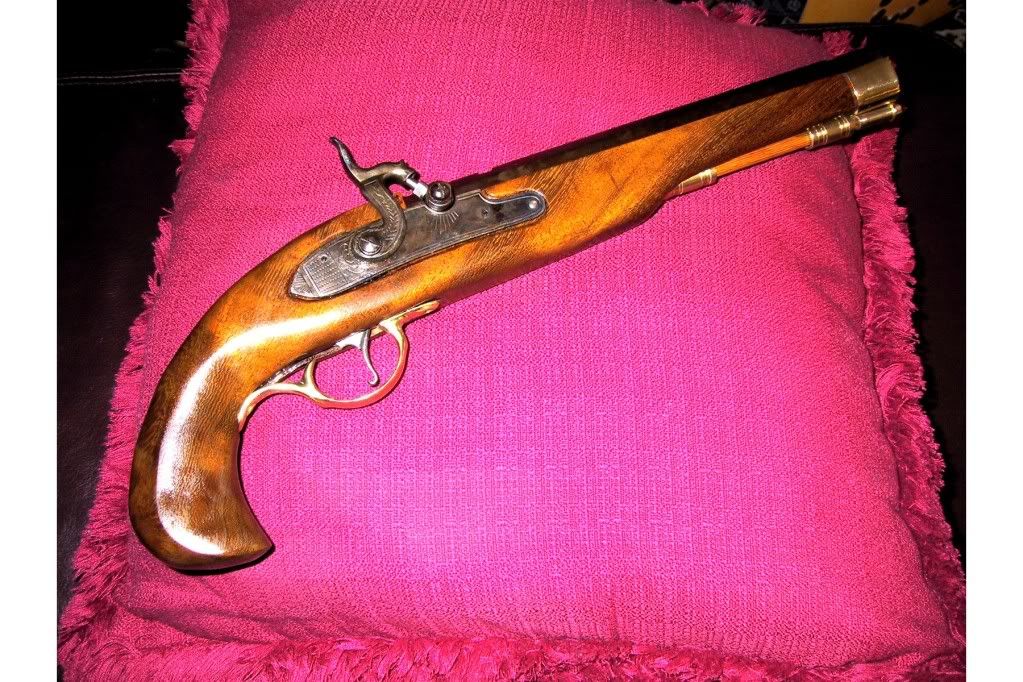
I was given an old, semi-finished, CVA Kentucky pistol kit to keep, if I could carve another stock (the original was split). I am not that experienced, but I decided I had nothing to lose. Have spent a lot of time taking a wood block to an almost finished stock. Nothing to brag about, but I am reasonably happy with it. I had tried to bend the back curl on the trigger guard to better fit the stock and cracked the brass piece. I found a website Muzzleloaders Builders Supply, LLC who had a cast brass one that was close and after grinding and polishing a very rough sand casting, have a guard that is much better than the original. Just thought I would let someone else with the same problem know where to go.
 
With 579 posts, you should know that "We want pictures" :blah:
 
Okay, here's a picture of the trigger guard on my klutzy effort to make a pistol stock from scratch. This is probably pretty common for most of you experienced builders, but for me, getting this sand-casted (very rough surface), brass trigger guard and converting it into a pretty good looking piece, was an accomplishement for me. The back curl and the nose were quite a bit longer when I received it. Please don't beat up my stock building skills too much. I still have a ways to go.

TriggerGuard.jpg
 
The stock and trigger guard look pretty darn good to me. :thumbsup:
 
Yep, that butt looks real nice done from scratch. Make sure we see the final product. What caliber did you get?
 
Would you believe I'm not sure??? It was given to me and I haven't really checked it since it isn't ready to fire; but I believe it is a 45 cal.(I have a 50 caliber and it is smaller). Okay, I went out and measured rifling with calipers and it is a 45 cal.
 
It looks like a good start to me.

One thing that detracts from your pistol is that Phillips screw. See if you can find a slotted head screw to replace it.

I know. Picky picky picky. :rotf:

Oh, another word of warning.
Once you have built something like this "the bug" will infect you and you will start thinking about building something else. :grin:
 
I don't mind someone pointing out the Phillips screw. Good point. I just pulled one out and put it in. I will find a brass, slotted head. All input is appreciated.
 
if you can't find a brass slotted head use a plated slotted but first soak it in muriatic acid and it will remove the galvanization and allow you to brown it.
 
Thanks for the advice. If I can't find a brass one, I will try that.

I had to look up Sheridan, Montana on Google Earth. I was born in Worland Wyoming and hadn't even heard of it. It looks like a nice place, off the beaten path.
 
Okay, Zonie, I had to go out to find a long drill bit to drill the hole for the ramrod. Looked for and found a slotted head, brass screw to replace the Phillips one. Put it in and on the last torque turn, it broke off down in the butt. SHEESCH!!! Now I have to work on a good method to get that out (any good ideas out there?). I figure I will have to backfill the hole afterward and drill another pilot for the screw. Life just isn't fair!

:barf: :cursing: :barf:
 
:grin: Success!!! I do power woodcarving and found a small, approx. 1/8" dia. fluted carving tool I had that happened to have carving flutes on the end of it too. I just put it in my Dremel, poked it down into the cavity and ground down the brass screw part that was still in the butt (it immediately started creating brass powder, so I knew it was working). Didn't take long before all the brass was gone (after some periods of smoke curling up out of the hot tool) and I plugged/glued a piece of scrap mahogany into the hole. Will redrill tomorrow and am probably back in business.
:grin:
 
Glad to hear you fixed the problem.

I didn't want to say anything before but as you had a problem with your brass screw I suppose now is the time to tell you.

Brass screws weren't used on guns prior to the 20th century and then only because the manufacturer wanted the screws to match the brass parts on the modern "reproductions" he was making.

Historically, steel (or iron) screws were always used, even to hold in a brass part.

Armed with that knowledge I'm sure you will feel better about using a steel slotted head screw in your trigger guard and you will have the added benefit of having a screw that won't twist off.

Some of you other folks who are building your Traditions, Lyman or Thompson Center kits might keep this in mind too.
One of the biggest complaints I've seen with those kits is that the poor brass screws furnished usually twist off right before they are tight.
 
Deano

Looks real good to me. If you can’t find un-plated steel wood screws locally I have some up to size 8. If you PM me I would be glad to give you some.


Tinker2
 
Brownell's, and I'm sure others, sells unplated slotted flathead wood screws. Expensive, however: $7 plus shipping for a dozen (!) - the price for authenticity.

Link: Brownell's wood screw kit

Zonie: The 'bargain' kit suppliers include brass screws as a teaching aid: you learn to get the right thing the first time, after you've gone to the trouble of drilling out a broken one.
 
Well, the saga continues. Got the first problem with the trigger guard fixed just fine. As I worked putting it together, some of the screws that were given to me with the unfinished kit, were dinged up. Being a Spanish made kit with M3-40 screws, which were a little difficult to find around here, I decided I wasn't going to be too PC concerned about using metric screws and decided to tap them out for 6-32 standard ones. Tapped a couple of brass thimbles and then went after the trigger (holds the front of the trigger guard down), which was steel. Almost had it tapped and the small tap broke off in the trigger. So now I am going to probably have to buy a new trigger, as drilling out the tap is going to be difficult and make it oversize. That leads to the next part of my saga.

I had gotten a new trigger guard from Muzzle Loaders Builders Supply in Ozone, Arkansas and looked to see if they had the trigger. Lo and behold they had one very close, that looked like it would work with some slight mod's. I took a picture of mine and along with their picture on the same page, asked their opinion on compatability. No answer for over a week. I called them this morning and guess what. They have been sold out to a guy by the name of Ryan Roberts in Aberdeen, Idaho. They told me they had just forwarded all the paperwork from the business to him this morning.

If I didn't have bad luck, I wouldn't have any luck at all.
:shake: :barf:
 
I had heard the business was up for sale. I guess they have found a buyer. I hope he gives the great service I have gotten from them over the years.
 
Before going to another trigger plate, try breaking the tap with a small pointed punch.Sometimes you can break up the tap enough to remove it from the hole. Taps are very brittle, and break almost like glass. I have even mounted a punch in the vice, point up, place my piece on the point and using another punch tried breaking pieces from both sides at once. This takes three hands, but after breaking a few taps just thought I would grow one. It's worth a try to save a hard to get part. I have even seen broken taps removed by heating everything to bright red and quenching in water. Taps sometimes shatter. Shouldn't hurt your trigger plate. Been there. Good luck
 
Well, instead of waiting until I fix the broken tap problem, I went ahead and finished everything else.

Probably repeating, but a partially finished kit was given to me (split stock) if I would make a new stock. A new stock from a block of wood, for a somewhat-newby like me was not easy and it took a long time and patience. If you are into restoring cars, it's a 10' job (it looks okay from 10' away, but don't look any closer).

The stock is shedua (I cut out, hand shaped and inletted), replaced the trigger guard with a brass sand casting (very rough, needing a lot of grinding/polishing), browned the barrel and lock and tapped some metric holes to standard. Finished the ramrod a lighter color for contrast (probably not PC, but I liked the look). Fun project.
:v :)

Ray_Pistol.jpg
 
Back
Top