I'm kinda interested in doing some simple engraving (I know, I WILL practice a bunch first!) but am at a loss as to what gravers I will need. At the price of them, I would only like to get 2-3 to start. What are the most common types/numbers to get. I will probably just be signing my name, dates, etc to start with. Thanks for any advise.
You are using an out of date browser. It may not display this or other websites correctly.
You should upgrade or use an alternative browser.
You should upgrade or use an alternative browser.
Graver questions
- Thread starter mazo kid
- Start date

Help Support Muzzleloading Forum:
This site may earn a commission from merchant affiliate
links, including eBay, Amazon, and others.
- Joined
- Aug 25, 2003
- Messages
- 6,527
- Reaction score
- 1,506
Your main working graver will be a square graver. In my experience, anything more than 1/8" is too much. I think mine is 3/32". You will need to mount it in a hardwood handle, or one of aluminum. The size, length, ect. will depend on you. Your hammer needs to be light. For me 3.5, to 4 1/2" oz., Total weight! You will also find a push graver handy for some work. You might want a flat graver also. The most important thing, is to learn to sharpen the graver. A Crocker jig will help greatly. Spend a little money, and buy Lynton McKenzie's first video. Buy the second if you want to learn more. Buy his video first thing. You will see what you are up against, and more of what you might want to get you going. I do warn you, it ain't as easy as it looks when Lynton does it.
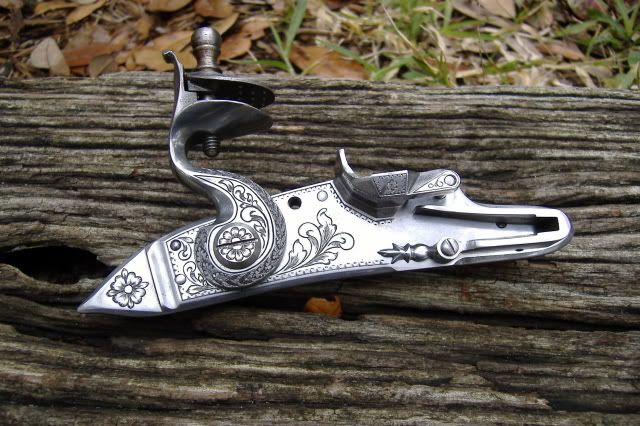
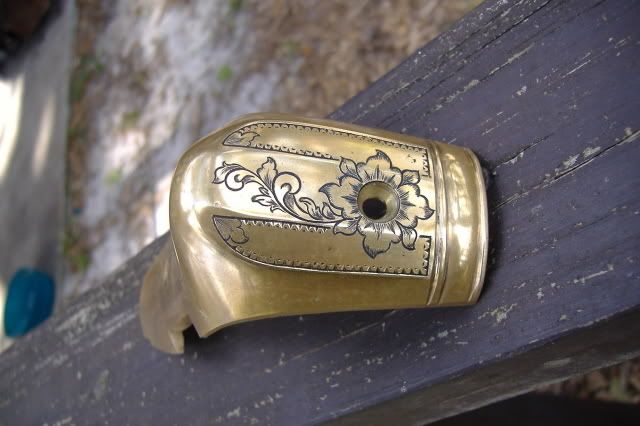


Dang Wick, that is nice work. You are, indeed, an artist.
Lynton McKenzie's video is available for rent from Samartflix. However, I gave up and bought the first DVD after waiting several months for all available copies to be returned.
You may have better luck than I had with smartflix. http://smartflix.com/store/category/74/Engraving
Lynton McKenzie's video is available for rent from Samartflix. However, I gave up and bought the first DVD after waiting several months for all available copies to be returned.
You may have better luck than I had with smartflix. http://smartflix.com/store/category/74/Engraving
Last edited by a moderator:
paulvallandigham
Passed On
- Joined
- Jan 9, 2006
- Messages
- 17,537
- Reaction score
- 94
My compliments, Wick. That is true Artistry in metal. I do believe any Art show would be thrilled to have your work displayed. :hatsoff:
- Joined
- Aug 25, 2003
- Messages
- 6,527
- Reaction score
- 1,506
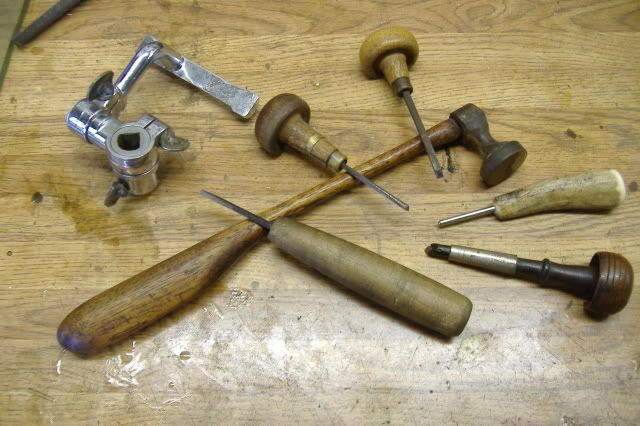
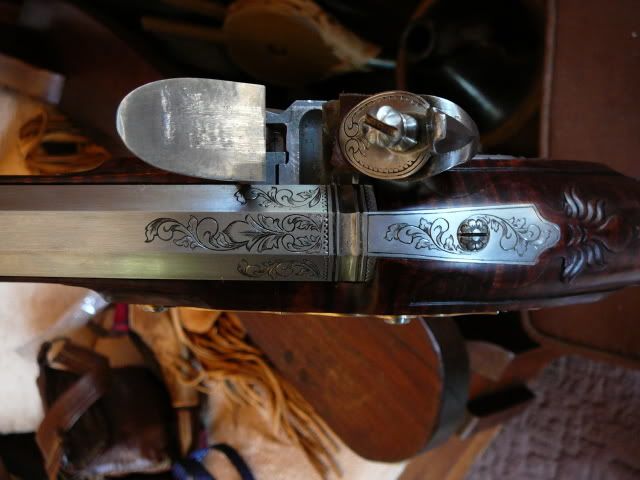
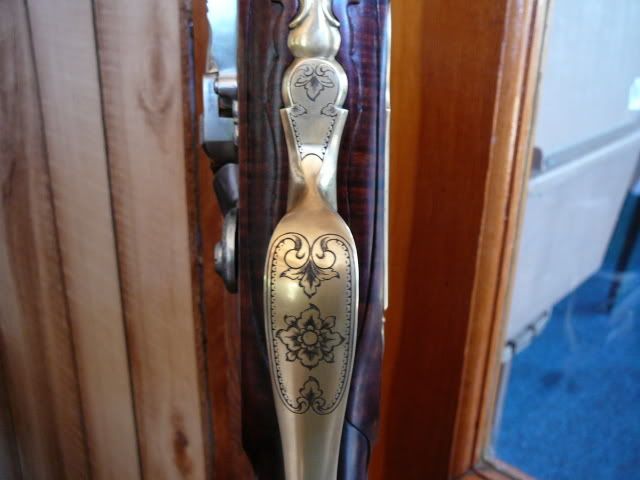
Here's a shot of my main engraving tools. Homemade chasing hammer, modified from a Dollar store tack hammer, homemade push type flat graver, mostly used for nick and dot borders, homemade burnisher, the engravers "eraser", Crocker sharpening jig, my main square graver, and a couple of square push gravers. Set up does not have to be expensive, but you cannot buy the skill, you have to work for that. I screwed around for years getting nowhere until I saw McKenzies videos. Then, like overnight, I understood, and corrected most of my problems from that video. However, being able to make decent cuts is only half of the formula. You have to learn to draw. This is my worst weakness. You have to draw for hours, and hours learning to make flowing curves, straight lines, and put it all into a design that you hope looks close to what is in your mind. That lock was quite a few days of work, with 75% of it being layout! It doesn't take long to discover why real pro engravers are very well paid for their work. They earn it! No, I am not a pro. Engraving is too stressful for me to go much farther than I have.


paulvallandigham
Passed On
- Joined
- Jan 9, 2006
- Messages
- 17,537
- Reaction score
- 94
Wick: You are WAY TOO MODEST about your ART!
You have the eye for proportions, that many engravers, no matter how much they command, just don't have. You have an eye for blending your choice and size of engraving of metal with adjoining relief carving of wood. The work is simply AWESOME! I gasped when I saw the picture of the tang and barrel work in the picture above!
Most important, you seem to understand the importance of leaving SPACE in your art, so that the viewer can fill that area in with his own imagination. That is what makes a master artist- the willingness to STOP, and leave something for the view to contribute. ( Think of what Michaelangelo's "Mona Lisa" would be if he actually drew in a definitive line for a smile! How many millions of people would have been disappointed looking at that painting if he didn't leave us all that "space" to fill it, one way or another??)
Your story should be used by the current marketers of that Video By Lynton McKinzie. I can't think of a nicer compliment than what you have made to him and his work. I have his book, but I can only imagine how much better his video would be to watch.
- Joined
- Aug 25, 2003
- Messages
- 6,527
- Reaction score
- 1,506
Thankyou Paul. Coming from you that means a lot, but I'm afraid you are over rating me. I do OK, and get by, but there are some on this board as good, and better.
I loved McKenzie's work, and I like that he did most of it with hammer & chisle. Now, he was a master, and his video is easy going, and easy to understand. You should get a copy. Seems like he was a very gentle, easy going fellow, with the gift and ability to teach.
I loved McKenzie's work, and I like that he did most of it with hammer & chisle. Now, he was a master, and his video is easy going, and easy to understand. You should get a copy. Seems like he was a very gentle, easy going fellow, with the gift and ability to teach.
Allan Gray
45 Cal.
- Joined
- Sep 21, 2007
- Messages
- 517
- Reaction score
- 5
Incredible work, Wick!
I agree McKenzie's video is worth the money. After messing around with smartflix I bought my own copy. I got it from Brownells for the lowest price I could find.
I agree McKenzie's video is worth the money. After messing around with smartflix I bought my own copy. I got it from Brownells for the lowest price I could find.
Well,for what use I would get from the tools, maybe I should spare myself aggravation, disappointment, and time and just find someone to do my engraving. I do have a couple of gravers so could just kinda play around for a while. Thanks to all for the time in responding, I appreciate the advice.
- Joined
- Aug 25, 2003
- Messages
- 6,527
- Reaction score
- 1,506
Nah, give it a try. Much of the engraving on American guns was not all that well done. Some even crude. Take a cheap small hammer and grind off the poll, or nail puller ears, solder a one inch diameter, about 1/4" thick new face on the hammer. shape the grip like in the photo. I can show you how to sharpen the graver enough to get you going. Note how thin the hammer shaft is between the head and hand grip. This gives a tiny bit of flex when you strike which kinda gives the graver more of a push instead of a shocking blow. You won't feel the flex, but it is there.
- Joined
- Aug 25, 2003
- Messages
- 6,527
- Reaction score
- 1,506
Mazo, this is where you start. Most engravers have their own variations on angles, but this will give you a start. All flats must be as flat and true as you can get them. They also need to be polished to at least 600 grit. Many go to 1200 grit and beyond. You need a magnifing glass to see that the point is sharp. You would find things much easier with a Crocker jig, About $35.00, but it can be done without.
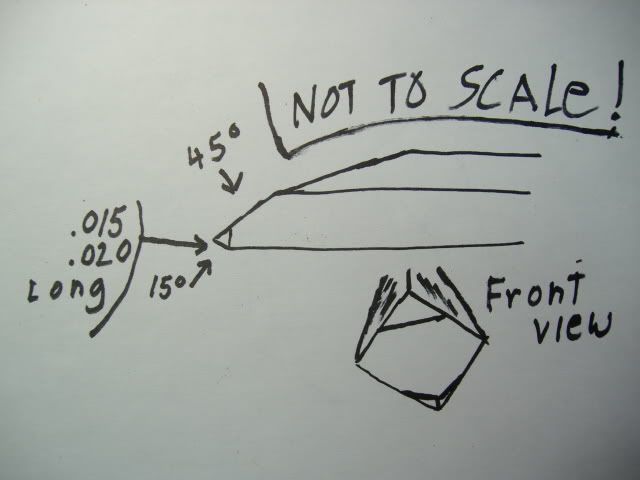
The very top angle is just to reduce the surface of the main 45° face, to ease sharpening. Rule of thumb on the 15° face, is no more than the depth you are cutting. Too little, and the graver can dig in, or skip out. Too much, and the curve cuts will be ragged. .020 might be a good start, and that would be length, and heigth. You have to grind these angles first, except for that tiny 15° angle. That you can get by stoneing. Grind, then stone true, working your way down different grits as you would sharpen a knife. Finally finish with 600 grit sandpaper or finer, on a dead flat surface.The graver face should be like a small mirror, or very close. Acually, all faces should be that polished. One trick in this, is to lay a brass, or steel rod lengthwise on the edge of an Arkansas stone, set the graver on this rod, adjust the angle the graver sets on the stone, and sharpen sideways, holding that angle as true as you can. Do the tiny 15°last, and just use sand paper for it, on a flat surface, or even laying on the stone if it is fairly true. Don't overdo that one. Then try it out. Start with very light taps, and many of them to move the graver forward. If it digs in and kinda stops. you stop, and make your working angle more shallow. If it jumps out, increase your angle of attack. Whenever possible, when cutting brass, anneal it first. Sometimes cast brass will try to crumble rather than be cut clean. Low carbon steel seems to cut as easily as brass, and sometimes easier. In my experience. Dipping the graver point in very thin oil sometimes helps, but can get messy if you use too much. I usually don't bother. Laurel Mt. Forge has a Chinese white that I found helpful for layout. Once I figured out how thick to use it, and thinned it a tad. You can draw on it with a pencil, and erase with a light touch, if needed, and I need to a lot. It comes right off will a damp rag.

The very top angle is just to reduce the surface of the main 45° face, to ease sharpening. Rule of thumb on the 15° face, is no more than the depth you are cutting. Too little, and the graver can dig in, or skip out. Too much, and the curve cuts will be ragged. .020 might be a good start, and that would be length, and heigth. You have to grind these angles first, except for that tiny 15° angle. That you can get by stoneing. Grind, then stone true, working your way down different grits as you would sharpen a knife. Finally finish with 600 grit sandpaper or finer, on a dead flat surface.The graver face should be like a small mirror, or very close. Acually, all faces should be that polished. One trick in this, is to lay a brass, or steel rod lengthwise on the edge of an Arkansas stone, set the graver on this rod, adjust the angle the graver sets on the stone, and sharpen sideways, holding that angle as true as you can. Do the tiny 15°last, and just use sand paper for it, on a flat surface, or even laying on the stone if it is fairly true. Don't overdo that one. Then try it out. Start with very light taps, and many of them to move the graver forward. If it digs in and kinda stops. you stop, and make your working angle more shallow. If it jumps out, increase your angle of attack. Whenever possible, when cutting brass, anneal it first. Sometimes cast brass will try to crumble rather than be cut clean. Low carbon steel seems to cut as easily as brass, and sometimes easier. In my experience. Dipping the graver point in very thin oil sometimes helps, but can get messy if you use too much. I usually don't bother. Laurel Mt. Forge has a Chinese white that I found helpful for layout. Once I figured out how thick to use it, and thinned it a tad. You can draw on it with a pencil, and erase with a light touch, if needed, and I need to a lot. It comes right off will a damp rag.
Similar threads
- Replies
- 33
- Views
- 1K
Latest posts
-
-
-
-
-
-
-
-
-
Anybody here proficient in making Plains war shirts? (Need help)
- Latest: Flintlock Fellow


