• Friends, our 2nd Amendment rights are always under attack and the NRA has been a constant for decades in helping fight that fight.

    We have partnered with the NRA to offer you a discount on membership and Muzzleloading Forum gets a small percentage too of each membership, so you are supporting both the NRA and us.

    Use this link to sign up please; https://membership.nra.org/recruiters/join/XR045103

hammer

Muzzleloading Forum

Help Support Muzzleloading Forum:

This site may earn a commission from merchant affiliate links, including eBay, Amazon, and others.

Lonstar

36 Cal.
Joined
Mar 2, 2010
Messages
56
Reaction score
0
OK. One more dumb question and I will leave you alone for a while (not)
Been checking out Chasing Hammers to go with all the other stuff on order for engraving in steel brass and GS or anything else I can find that will sit still long enough. I have found them anywhere from $60.00 down to $9.95. What’s the difference? Don’t want to buy any junk. :nono:
Thanks,
 
Hammer differ in the weight of the head, the shape of the nose, and in the shape of the handle. I watched to engravers at Dixon's Gunmaker's Fair, in 2003, using chasing hammers that had a 45 degree mend in the handle, so that they could work the point of the graver towards their eye, instead of away from it. The bend allowed them to use the hammer without holding their elbows up in the air, where they would quickly get cramps in their shoulders and upper arms.

So, you probably need some actual trial experience to find out what technique works best for you, before finalizing your choice of hammers. :hatsoff:
 
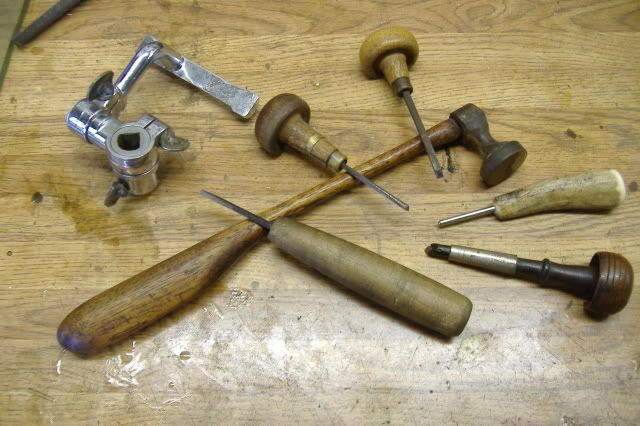
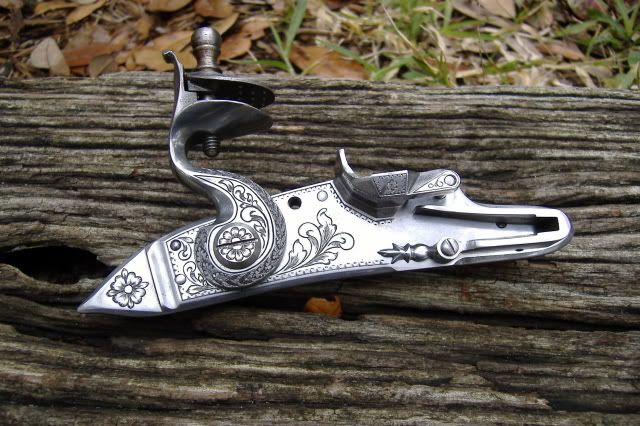
The difference is in price. My hammer is a cheapo tack hammer and handle that I altered to a one inch face, and slimmed the grip. Here is a shot of my entire group of tools, and a piece of my work. Bear in mind, I am no where near a pro.
pennyknife426_640x480.jpg


pennyknife181_640x480.jpg
 
Wick Ellerbe said:
Bear in mind, I am no where near a pro.


pennyknife181_640x480.jpg

That's allright, I ain't fussy either. Just send that old lock to my house, I'd be danged happy with that work.
 
Come on Wick! :hmm:

If you don’t mind I am stealing the pattern. If you do mind I’m a taken it anyhow. Don’t know what you do fir a liven but ya outa think bout a career change. That there is some mighty fine work. :applause: Makes me want to crawl off in a corner and forget about trying this engraving thing. :redface: I know you got some more. Let’s see it!!!
 
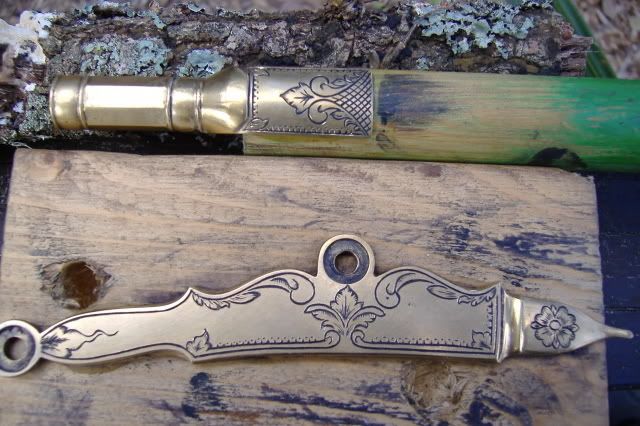
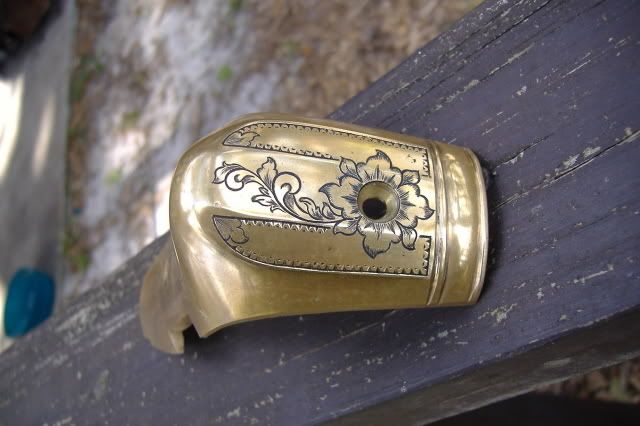
If you like the pattern, you're welcome to use it. I'll post a few more, but the main theme here is that one does not need to spend a lot of money on these tools. The square graver in the long handle is my main working graver. I've got maybe $5.00 in it. The flat graver near the hammer head I use for the nick and dot borders I made from a piece of file, tempered back a tad. I use a couple of push/palm gravers to detail and clean up lines. They are cheap. The shiney tool in the antler grip is a burnisher, the engravers "eraser". I made that from a piece of drill rod. The Crocker sharpening fixture is old and about worn out. That was given to me, but they are not too expensive anyway. And everything I know came from Lynton McKenzie tapes, and trial and error. The hardest part of engraving is learning to draw it. I probably spent 20+ hours drawing and laying out that lock, but less than half that time cutting it. Here are a few more pieces that went on the same gun.
pennyknife146_640x480.jpg


pennyknife147_640x480.jpg


pennyknife148_640x480.jpg
 
Wick, you may have learned a lot from the tapes but you didn't learn to cut those straight lines by watching, you learned by doing a LOT of practice. Nice work!

My first engraving tools were a small ballpien hammer and the tang from a small file that I squared up and sharpened. My vice is made from a bowling ball with a small vice attached which is a luxury now compared to how I had a Craftsman vice screwed to the corner of the bench so I could "walk around" it to cut curves. You don't need to spend a lot of cash to get started. Start cutting and as you get into the more difficult set ups you will aquire tools like sharpening jigs, lighter or heavier hammer, different shaped gravers. I've drilled two holes in my chasing hammer to lighten it for certain cuts and materials. When I want it heavier I fill the holes with small lead billets made for that purpose. Like having two hammers in one. There are websites like this forum (Engraver's Cafe) where you can see and learn stuff that would take years to learn by yourself. Good luck, get cutting!

L.Dog
 
Wick Ellerbe said:
If you like the pattern, you're welcome to use it. I'll post a few more, but the main theme here is that one does not need to spend a lot of money on these tools. The square graver in the long handle is my main working graver. I've got maybe $5.00 in it. The flat graver near the hammer head I use for the nick and dot borders I made from a piece of file, tempered back a tad. I use a couple of push/palm gravers to detail and clean up lines. They are cheap. The shiney tool in the antler grip is a burnisher, the engravers "eraser". I made that from a piece of drill rod. The Crocker sharpening fixture is old and about worn out. That was given to me, but they are not too expensive anyway. And everything I know came from Lynton McKenzie tapes, and trial and error. The hardest part of engraving is learning to draw it. I probably spent 20+ hours drawing and laying out that lock, but less than half that time cutting it. Here are a few more pieces that went on the same gun.
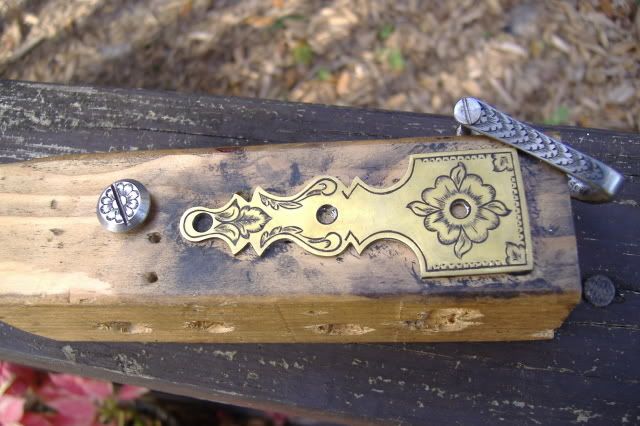
pennyknife146_640x480.jpg


pennyknife147_640x480.jpg


http://i37.photobucket.com/albums/e77/wicklrb/pennyknifThanks Wick,
I really appreciate the pointers. What are you using to draw on the brass with? When I Scrimshaw a horn or something, I draw it on with a pencil and spray it with Fixative to keep my paws from rubbing it off. I have not found anything that will write on brass or GS or polished steel for that matter. Do you coat it with some kind of paint?
Again, very nice work. Thank You.
e148_640x480.jpg
 
You're right. Practice is a large part of the picture, but acually I did learn from Lynton to cut straighter lines by cutting down the side of the line a tad bit instead of cutting the line itself, and if you'll look, I screwed up a line on the side plate. One thing I believe most beginners don't get, is that it only takes very light taps to cut even steel, if your graver is sharp, and held at the correct angle. My hammer weighs 3 1/2 oz. Total weight counting the handle.
 
Wick,
Um, are you taking commissions?! ;~)

That is some FINE work. The lock knocked my socks off!

I had a run at engraving, but ended up giving away my gear
to a jeweler pal, who has made better use of it.

That level of engraving requires practice and "time in"!

Fine work!

Reboundspring
 
Wick, that is some FINE work! Maybe one day I will be in a position to get you to practice some on something for me.
 

Latest posts

Back
Top