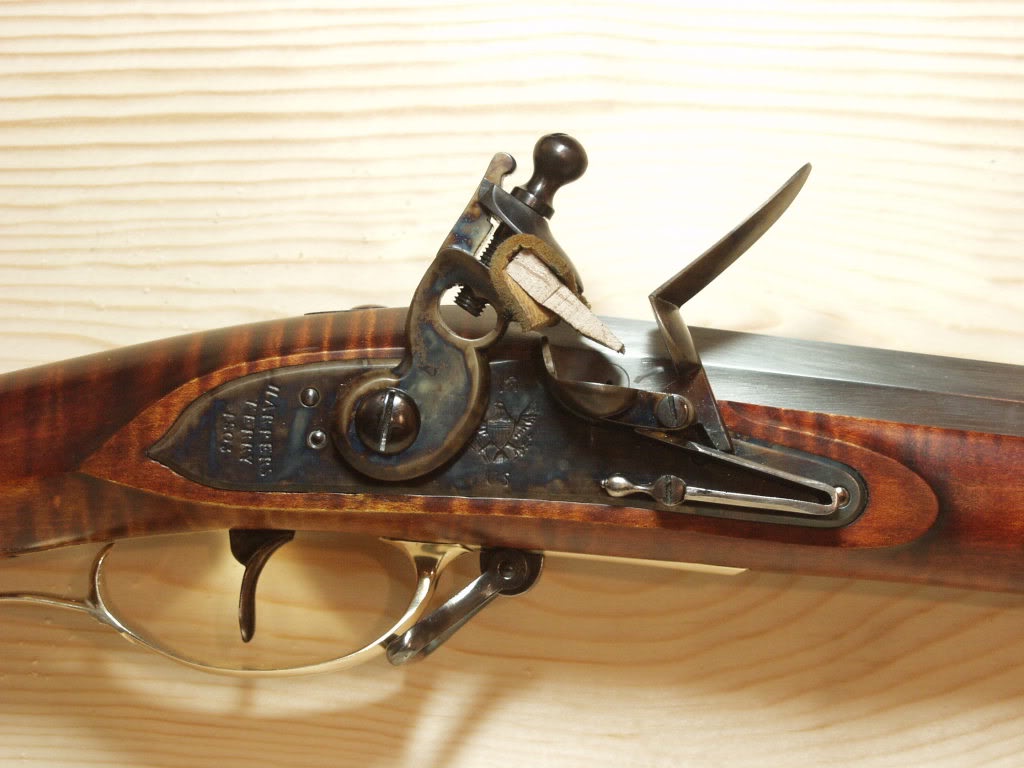
Hawkins lock finish?

Muzzleloading Forum

Help Support Muzzleloading Forum:

This site may earn a commission from merchant affiliate links, including eBay, Amazon, and others.

mrfritz44

36 Cl.
Joined
Jan 21, 2024
Messages
62
Reaction score
63
Location
PA
Does anyone have a good video or tutorial on how to achieve the mottled, multicolor and fired look of a Hawkins lock?

I'm putting together a hunting rifle and thinking that Hawkins lock finish is a good way to bring together the browned barrel, darkened to black brass finishes of the other components.

I'm open to other finish suggestions that create the illusion of depth as well.
 
By "mottled, multicolor" do you mean "color case hardening" finish?

There are some simple ways to achieve such a "faux" finish, but not authentic, and not so durable. But "real" color case hardening not so much. Maybe be more specific what you hope to achieve? Or what you mean by "illusion of depth"? Implies a "faux" finish, no? Plenty of expert help here if you're more specific. Thanks........
I'm willing to try both methods as you've already laid out some pros and cons of the faux finish.

Open to suggestions at this point.
 
Hi,
FYI it is "Hawken" rifle not "Hawkins" . At least some locks on Hawken rifles appear to have had color case hardening. They likely case hardened all of their locks because they were made from wrought iron and had to be cased to achieve a skin of steel for wear. However, they likely did not produce or preserve the case colors on all of them. The first step is polish the lock plate and hammer highly. Don't leave any sand blasted finish that comes on the castings. You want at least 600 grit polish. Degrease the parts and pack them in a steel tube or box with a mix on bone and wood charcoal. You want to make sure the parts are not exposed to pockets of air. Make sure the box or tube has a lid. Then it needs to be heated to at least 1375 degrees F and heat soaked for 90 minutes or so. I find the best colors occur when the heat is between 1375 and 1475 degrees. After heating the box and contents are poured as a solid brick into room temperature water. Some folks aerate the water producing bubbles, some stir it just before quenching. The aerating introduces nitrogen to the water, which can enhance the colors. The key is the pack must hit the water without exposing any of the parts to the open air. After quenching, dry the parts and then temper them to 490 degrees F which will reduce brittleness and bring out the yellow-brown colors. You cannot do this with propane torches. You need a forge or heat treating oven. You can simulate the colors using a propane torch and swirling it around the polished parts to create bronze, purple, and amber mottling, then let air cool. However, the colors don't last long and they don't really look right. Case colors, even when done right do not last as long as browning or bluing.
bmZgU7G.jpg


dave
 

Latest posts

Back
Top