• Friends, our 2nd Amendment rights are always under attack and the NRA has been a constant for decades in helping fight that fight.

    We have partnered with the NRA to offer you a discount on membership and Muzzleloading Forum gets a small percentage too of each membership, so you are supporting both the NRA and us.

    Use this link to sign up please; https://membership.nra.org/recruiters/join/XR045103

help soldering ramrod thimbles

Muzzleloading Forum

Help Support Muzzleloading Forum:

This site may earn a commission from merchant affiliate links, including eBay, Amazon, and others.

HAMMERSCHILD

40 Cal.
Joined
Oct 17, 2010
Messages
107
Reaction score
0
Hello, I am in the planning stages of a Hawken build. I have done a couple of kits with good results and am gearing up to take the plunge. I would like to ask what is the prefered method of soldering brass thimbles( Ted cash)to the barrel under rib. The kits I have done had screws and such. Thanks in advance.
Hammerschild
 
If the rib is screwed or riveted to the bbl, use soft solder for the pipes, but if the rib is soldered to the bbl, then the pipes should be hi temp silver soldered. Anyways that's the way I would do either. In any case, the pipe should have a flat filed on and likewise the rib but the rib flat should be deep enough so the ID of the pipe is even w/ the rib groove.....Fred
 
I don't know if this is the preferred or best method, but this is how I did mine. I have only done this once, but it worked well.

I flattened the bottom of the thimble. This gives a surface that will mate to a notch filed into the underrib. I made the depth of the underrib notch deep enought so that the inside of the thimble matched the top of the underrib. My reasoning was, that if the surfaces matched, the ramrod wouldn't hang up on the thimble when it was inserted. Also it looks good, there is no gap between the underrib and ramrod. After the I had everything fitted, I used TIX solder to tin both the underside of the thimble and the notch in the underrib. I applied solder to both parts and then used a rag to remove the excess solder. I used the TIX antiflux to coat the areas that I didn't want the solder to stick, like the sides of the thimble and the areas of rib outside the notch. This seemed to work well. If solder landed on the areas coated with antiflux, it didn't stick. I didn't have to clean up any of the joints. With both parts now tinned, I applied the liquid flux and used a clamp to hold the thimble to the rib and applied heat mostly to the rib. When the parts get hot enough, the solder will reflow and you're done.

Here's a picture of how my came out. You can clearly see the notch in the underrib. The thimbles that I used were thick, they were made from brass tubing, so the notch is relatively deep.

AstorianMuzzle.jpg


Good luck, if I was able to blunder my way though it, you should be able to as well, Tim
 
Here's how I do it. File a flat on the side of the thimble, with parrallel lines, so that it doesn't rock when tested on a flat surface. The flat doesn't need to be very wide, just something to keep the thimble stabilized and anchored while soldering. Now cut the corresponding flat in the rib with a file, so that the inside of the thimble is flush with the radius of the rib. The ends of the thimble should fit skin tight against the cuts in the rib, making the thimble almost lock into place in the rib. Check to make sure the thimble is straight in all directions.

Now make sure the two pieces are clean and apply a thin layer of flux. Heat the pieces individually with a low torch or over a kitchen stove and tin the rib and thimble where contact is to be made. Wipe off the bulk of the solder with a clean rag or stiff brush, leaving only a paper thin layer on both pieces. Check to ensure there are no bare spots in the solder coverage.

Set the thimble into the rib cutout. If it doesn't fit, you can scrape away some solder where it is hanging up. Now you're going to solder it permanently, but first you need to ensure the rib is in a solid flat position, so that gravity doesn't cause the thimble to drift when the solder melts. I like to place the rib on a stove-top burner and place a weight on it so it doesn't move. Now heat it up and test the heat by touching the joint with solder to find the melting point. Once the solder starts flowing, apply just enought to make a "bulge" on each side of the joint without moving the thimble. Here's a trick that helps me, flatten the solder with a hammer so that it's easier to "sneak" into the joint without bumping the thimble. Once the solder has cooled, check the thimble again in all directions to make sure it is still straight. If it's crooked, just reheat and bump it straight with a small screwdriver or wire, etc.

You can clean cut off the extra solder with a knife and then sand flush to your desired finish. Bill

EDIT: My goodness, it took me so long to write this that there were already a bunch of good answers posted. :rotf:
 
Well I tell you, I did the thimbles like the guys said, but I soldered the rib and the thimbles at the same time. I got a jar of swif solder from Brownells, cleaned the barrel flat and the rib, then spread the Swif on the barrel, put the rib in place and tied it tight with soft iron wire. The did the same with the thimbles. I used a propane torch and heated everything until the solder flowed. Let it cool and cleaned it up. It was the easiest solder job I ever did. Swif is lead free and quite strong.
 
Nice going. I also use Swif 95 solder paste and it's so easy to solder....sandpaper the surfaces, no need to tin, just apply thinly, lightly clamp, heat and it's done. Mainly use Swif 95 for Pbox hinges, bbl lugs and attaching pipes to ribs, although lately I've been riveting under ribs to the bbl instead of using screws......Fred
 
There is some excellent advice given above on soldering the pipes. A neat trick I learned from a mentor is to run a brass rod through the thimbles, and use spring clips to hold the rod and thimbles to the rib. This keeps them from floating off center and perfectly aligned from front to back while soldering. (tin both surfaces first, of course)
 
Well Fred, since I heard it from you, I'm going to have to give that Swif a try. I had no idea it worked that well on steel.

Back when I was a pipefitter, Swif was kind of a joke, and only used by guys who couldn't make a good solder joint with regualr solder. It was iffy at best on smaller copper pipe, and from 1" on up, it just plain wouldn't seal the joint.

I can see where there are some gunsmithing conditions that it wouldn't work on, like when you need some solder build-up, but for things like soldering the rib to the barrel, I think it would be perfect. Personally, I like to fill the little gap between the thimble and the rib with a nice little streak of solder. I wonder if Swif could do that? Bill
 
Don't know what is meant by "a streak of solder between thimble and rib". I've found that Swif 95 is very easy to control because the flux isn't separate....should be next to no overflow at the joint between the pipe and rib along the length of the pipe....Fred
 
Bill, you can get that streak of solder if you leave a little gap (don't file the flat as deep on the thimble) spread a little extra swif on the rib and squeeze it out into the gap. The flux turns black, but is easy to clean up.

Mel
 
Right Sign Cutter, if you look at that pic provided by tsharrison, you can see a small gap between the thimble and rib. It's just kinda my trademark to fill that up and leave a solder "line" showing there, just for looks.

What I probably should do is just get some of that swif and play around with it to see what it can do. Never actually used the stuff because of the negative vibes associated with it that I mentioned earlier. Thanks for the replies guys. Bill
 
If you are trying to make a copy of an original Sam Hawken rifle, he used only steel rod pipes as far as I know. Jim Gordon's book "Great Gunmakers for the Early West, Volume III, Western U.S.", has a picture of a S. Hawken halfstock percussion rifle on page 390 that has brass trim including butt plate, toe plate, side plate, trigger guard, nose cap, entry pipe and key escutcheons and a brass pineapple patch box. The rod pipes are steel or iron.
 
Hmmmm,
Thats interesting. I very much like the look(and non reflective nature) of iron fittings. I could turn some with little effort. Very good suggestion. thanks
 
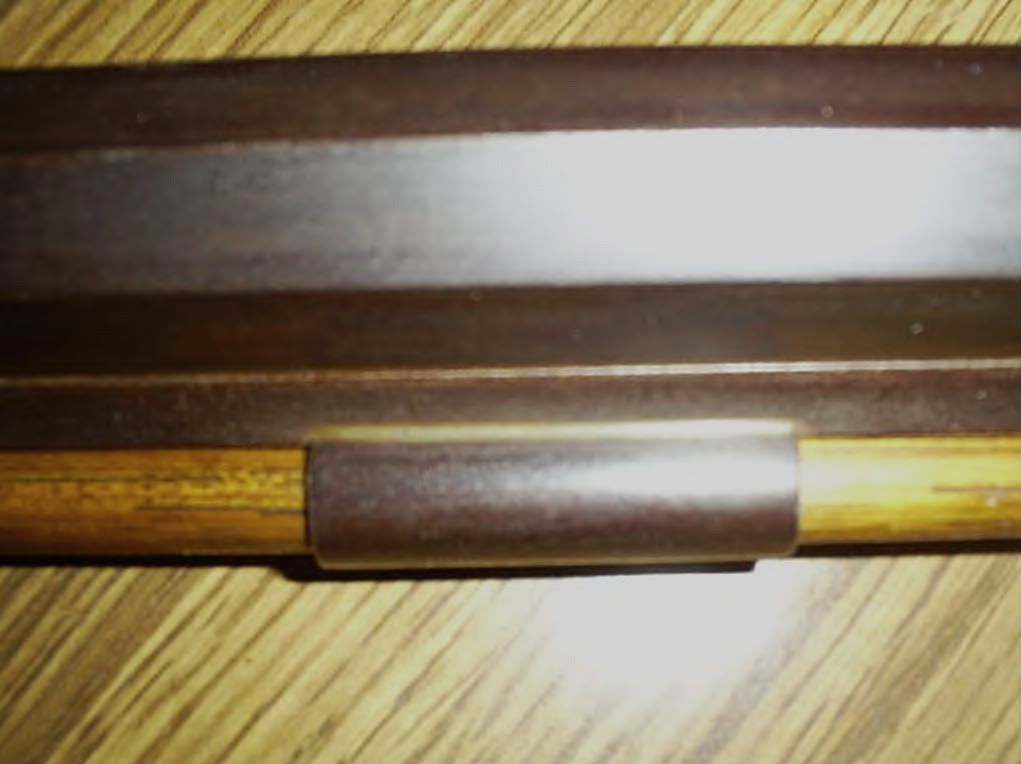
Hammerschild, here is a (slightly blurry) pic of a steel thimble soldered to a rib. The rib is riveted on, not soldered. The "streak" between the rib and thimble is the solder showing from the slight gap, but is kinda dull due to the browning. Barrel, rib, and thimble are cold browned. Very non-reflective and I think it all looks "natural" together. Hope this is of some help. Bill
Picture091-1.jpg
 
P.S. There are two thimbles, and I did turn them on a lathe, since I couldn't find any tubing laying around that would work. Bill
 
Back
Top