Hudson Bay Camp knife

Muzzleloading Forum

Help Support Muzzleloading Forum:

This site may earn a commission from merchant affiliate links, including eBay, Amazon, and others.

Brasilikilt

45 Cal.
Joined
Dec 13, 2005
Messages
560
Reaction score
1
Ha....one of these days very soon, I need to post pics of knives I've actually finished, not these "in the works" photos :)

Here is my very first attempt at a HBC Camp knife, and I was hoping for some feedback from the forum.
You guys have been immensely helpful in the past with comments and criticisms by often pointing out details which I had missed :)
It's easier to ask now, than have something pointed out to you after it's finished :)

I started out with a 2 1/4" wide 1/4" thick leaf spring...during the forging the spine gained about a 16th in thickness.
The cross section of the blade was forged into a very steep wedge in preparation for draw filing it into a flat grind.
For handles, the customer requested I use a lighter colored wood, and copper instead of brass for the rivets and bolster. I figure oak or ash would be ideal for a rough-use chopper such as this.
Here it is fresh from the forge
DSCN3852.jpg

DSCN3851.jpg


Here it is after I ground off the forge scale, marked the blade for a little reference and cleaned up the lines a bit with a coarse file.
073.jpg


And here it is in hand to show that it is a bit larger than your standard HBC knife.
080.jpg


The future owner's wife who commissioned this blade from me, expressed her husband's love for large impressive knives, so I took the liberty to scale this one up a bit from the original dimensions.

As always, thanks for looking, hope you enjoyed checking out my first shot at this pattern.

Iain

Iain
 
That looks like a good start. I am no knifemaker, but it looks good. I hope you'll photograph the knife nearing and at completion. :thumbsup:
 
Iain

You are definiely on the right track....I have done some HBCKs on special order and your knife is tracking similarly.

Copper is VERY soft and discolors the user's hands more than brass, if you are planning to add the handle washers for a HC knife.

A flat grind is good...these knives, which date from the 1830s and 40s and later, were made for slicing as well as chopping big cuts of meat. The sway back was used in "malleting" through big chunks, as the mallet did not glance from the concave surface of the knife spine.

Because these knives are so big, they were reportedly more often found in the wagon box than on the hunter's personal kit, which is why so few Euro made sheaths are seen. Best description is in "Firearms, Traps and Tools of the Mountain Men" by Charles Russell

Stand by for lots of finish work on the blade, and check handle gaps with a flat slab of wood before heat treat.
 
Hey all

I didn't see any responses for a while and was starting to think this blade kinda sucked :)

I do however appreciate the responses, and will continue to post pictures as more work on the handle/blade is completed.

I did discuss the handle material with the future owner, and he eventually decided to go with an oak/brass combination...good choice I think.

Big brass washers/disks for the handle are tricky to find.

I thought I was going to be able to use some old domed 3/4" upholstery tacks, drill out the centers and hammer them flat, but the ones I have are only brass plated...

Anyone know of any good non-tedious methods to fabricate disks out of thin brass sheet?
 
knifemaking.com has some round brass blanks but they are 1" in diameter, I'm not really sure how big you wanted them though. This way is kinda rigged but it may work, take your brass sheet, cut it pretty close to round, drill a hole in the center and then screw all of the blanks together with a carriage bolt and a nut. Put the end of the bolt in a drill press at a slow speed and use a file or block and some sandpaper and sand/ file it until it is round and the size you want it. The hole will also be dead in the center.

Just an idea though, I don't know if it will work well or not.

-Andrew
 
Last edited by a moderator:
They actually make hole saws for soft metal like brass n copper. Hunt around yer hardware stores or maybe get a dealer by looking on line first.Perfect circles with the hole already centered.Just a thought YMHS Birdman
 
Blacksmith Andrew said:
knifemaking.com has some round brass blanks but they are 1" in diameter, I'm not really sure how big you wanted them though. This way is kinda rigged but it may work, take your brass sheet, cut it pretty close to round, drill a hole in the center and then screw all of the blanks together with a carriage bolt and a nut. Put the end of the bolt in a drill press at a slow speed and use a file or block and some sandpaper and sand/ file it until it is round and the size you want it. The hole will also be dead in the center.

Just an idea though, I don't know if it will work well or not.

-Andrew


Hey there, that was what I first tried, and it seemed to work great until I took the washers off the bolt.....
Maybe I hadn't tightened the nut down enough, what happened is that the hole in the center which was a nice 1/8" wore itself about twice as big from the washers spinning against the bolt threads.

It is a good method, it's just that there were flaws in my execution of it....just figured I'd mention that for others to learn from my experiences :)

Either way, I found a solution right under my nose sitting in a box under the Shopsmith.
A few years ago a friend of mine was demo-ing some apartments downtown and grabbed 100 or so of those bathroom sink drain pull rods knowing I could use these for pinning on knife handles
Anyways, almost all these rods are 1/8" brass at least 8" long. They still have the round knobs still screwed on the end which are mixed sizes from about 5/8" to maybe an inch.

AH HA!! I have a hundred or so perfectly round brass circles with a 1/8 threaded pilot hole perfectly centered....I simply drilled 6 of them out and ground them flat on either side.

For the bolster,I was simply going to pin and epoxy some 1/16" plate into a recess at the front of the handle like what this shows:
http://www.wrtcleather.com/1-ckd/ff-blades/hudson-bay-buffalo-1.jpg

What I was wondering is that if I used the thicker 1/4" stock I have, would the added weight forward contribute to it's chopping power?


Anyways...thanks again for adding to this thread...I'll keep you all posted on progress

Iain
 
Last edited by a moderator:
Try a hole saw with a pilot bit the same dia as your handle pins.

To cut the recesses in the scales for the washers, usea forstner bit the same dia as the washers.
 
Forstner bit....It's going to be very handy to know what to ask for when I go pick up a counter-sinking bit :)

Thanks
 
Hey all

For those who have been interested enough in following this thread I figured I would post some pictures of the progress I made last night.

DSCN3886.jpg


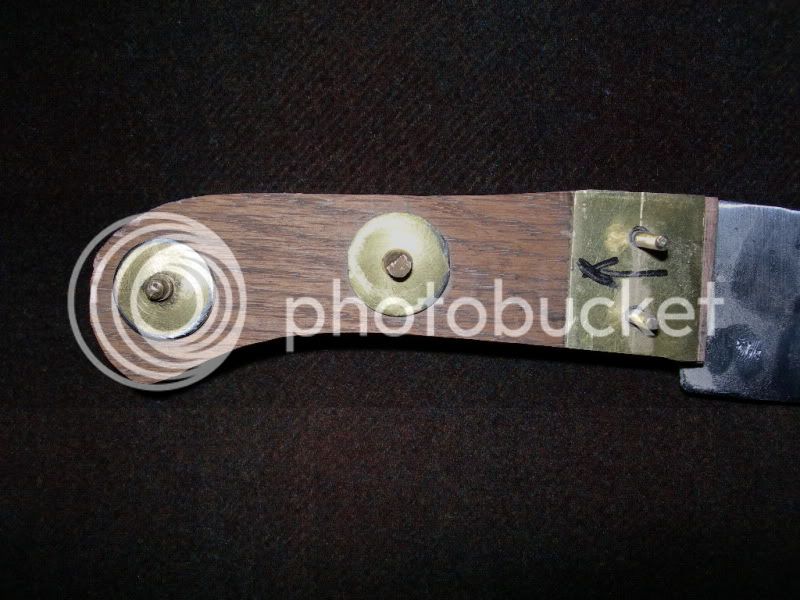
I'm really questioning my choice to go with a 3 pin handle....
I couldn't quite get the spacing of the pins and large washers to look right, so the front washer is a lot closer to the brass bolster plate than on the originals.

I spent quite a long time measuring and marking the spots to drill, checking and rechecking the measurements, and a couple of the holes are not quite where I wanted them to be.... :shake:

DSCN3887.jpg


DSCN3888.jpg


I have to go now to get the kids ready for the library, so I'll remind myself now to ask the reason why the tang on the originals was tapered so thin towards the butt end of the handle.

Is it a 'weight forward' thing to aid in chopping ergonomics?

Anyways...any of you knife-makers who, (unlike myself) have actual talent in knife crafting, please feel free to chime in. :grin:

I look forward in reading what y'all have to say.

Thanks,
Iain
 
Iain

Its both ergonomics and total weight. I suspect the original blades were rolled for the taper. These knives were at least serially, if not mass produced.

Grant
 
Hey all

GBlacksmith: I have an really huge old Henckels butcher cleaver which has a similar tapered tang. It makes a lot of sense to do that for a blade designed for hacking and chopping.
And yes, these were trade knives, meant to be produced economically by semi-skilled laborers.
I think it might have been too expensive and time consuming for a smith to forge these out of bar stock.

I really didn't like the handle with 3 pins and rivets, and I couldn't find any original examples with 3 of those rivets and the brass bolster.

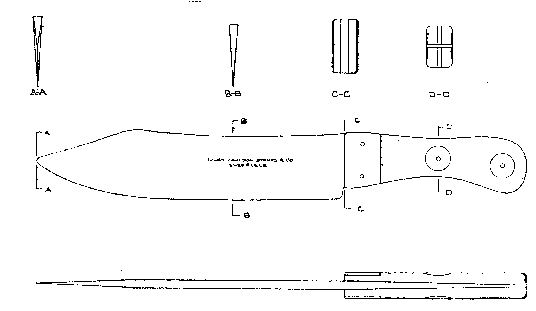
So.....I decided to plug the previous holes in the tang, cut some more oak slabs and re-do everything to resemble this:

hbkdwg-1.gif


100-1-2.jpg


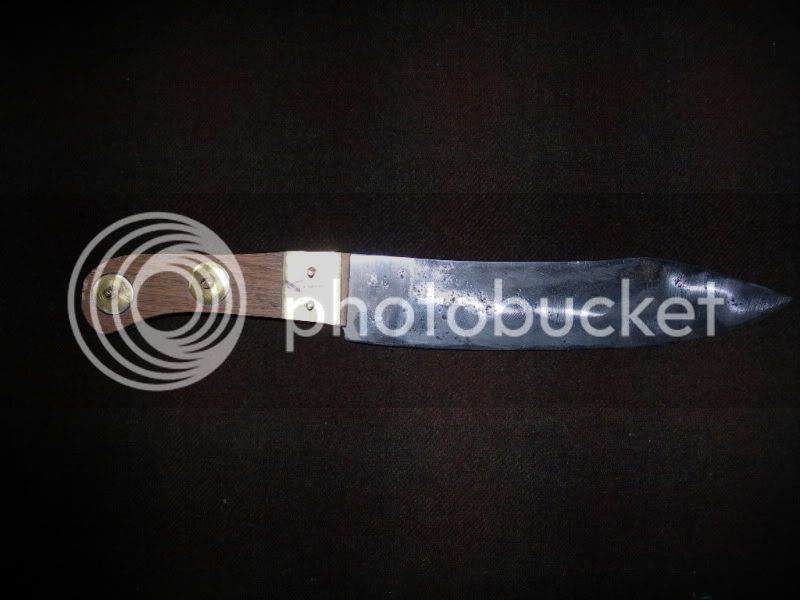
Here's what I have after the initial rough shaping and fitting.
DSCN3934.jpg

DSCN3935.jpg


It's turning out pretty good considering that it's my first one...
I almost don't want to sell this one :) I'll have to hammer out a few more, and keep one for myself :)
 
GBlacksmith: The weight ergonomic thing makes sense for a blade designed to hack and chop.
I have a really old huge Henckels butcher cleaver that has a similar tang.
And also...This was originally a trade knife, so they needed to be made as economically as possible.
I imagine this meant they used more semi-skilled laborers to run machines, and not so many smiths to forge them out from bar stock.

Anyways....I didn't like the 3 pin handle. It didn't 'look right' and seemed a bit overkill.
I also didn't see any actual examples of originals that had the 3 pins/rivets and the brass bolster.
I plugged the holes in the tang and re did everything to resemble this more common handle configuration.
hbkdwg-1.gif

100-1-2.jpg


Here's what it looks like after the first round of fitting and shaping:
DSCN3934.jpg

DSCN3935.jpg


A lot better I think

Thanks again for those of you who have put in their 2 cents.

I'll show more pictures as further progress is made.

Iain
 
The blades were likely sheared from flat stock and rolled....even military swords were made this way, by some. Many different types of forging dies were made to forge rough billets, using open and closed dies. They had no oxy-gas or electric cutting back then, of course. They were incredibly skilled at die forging complex shapes in the 19th century.

Your schematic is the same one my HBCKs are based on, though I have used a pinned handle. The washers date from a time when pins were the primary holding agent, buttressed by cutler's pitch or protein-based glues. There are originals with pin-only handle scales. No polymer glue chemistry back then, either.
 

Latest posts

Back
Top