Ignition Problems – No I idea what I am doing!!! Please help!

Muzzleloading Forum

Help Support Muzzleloading Forum:

This site may earn a commission from merchant affiliate links, including eBay, Amazon, and others.
Be sure to wipe the frizzen face off with a clean ungreased patch after firing. Do not wipe the frizzen face with your finger. Oils and fouling crud can easily cause a misfire, particularly if there is significant moisture in the air. Please abandon the thought of removing the breech.
Best left to a gunsmith or very experienced person with the proper tools and jigs.
If you wish to use a brush be certain to use the type that are looped through the attachment, NOT the swedged type. See photo below.
Yes, I gave up on removing the breech. A couple tugs on the wrench and it was clear it wasn't going to move!

I will start wiping the frizzen, thanks. I think I have that part under control now. I shimmed the flint higher and moved it forward a bit, and it seems to to be sparking nice, the swipe looks good and I am getting reliable flashes. PITA to figure out, but I think I have it working.

I learned my lesson with brushes long ago, buy brass and sweat solder in them. Have not had a single failure since!


IMG_0595.JPG
 
First time I did that, it completely filled the pan, it that normal?
Put your pick in the touch hole during the reloading process and do not remove it until you are ready to prime . It keeps the powder in and flash hole open If you dont tap the side when you pour in the powder you risk the chance of not settling the powder in the chamber
 
I learned my lesson with brushes long ago, buy brass and sweat solder in them. Have not had a single failure since!
Easier just to buy and use the looped style brushes instead of the crimped type. Solder may hold for a while, but the brush will be a failure waiting to cause a problem. Some folks even swear off using brushes in muzzleloaders.

This is what you want if you are going to use brushes. No need to solder.
1737850787128.jpeg

1737850922031.jpeg
 
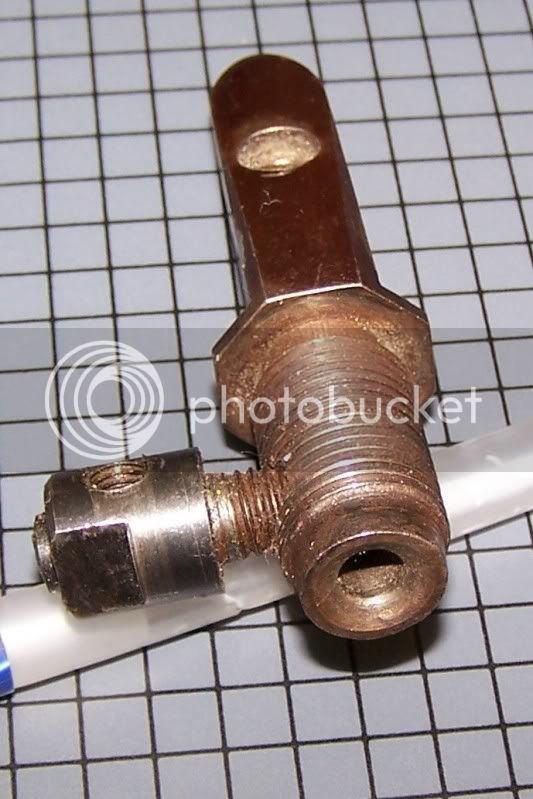
The breach plug should NOT be removed , and nis not meant to be removed. It is "cross pinned" by a threaded insert that the touch hole liner screws into. In theory you could drill out or otherwise extract the insert then remove the plug , but would be near impossible to line the plug perfectly with threaded hole up . Make sense ?


Here is another image of the patent breach, from a cap lock but same idea.
b7966a9b879281e8c3fd2c9f5ec9a88f.jpg

See how the drum threads through the barrel into the breach plug and acts as a cross pin . See the channel/hole ? This one appears to be around 1/4" (.250") , on this one, which I believe is from a Pedersoli. Most Traditions and CVA's have a much smaller hole.

Disclaimer: for information purposes only.
Here is an extreme option I would only recommend to someone with machining skills. The channel (center hole) in the patent breach on a friends barrel measured .177" or 4.5mm , very small and easily fouled and making powder flow difficult causing misfires. Using a 3' section of 3/8" steel rod I center drilled the end using a lathe starting with a 3/16" (.187") drill and secured it (press fit) also adding two set screws on the drill flats. I used a brass muzzle guard on the rod to center the rod and with a lot of cutting fluid and low speed carefully drilled the hole out to .187" .This is very hard steel a quality colbalt drill is needed. Then repeated the process going up in size .015" at a time stopping at 15/64" (.234"). This increased the diameter by .057" , not a lot but enough to allow better powder flow and less clogging from fouling and not enough to affect the wall thickness of the plug as to weaken the threads. We tested after this size and the issues all but went away so we left it at that. Again this is an extreme option left to an experienced machinist. You screw up and snap a drill and you're done, barrel is scrap metal.

I believe with the advice you've got from proper cleaning, vent picking, and loading that 95% of your problems should go away. This would be my advice as well.
 
I have a ebay $10 borescope, good for HVAC vents, not great for barrels, very low res, I need to look for real one! No steam cleaner, just hot water and 100psi air.
You can buy suitable bore scopes on Amazon for around $50.00, mine is a Teslong, works well.

Before those were available I bought a Hawkeye, a little pricey is an understatement. Buy the Amazon ones.
 
The breach plug should NOT be removed , and nis not meant to be removed. It is "cross pinned" by a threaded insert that the touch hole liner screws into. In theory you could drill out or otherwise extract the insert then remove the plug , but would be near impossible to line the plug perfectly with threaded hole up . Make sense ?


Here is another image of the patent breach, from a cap lock but same idea.
b7966a9b879281e8c3fd2c9f5ec9a88f.jpg

See how the drum threads through the barrel into the breach plug and acts as a cross pin . See the channel/hole ? This one appears to be around 1/4" (.250") , on this one, which I believe is from a Pedersoli. Most Traditions and CVA's have a much smaller hole.

Disclaimer: for information purposes only.
Here is an extreme option I would only recommend to someone with machining skills. The channel (center hole) in the patent breach on a friends barrel measured .177" or 4.5mm , very small and easily fouled and making powder flow difficult causing misfires. Using a 3' section of 3/8" steel rod I center drilled the end using a lathe starting with a 3/16" (.187") drill and secured it (press fit) also adding two set screws on the drill flats. I used a brass muzzle guard on the rod to center the rod and with a lot of cutting fluid and low speed carefully drilled the hole out to .187" .This is very hard steel a quality colbalt drill is needed. Then repeated the process going up in size .015" at a time stopping at 15/64" (.234"). This increased the diameter by .057" , not a lot but enough to allow better powder flow and less clogging from fouling and not enough to affect the wall thickness of the plug as to weaken the threads. We tested after this size and the issues all but went away so we left it at that. Again this is an extreme option left to an experienced machinist. You screw up and snap a drill and you're done, barrel is scrap metal.

I believe with the advice you've got from proper cleaning, vent picking, and loading that 95% of your problems should go away. This would be my advice as well.
I have drilled out a few. Took the breach plug out. Not to difficult on new guns. I would open them up to bore size on the flint lock. I also put a 1/4 inch touch hole liner in on the flint locks. I owned a full machine shop at the time. I wouldn't recommend this to anyone without proper skills
 
The breach plug should NOT be removed , and nis not meant to be removed. It is "cross pinned" by a threaded insert that the touch hole liner screws into. In theory you could drill out or otherwise extract the insert then remove the plug , but would be near impossible to line the plug perfectly with threaded hole up . Make sense ?


Here is another image of the patent breach, from a cap lock but same idea.
b7966a9b879281e8c3fd2c9f5ec9a88f.jpg

See how the drum threads through the barrel into the breach plug and acts as a cross pin . See the channel/hole ? This one appears to be around 1/4" (.250") , on this one, which I believe is from a Pedersoli. Most Traditions and CVA's have a much smaller hole.

Disclaimer: for information purposes only.
Here is an extreme option I would only recommend to someone with machining skills. The channel (center hole) in the patent breach on a friends barrel measured .177" or 4.5mm , very small and easily fouled and making powder flow difficult causing misfires. Using a 3' section of 3/8" steel rod I center drilled the end using a lathe starting with a 3/16" (.187") drill and secured it (press fit) also adding two set screws on the drill flats. I used a brass muzzle guard on the rod to center the rod and with a lot of cutting fluid and low speed carefully drilled the hole out to .187" .This is very hard steel a quality colbalt drill is needed. Then repeated the process going up in size .015" at a time stopping at 15/64" (.234"). This increased the diameter by .057" , not a lot but enough to allow better powder flow and less clogging from fouling and not enough to affect the wall thickness of the plug as to weaken the threads. We tested after this size and the issues all but went away so we left it at that. Again this is an extreme option left to an experienced machinist. You screw up and snap a drill and you're done, barrel is scrap metal.

I believe with the advice you've got from proper cleaning, vent picking, and loading that 95% of your problems should go away. This would be my advice as well.
I did notice the witness lines of the liner in the side of the barrel around the touchhole screw and figured that was what was locking it in.
 
You can buy suitable bore scopes on Amazon for around $50.00, mine is a Teslong, works well.

Before those were available I bought a Hawkeye, a little pricey is an understatement. Buy the Amazon ones.
There are some on ebay that work with your phone, 5.5mm so they might fit a .223, and 1920x1080 resolution in the $20-30 range. I'm researching now.
 
First time I did that, it completely filled the pan, it that normal?
You are using 3F powder. If the pan is filling from pouring the charge, the touch is 5/64" or larger. In my opinion, that's too large. The touch hole liner should be replaced with one that has a touch hole of 1/16".

Now that you have been practicing on getting a sharp edge on your flat, keeping the chambered breech clear of fouling, and your flint positioned in the jaws of the cock to scrape the frizzen, is the pan flashing? You need the pan flash to generate the heat to set off the main charge. If the pan is self filling on loading, then you need sparks to set off the powder on the pan.

You're getting there.
 
That was extremely helpful! Thanks! He described a problem I am seeing now, the flint is bouncing off the frizzen, it hits, then bounces back, then scrapes on the second contact. I am going to make a lead flint holder, haven't figured out how yet, but I will make it happen!!! Thanks!
Take a soft lead ball. Beat it flat with a hammer.
 
Back
Top