I bought a Isaac Haines kit from Dunlap in cherry 20 years ago. Slim that puppy down. These guys are giving good advice. If you need pics of mine I can post them.
-
Friends, our 2nd Amendment rights are always under attack and the NRA has been a constant for decades in helping fight that fight.
We have partnered with the NRA to offer you a discount on membership and Muzzleloading Forum gets a small percentage too of each membership, so you are supporting both the NRA and us.
Use this link to sign up please; https://membership.nra.org/recruiters/join/XR045103
You are using an out of date browser. It may not display this or other websites correctly.
You should upgrade or use an alternative browser.
You should upgrade or use an alternative browser.
IH kit from Dunlap Woodcrafts - let the build commence
- Thread starter tnlonghunter
- Start date

Help Support Muzzleloading Forum:
This site may earn a commission from merchant affiliate
links, including eBay, Amazon, and others.
The wood missing from rear of the pan, did it come that way? Or is that the way your doing it?
Regards
Regards
tnlonghunter
40 Cal.
If I'm looking at what you are, there's about a 1/4" gap between the back of the pan and the place where the wrist and lock mortise meet by the breech...?The wood missing from rear of the pan, did it come that way? Or is that the way your doing it?
Regards
I have to admit I don't remember removing that wood myself, but I don't even think I would have noticed it if you hadn't pointed it out. I had to back the barrel up about 3/16", and I wonder if I simply assumed that wood had to be removed, too.
Says a lot about my attention to detail, doesn't it...?
Last edited:
Do you mean the notched area by the ****? If that's what you're looking at, I had to carve out that much to have clearance for the **** one the bolster was flush against the barrel. The lock sits really deep in the mortise, and most of that will be filed away. It won't look nearly so glaring once it has been worked over.
If you're looking at a different place, can you clarify?
The area directly behind the pan, usually the wood goes all the way to the rear of pan.

Like here on one of my rifles

tnlonghunter
40 Cal.
I realized that right after I posted and edited my initial response. See above.The area directly behind the pan, usually the wood goes all the way to the rear of pan.
View attachment 53866
If I'm looking at what you are, there's about a 1/4" gap between the back of the pan and the place where the wrist and lock mortise meet by the breech...?
I have to admit I don't remember removing that wood myself, but I don't even think I would have noticed it if you hadn't pointed it out. I had to back the barrel up about 3/16", and I wonder if I simply assumed that wood had to be removed, too.
Says a lot about my attention to detail, doesn't it...?
I am in the middle of my first build, and mistakes are happening. I save every piece of wood I take off, just in case I need to patch.
Don't be discouraged you can fix darn near anything. What I don't like is creating additional work, I have to fix LOL
tnlonghunter
40 Cal.
Hear, hear. Daniel at Dunlap gave me some very nice curly maple samples to practice finishes, so it won't be hard to make a piece to fit there. Thanks for pointing it out.I am in the middle of my first build, and mistakes are happening. I save every piece of wood I take off, just in case I need to patch.
Don't be discouraged you can fix darn near anything. What I don't like is creating additional work, I have to fix LOL
Here is Duelist1954 repairing the same thing
Most likely one of the issues has to due with the length of the breech plug. Many are too long and thus you have a bit of refitting to get the back of the fence of the pan to line up with the back of the barrel. I believe that Dave_Person solved this situation in his thread on "Building a British Officer's Pistol".
tnlonghunter
40 Cal.
It took me a minute to find the follow-up to Duelist 1954's fix for that gap. It makes sense, but I'll have to decide if it's worth the headache to me. Yes, the gap is annoying now that I know it shouldn't be there (and now that I've had time to think about it, I distinctly remember filing that little area back flush to the breech end of the barrel, fully believing it was the correct path  ). But I also have learned the hard way to leave well-enough alone at times. I fear this may be one. There's only about 1/8" thickness there now, so I'm afraid the fix would be more obvious than the mistake. At least, I'm fairly sure it will be if I'm the one that does the fix!
- Joined
- Jan 12, 2005
- Messages
- 1,237
- Reaction score
- 1,655
Actually, you can fix that quite easily. Glue and pin a small piece in, and shape it to fit. Where it’s located, it will be unnoticeable.
- Joined
- Nov 26, 2005
- Messages
- 5,226
- Reaction score
- 10,889
Hi Guys,
You can certainly fix it but you don't have to. Many original guns show that gap as well and the little nib of wood can be very fragile and break off during cleaning or use. I'll be honest with you guys, on some guns I work to position the fence right at the end of the breech and on some I leave a little nib of wood but if it breaks off during construction, oh well, there will be a gap. The truth is, you really don't notice it with the flint **** in place. Here is a big gap on a Ferguson rifle but that is actually owing to the design of the breech.
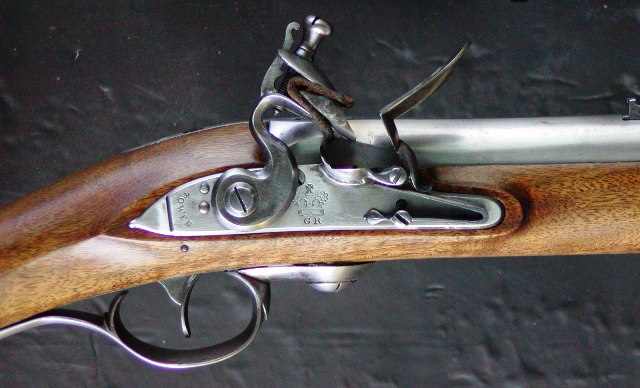
Here is a fowler on which the nib didn't make it becoming a wood chip on the floor of my shop:
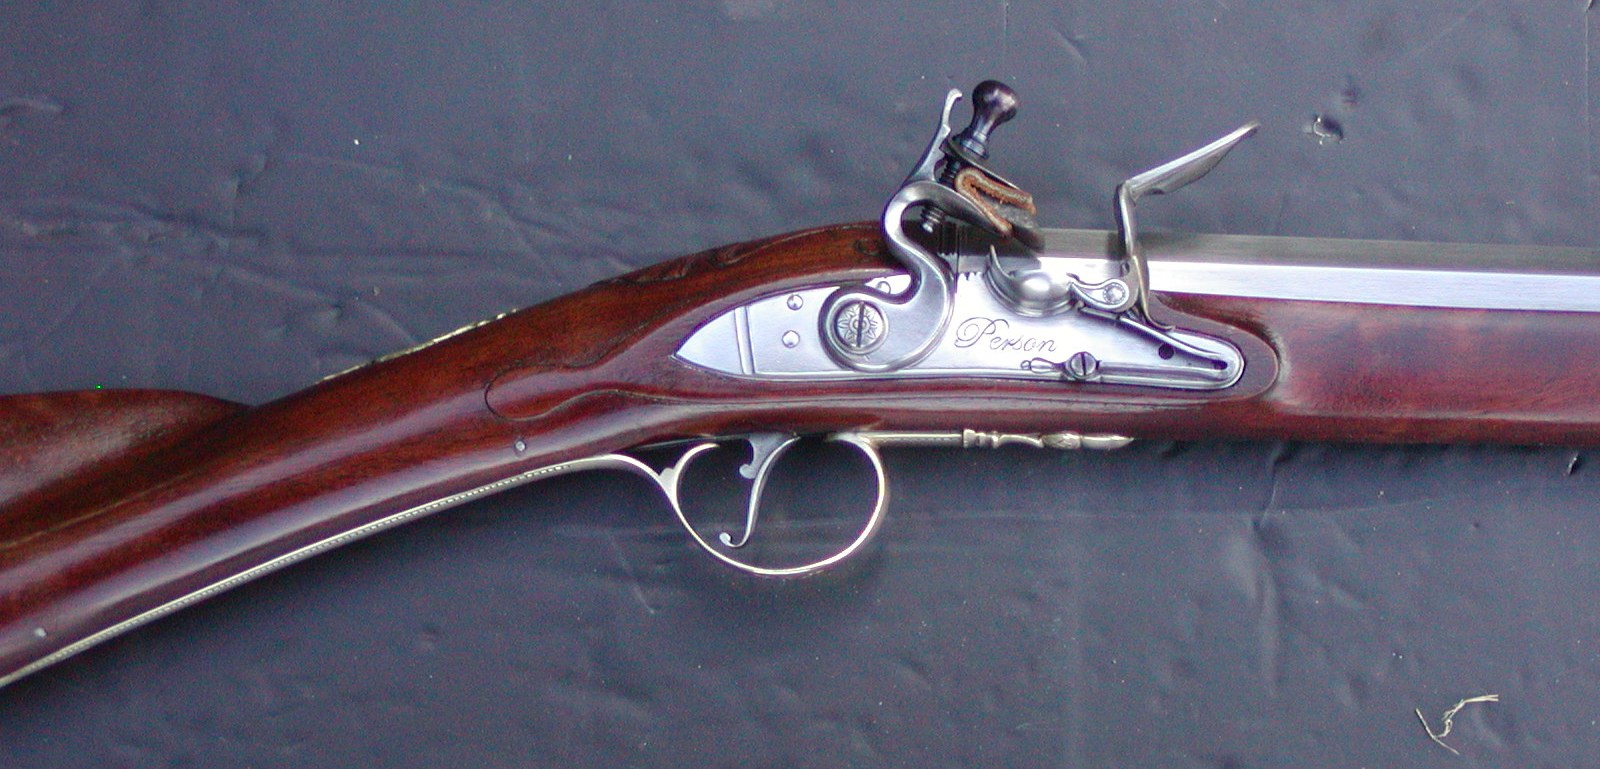
Oh well. Wrote myself a note, "Must do better next time"!
Aesthetically, what I dislike much more is the notch in the lock panel for the flint ****. No matter how you do it or how historically consistent it can be, it is still a blemish. It is not needed if your flats around the lock are properly thin and you taper the edge of the lock panel inward as it approaches the pan fence of the lock. No notches here:
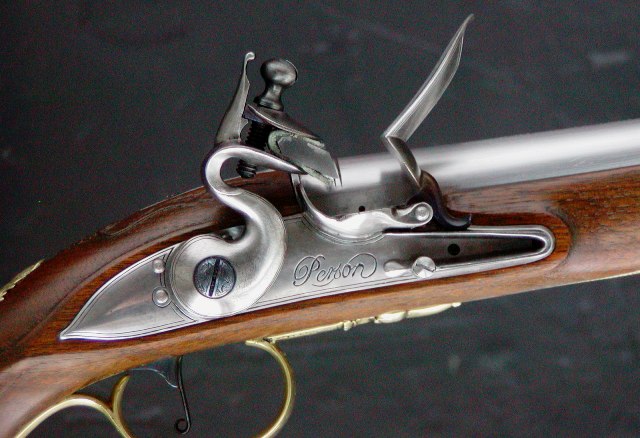
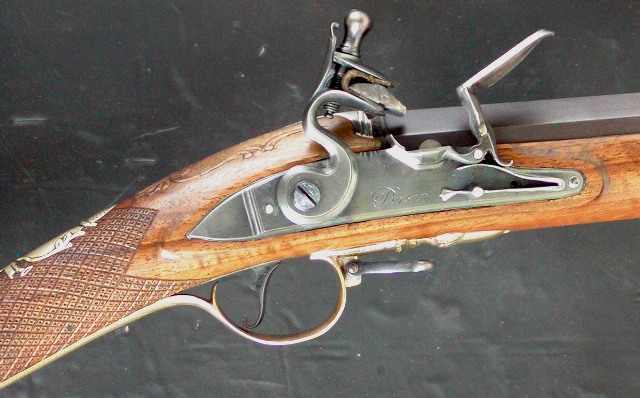
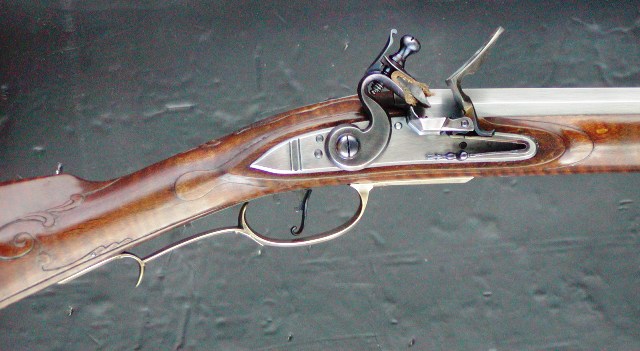
Love them thin lock panels:
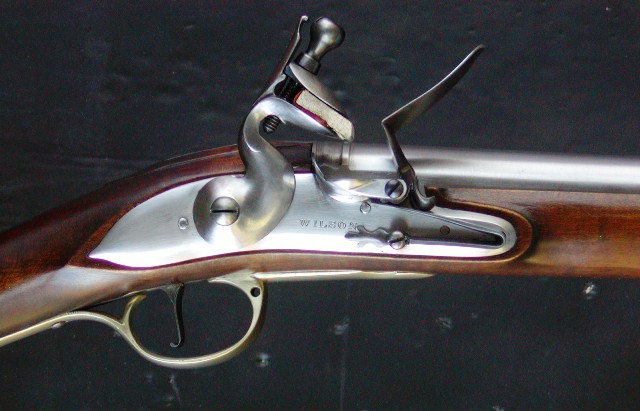
No notch here either, but oopsy, little gap behind the pan.
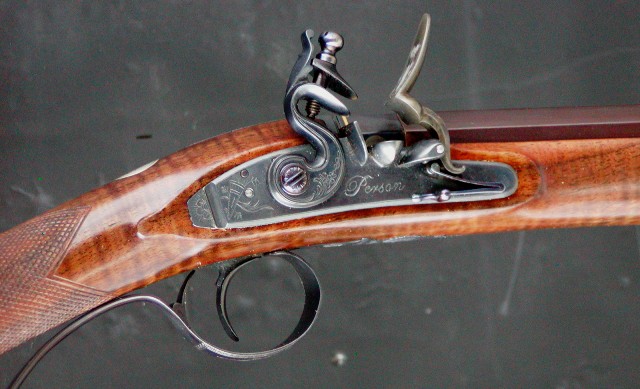
One other little trick that helps avoid the ugly notch, the flats around the lock do not have to be even in width. Here is a good example:
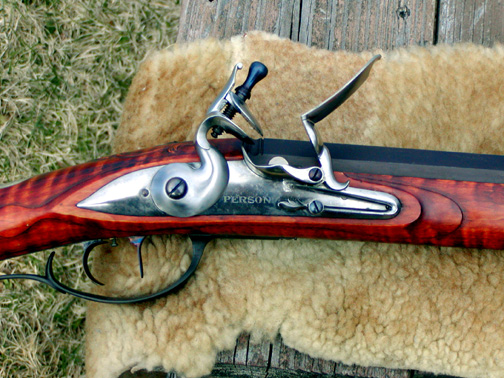
Thinning the flats along the top of the lock and leaving them wider on the bottom looks just fine and nicely balanced.
Good luck,
dave
You can certainly fix it but you don't have to. Many original guns show that gap as well and the little nib of wood can be very fragile and break off during cleaning or use. I'll be honest with you guys, on some guns I work to position the fence right at the end of the breech and on some I leave a little nib of wood but if it breaks off during construction, oh well, there will be a gap. The truth is, you really don't notice it with the flint **** in place. Here is a big gap on a Ferguson rifle but that is actually owing to the design of the breech.

Here is a fowler on which the nib didn't make it becoming a wood chip on the floor of my shop:

Oh well. Wrote myself a note, "Must do better next time"!
Aesthetically, what I dislike much more is the notch in the lock panel for the flint ****. No matter how you do it or how historically consistent it can be, it is still a blemish. It is not needed if your flats around the lock are properly thin and you taper the edge of the lock panel inward as it approaches the pan fence of the lock. No notches here:


Love them thin lock panels:

No notch here either, but oopsy, little gap behind the pan.

One other little trick that helps avoid the ugly notch, the flats around the lock do not have to be even in width. Here is a good example:

Thinning the flats along the top of the lock and leaving them wider on the bottom looks just fine and nicely balanced.
Good luck,
dave
Last edited:
tnlonghunter
40 Cal.
Dave, thanks for the pictures and perspective. I'll see what I can do about that notch.
I only use Rice bbls and to remove the breech plug requires a large wrench w/ 2 feet of pipe . The vise jaws have 1/8" thick copper liners. I place {2} 1/8" thick copper shims between the wrench jaws and the bolster. The pipe is more necessary when re-installing the breech plug so the witness marks easily line up exactly.
When browning the bbl and installed breechplug, no lubricant is used on the threads so the transition from bbl to breechplug doesn't fail to brown. Have used my squirrel LR w/o lubricant for a number of years and one day removed the breechplug and found no rust on the threads because the seal between the bbl and plug end allowed no gas seepage......Fred
When browning the bbl and installed breechplug, no lubricant is used on the threads so the transition from bbl to breechplug doesn't fail to brown. Have used my squirrel LR w/o lubricant for a number of years and one day removed the breechplug and found no rust on the threads because the seal between the bbl and plug end allowed no gas seepage......Fred
GANGGREEN
45 Cal.
I described a sad accident I had in the woods last week which left one of my rifles unusable and requiring repair or rebuilding. I tore it down to parts yesterday and was surprised to find the breech threads as clean as a whistle and easy to remove even though I had used no lubricant, anti-seize or anything else. I was also rather pleased to find that the bore of the rifle was basically as new even though I've had it for years now and have shot hundreds of rounds through it.
tnlonghunter
40 Cal.
How do y'all like to install your inlays? I've about got my hunter's star inlet, and I'm trying to decide. I've got one small chip at the northwest corner. Of course, I could epoxy it in place (which - along with some sawdust - might be good to fill the chip), and I know some use small brads or small screws. I'm open to suggestions.


- Joined
- Nov 26, 2005
- Messages
- 5,226
- Reaction score
- 10,889
Hi,
Do not be in a hurry to inlet all the parts and inlays. Fit the parts to the stock that you shape rather than have to shape a stock to fit your parts. That is the first big step toward building graceful rifles rather than awkward, clunky ones. Decorative inlays like the star should not be installed until you are almost ready for stain. There appears to be a lot of extra wood on your cheek piece such that if you file, scrape, and sand it down to the proper concave shape, your current star inlay mortice will about disappear. You should get a second chance at inletting it. The rough mortice edges suggest to me that your chisels are not sharp enough. In addition, do not install your trigger guard until the gun is almost ready for stain. Do not use sawdust and glue as a filler. It always looks bad. Instead glue in chips of wood if you have to with the grain running parallel with the stock.
dave
Last edited:
Col. Batguano
75 Cal.
- Joined
- Feb 10, 2011
- Messages
- 5,039
- Reaction score
- 1,424
A long soled rasp like a Japanese rasp will help you immensely with getting those long straight lines you want like coming off the butt plate, or for the line from the entry pipe bottom to the Trigger Guard. They also are not prone to giving you tear-out, unlike planes if worked in the wrong direction. With curly wood like you have, there WILL be parts of it that are going in the wrong direction.
It also looks like you need sharper chisels to obtain cleaner inletting lines. I suggest you use very fine and small hand-push tools, like the Pfeils to get things started, and leave the mallet-driven stuff on the bench. It's slower, but until you've really mastered them, they can doo too much damage too fast, like Dremel tools do.
It also looks like you need sharper chisels to obtain cleaner inletting lines. I suggest you use very fine and small hand-push tools, like the Pfeils to get things started, and leave the mallet-driven stuff on the bench. It's slower, but until you've really mastered them, they can doo too much damage too fast, like Dremel tools do.
tnlonghunter
40 Cal.
10 4, y'all thanks for the caution.
Col. Batguano
75 Cal.
- Joined
- Feb 10, 2011
- Messages
- 5,039
- Reaction score
- 1,424
One of the mistakes newer builders make in inletting pieces like cheek stars is they Gert it bent to match the profile of the surface and then inlet it straight down. When it gets seated to full depth there is an unsightly gap, usually at the top. Since the location of the bottom point is usually more critical then the top, I suggest you "over-bend" your inlay, and start at the bottom getting it to depth. As you progress you slowly "roll your piece in to the inlet. By the time you get to the top you will have a nice tight inlet all the way around.
The process is similar for convex things, like thumb pieces and patch boxes, except you start at the middle and work outwards
The process is similar for convex things, like thumb pieces and patch boxes, except you start at the middle and work outwards
Similar threads
- Replies
- 3
- Views
- 312
- Replies
- 6
- Views
- 341


