• Friends, our 2nd Amendment rights are always under attack and the NRA has been a constant for decades in helping fight that fight.

    We have partnered with the NRA to offer you a discount on membership and Muzzleloading Forum gets a small percentage too of each membership, so you are supporting both the NRA and us.

    Use this link to sign up please; https://membership.nra.org/recruiters/join/XR045103

Inlay recommendations for idiots

Muzzleloading Forum

Help Support Muzzleloading Forum:

This site may earn a commission from merchant affiliate links, including eBay, Amazon, and others.
Joined
Sep 13, 2020
Messages
810
Reaction score
1,187
Hi all....Looking for recommendations on first inlay projects...
I am slowly picking away at my Kibler Colonial. I am happy to keep it simple with out any carvings, etc. thinking its beautiful lines speak for itself, but as more time goes on, I would really like to give it a simple appropriate inlay. I have always been partial to the hunters moon, or a simple hunters star.
A couple questions....First, was it ever done to pin a piece without inlaying it? I seem to recall having seen some pieces done as such, but how common was it? can it look decent and appropriate?
2nd, If inlayed, are there particular designs that are easier/more forgiving for a novice to tackle? Of course, the smart thing to do is to get a design and practice first, of course.

Thanks for any thoughts
 
You don't want anything pinned to the surface of a cheekpiece. Think of what will happen to your cheek when the gun recoils. A star or hunter's moon are not the easiest to inlay, consider going for simple shapes to start like ovals.
 
I find straight lines like the hunter star to be easier then curved lines.
First thing on any inlay is to very slightly file the edge to have a one or two degree angle. Then make sure it has the same contour as the surface it will lay on. If you just pin to the surface it will look and feel shoddy. Inlet to be smooth with the surface or leave it off!
 
As a retired carpenter anything on wood that sticks out will just catch on clothing or hair, drive that non inlayed baby up under your fingernail once and you'll be using your rifle for a baseball bat on the nearest tree.
I've been thinking about flush brass wire designs put in like a nail but don't know how to do it without destroying the finish. And ya I could re-finish the stock but don't want all that work. See knife I have below as an example
1631731098705.png
 
A star is relatively easy to inlet due to the straight lines, but it has to match the curve of the cheekpiece. Practice on doing an inlay on a flat scrap of wood first.
 
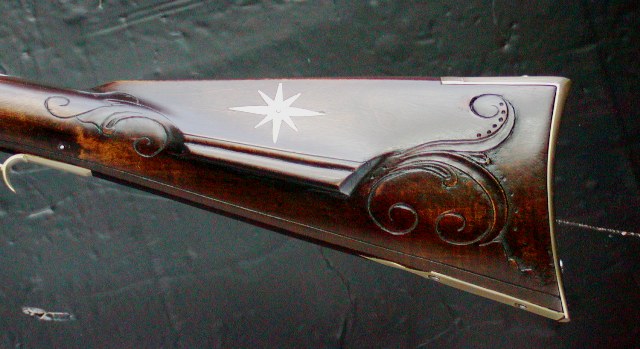
I inlay a "leafy" star on the cheeks of all the all Bucks County LRs. The star mat'l is 1/16" thick sterling silver which requires only 1 dome headed screw to retain. After the star or whatever design you go w/ is laid on the cheek, screwed down and formed to the cheek contour, the edges have draft filed on before inletting and this requires ensuring there's enough draft....more is better than less. An easier inlay is an oval name plate behind the tang... which when bent to the wrist shape the draft automatically happens. These inlays are attached w/ 2-4 small dia pins in ctsk holes and the heads are filed smooth.......Fred

P1010005.JPG
 
Hi Dave,
Consider that a simple inlay like an oval is easy to do but it really doesn't look that good unless engraved. A hunter star is very generic but it is fairly easy to do and can look OK without engraving. But even a star is a blob of metal. Below is a different example that really does nicely without engraving because it is less massive and more delicate. It was not hard to inlet at all. Just straight lines and the delicate shape was very easy to bend into the convex face of the cheek piece. The hardest part was making the star, which required some cutting and filing.
8gs9sth.jpg


A smaller version of it would not hard to make and you may be able to buy a commercially made star inlay and modify it.

dave
 
Great information and ideas. I considered the recoil/catching part of the pinned decoration, obviously a no go. I have a couple of old gun stocks that arent worth ...well, firewood really, but the curved stock area would be a perfect place to practice on. The engraved oval cheek piece at TOTW is another real good idea. I am just puttering along on my Colonial, so I have alot of time to decide what to do...or not to do. Thanks All!
 
Inlaying in to a concave surface is a bit on the tricky side. If you just contour your piece to the shape of the concave and inlay straight down you will wind up with a gap--usually on the top. You have to "over-bend" the inlay and then start inlaying from the bottom and "rolling" it in to position.

Be careful about filing in too much draft too when you leave your metal a little proud to the wood, and then file it flush you will inevitably take down some wood too. As you lower both surfaces keeping them flush, if the metal draft is at a steeper angle than the wood cut that little triangle (most guys use epoxy to glue their inlays in to position) will open up and give you a gap (or a black glue line).
 
Inlays are relatively easy if you take your time. Some file a reverse/undercut bevel on them to help get a tight fit.

To pin them in a way where the pin is virtually invisible, use a countersunk pin. You can make them easily. Use solid brass brads and do the following

1) drill a hole in a steel plate the same size as the brad
2) put a countersink in the plate, I do it using a larger bit at a slow speed
3) place brad in hole, use ball peen hammer to peen head of brad into countersink
4) drill and countersink inlay
5) drill small pilot hole in stock
6) trim brad to about 3/8", secure inlay and peen head into inlay countersink
7) file head flush with inlay, then fine sandpaper

Each star below has its own brad, and the eagle has 5 holding it.

20190730_191824.jpg
 
The "leafy" cheek star shown above is fairly easy to inlet if the draft is sufficient The star is centrally screwed down to the cheek and softly hit w/ a small piece of soft pine board {the silver is quite soft and easily bent}. The screwed down star is then outlined w/ an Exacto knife and the inletting starts. The star doesn't require addt'l bending and the star's contour ends up the same as the cheek contour. Very little filing of the star and wood is req'd to bring flush. Most important is sufficient draft to eliminate gaps......Fred
P1010004.JPG
P1010001.JPG
 
Last edited:
The "leafy" cheek star shown above is fairly easy to inlet if the draft is sufficient The star is centrally screwed down to the cheek and softly hit w/ a small piece of soft pine board {the silver is quite soft and easily bent}. The screwed down star is then outlined w/ an Exacto knife and the inletting starts. The star doesn't require addt'l bending and the star's contour ends up the same as the cheek contour. Very little filing of the star and wood is req'd to bring flush. Most important is sufficient draft to eliminate gaps......Fred
That is about where I am at putting a star on, just haven't attached it to the stock yet to trace around it. How thick is your material?
 
I tried and tried to make silver nails from sterling silver rod and none of them looked very good, so I finally gave up and ordered sterling silver earring studs from Rio Grande Jewelry supply. Those have worked out just fine.

Be careful about using materiel that is on the thinner side, like .040". I made one star from German Silver and as I was filing it flush I filed a hole right through it! Aaargh! So I ripped it out and made a new one (this time from .050" sterling) and found that was much easier materiel to work with--just quite a bit more expensive.
 
Back
Top