-
Friends, our 2nd Amendment rights are always under attack and the NRA has been a constant for decades in helping fight that fight.
We have partnered with the NRA to offer you a discount on membership and Muzzleloading Forum gets a small percentage too of each membership, so you are supporting both the NRA and us.
Use this link to sign up please; https://membership.nra.org/recruiters/join/XR045103
You are using an out of date browser. It may not display this or other websites correctly.
You should upgrade or use an alternative browser.
You should upgrade or use an alternative browser.
Inletting a patchbox
- Thread starter navaho
- Start date

Help Support Muzzleloading Forum:
This site may earn a commission from merchant affiliate
links, including eBay, Amazon, and others.
A pencil
yard stick
razor knife
small sharp chisel
large sharp chisel
inletting black or lipstick
rubber mallet
small block of wood
round piece of wood like part of an axe handle
screw driver
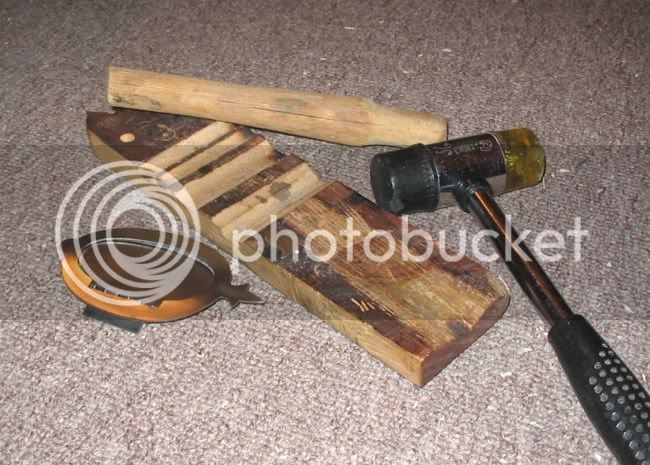
The rubber mallet, the block of wood and the round piece of wood are for forming the patchbox to match the contour of the rifles stock.
Mine look like this

If you dont have a picture to establish the position of the patchbox, I use the following zonie rules.
The rear of the patchbox should be centered on the center of the curve of the buttplate.
The centerline of the lid of the patchbox should fall on a line drawn between the center of the buttplate and the screw on the hammer or ****. (use the yardstick and pencil to draw this line).
The forward end of the patchbox (finial) should be even with or up to 1 1/4 inches behind the start of the wrist. It should not extend into the wrist area. (Use your eye to determine the best location).
When the best location is found, draw around the finial and down both sides of the lid.
Also mark the center of the hinge.
Installing a patchbox is very similar to installing inlays so use this link to read up on how to prepare the edges of the patchbox finial and side pieces and install these things:
INSTALLING INLAYS
Remove the wood for the hinge being careful not to cut outside the area where the patchbox will live.
Remove the wood that interferes with the bent spring tab (if one is present).
Use the block of wood, the wooden dowel and the rubber mallet to form the finial to fit the stock.
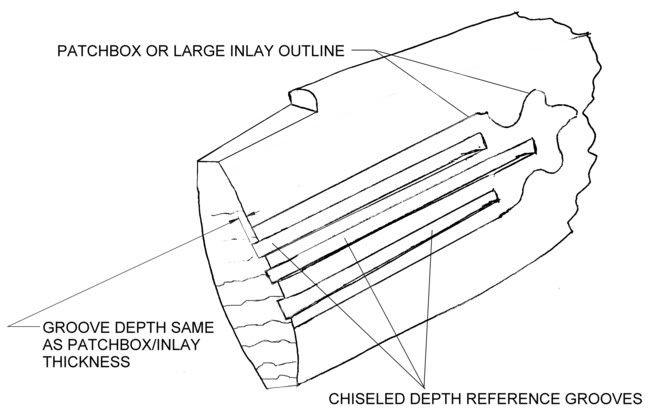
When you start to remove the rest of the wood, you might want to use this idea to establish the depth.

Many people install the screws in the finial before they actally start cutting in with a razor knife but if the fit with the contour is really good, the gel magic glue will also work.
Save cutting in the spring slot and main compartment until you have all of the pieces installed. Then cut the main compartment.
The lock will have to wait until another day.
yard stick
razor knife
small sharp chisel
large sharp chisel
inletting black or lipstick
rubber mallet
small block of wood
round piece of wood like part of an axe handle
screw driver
The rubber mallet, the block of wood and the round piece of wood are for forming the patchbox to match the contour of the rifles stock.
Mine look like this

If you dont have a picture to establish the position of the patchbox, I use the following zonie rules.
The rear of the patchbox should be centered on the center of the curve of the buttplate.
The centerline of the lid of the patchbox should fall on a line drawn between the center of the buttplate and the screw on the hammer or ****. (use the yardstick and pencil to draw this line).
The forward end of the patchbox (finial) should be even with or up to 1 1/4 inches behind the start of the wrist. It should not extend into the wrist area. (Use your eye to determine the best location).
When the best location is found, draw around the finial and down both sides of the lid.
Also mark the center of the hinge.
Installing a patchbox is very similar to installing inlays so use this link to read up on how to prepare the edges of the patchbox finial and side pieces and install these things:
INSTALLING INLAYS
Remove the wood for the hinge being careful not to cut outside the area where the patchbox will live.
Remove the wood that interferes with the bent spring tab (if one is present).
Use the block of wood, the wooden dowel and the rubber mallet to form the finial to fit the stock.
When you start to remove the rest of the wood, you might want to use this idea to establish the depth.

Many people install the screws in the finial before they actally start cutting in with a razor knife but if the fit with the contour is really good, the gel magic glue will also work.
Save cutting in the spring slot and main compartment until you have all of the pieces installed. Then cut the main compartment.
The lock will have to wait until another day.
Similar threads
- Replies
- 11
- Views
- 874
- Replies
- 34
- Views
- 3K
- Replies
- 12
- Views
- 853


