• Friends, our 2nd Amendment rights are always under attack and the NRA has been a constant for decades in helping fight that fight.

    We have partnered with the NRA to offer you a discount on membership and Muzzleloading Forum gets a small percentage too of each membership, so you are supporting both the NRA and us.

    Use this link to sign up please; https://membership.nra.org/recruiters/join/XR045103

Inletting fowler Trigger guard question

Muzzleloading Forum

Help Support Muzzleloading Forum:

This site may earn a commission from merchant affiliate links, including eBay, Amazon, and others.

Micah Clark

45 Cal.
Joined
Dec 9, 2010
Messages
623
Reaction score
4
The talk on another thread about a Chambers PA fowler brings to mind a question I have. ( Got one of those kits on order.)

The fowler trigger guards are much longer and more ornate than a rifle on the ends with an acorn or torch or other elaborate tip.

Are those decorative ends inlet?

Also how deeply is the guard inlet overall?

Hope those questions make sense ... It seems as though I've seen guards at differing depths.

Thanks !!
 
Mac1967 said:
The talk on another thread about a Chambers PA fowler brings to mind a question I have. ( Got one of those kits on order.)

The fowler trigger guards are much longer and more ornate than a rifle on the ends with an acorn or torch or other elaborate tip.

Are those decorative ends inlet?

Also how deeply is the guard inlet overall?

Hope those questions make sense ... It seems as though I've seen guards at differing depths.

Thanks !!

I'm not the best guy to answer your question, but I do have a copy of Recreating the American Longrifle, which Jim Chambers recommended to me. It says to make mortises in the stock for the lugs first. The front extension is inlet about 3/32, then pinned in place before the rear extension is worked on. Also says the extensions are typically 1/16 to 3/32 thick and it's good to inlet them slightly below the level of the wood so when finished, the wood level is right. Note that the trigger and trigger plate were dealt with on the page before this one about the guard.

I would recommend reading the whole book, or one like it, yourself. I've given you only a small part of a page and a half on inletting trigger guards, and the book is packed with information.

Again - Warning! - I have no personal knowledge of how to do this, just passing on some out-of-context information that you can consider.

It's really too bad you don't live up in the northwest, we could get together to compare stuff!

Jamie
 
That's very kind, I am in Indiana. . .

I don't have that book, but I do have The Gunsmith of Greenville County. . .I'll look up the trigger guard again and see what he says.

I guess the reason I asked is that it seems like inletting a Fowler guard is a lot more of a task than a typical rifle because of it's length and fancy tips. . a rifle as you know is mostly just squares.

Thanks for the info from that book,
 
As a general(there's always exceptions) rule trigger guards, side plates and even locks(most, especially Germanic) are inlet to the bevel.

In short yes, the decorative finials are inlet.

For this type of work I recommend a small chisel. A 1/8 or smaller chisel is good for some of this work. A small width chisel is also good for the nose of the lock. Advance the out line just a hair for each cut with the small chisel and you will be able to make tight curves. If the curve is very tight you can even make a tiny chisel from pin stock or even a nail.

It's not written in stone you have to use a decorative guard like that. If it really bothers you can you can always use a rifle guard from the period.

Honestly though, by the time you get to that I think you'll be confident enough in your skill to inlet it. :hatsoff:
 
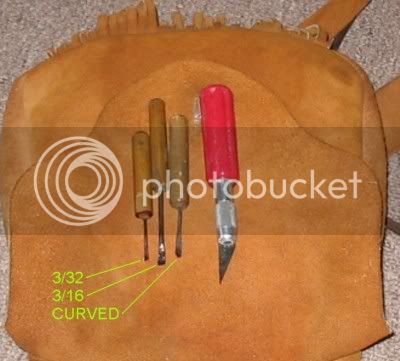
To remove the wood when inletting trigger guards, sideplates and inlays that contain curved shapes I use the tools shown in this photo.


As anyone who has built a muzzleloader knows, a good very sharp Exacto knife is essential.

Along with this, small home made chisels of various widths are needed to remove the wood in these tight areas down to a common, smooth bottomed depth.

I made these chisels using lengths of music wire, bought at my local Ace hardware store. Hobby shops also carry this material.

The sizes of wire that work the best for this sort of chisel is 1/16", 3/32" and 1/8".

The numbers shown in the photo represent the finished width of the cutting end.

The wire is pre-hardened so it needs to be softened (annealed) before it can be pounded and filed into a chisel shape.

When the shaping is finished, the end is heated to a bright red/orange color, quenched in oil and then ground to a razor sharp edge.
 
Mac scroll down in the builders bench to virgina fowler, You can see it in the pictures.
 
Hi Mac,
The guard is completely inlet but very shallowly, perhaps no more than 1/16". Do not inlet the guard until you have finished shaping the gun almost to its finished form and ready for final sanding or scraping. Inlet the front first. Then inlet the rear by starting behind the trigger bow and working backward. As the guard sits down in the wood, the rear end will creep forward a tiny bit. If you cut that outline too soon, you will end up with a gap. When inletting the rear lugs, give them a little room in the inlet to move forward. Once the guard is all the way in, clamp it tightly in place and drill the pin holes. If the guard is steel, anneal it by heating to bright red and letting it cool slowly. That will help remove some of the springiness that can make inletting more difficult. If it is brass you probably do not need to do any annealing. To anneal brass you normally heat it to bright red and quench in water but castings can crumble under high heat. I leave the front lug as high as possible so the pin is hidden within the lock mortice. If the front lug on your guard is too short, flatten the top of the lug and cut a dovetail in the top. Make a mating piece of steel with dovetailed tennon to fit on the top and extend its height. Install the piece of steel and solder it in place.

dave
 
These are ALL helpful items. When I inlet for my Lancaster, I used an X-acto knife more than anything else, and it is only about 1/16th of an inch deep. I wondered if fowlers were done similarly and it sounds like they are.

The pinning advice is a good reminder as are the tool suggestions. . small chisels especially for the decorative tips of the fowler guard seem essential. . . my lancaster was mostly all squares or straight angles.

THANKS FOR THE TIPS !!!! VERY HELPFUL.
 
Just a heads up.....the cast in lugs on the TG are not always on the center line. They may be offset a little to one side or the other. Examine your guard closely and cut the recesses accordingly.
 
Excellent . thank you . .

I have my Gunsmiths of Greenville County open to inletting the trigger guard. That piece, and the Oct-to-Round barrel are the two big differences between my first build (Lancaster) and the fowler that I've been pondering . . . yes, the butt plate is different, but already inlet in chambers kit and not a big concern to me, yet.
 
I beg to differ when people talk about using Xacto knives for in letting. I find them to be almost useless, too flexible, and the tips break off. I use chisels nearly exclusively, along with a couple of chip carving knives. I have a hand forged broad nosed chisel that I use with a rocking cut to shave the sides of inlets. The cutting edge is radiused to allow a rocking cut. I outline my inlets with a sharp scribe, following it up with a sharp pencil point, in the scribed lines. Rather than a Xacto knife. BJH
 
To go along with my rant against Xacto knives, the broad nosed chisel is about the nicest tool for shaving long inlet edges, such as fowler trigger guards. It is easy to make from a flat chisel the cutting edge has about a 1/4 inch radius. The cut is a simple rocking motion, yealding high precision for me. BJH
 
So is this broad nose chisel you mention a rounded cutting edge or is it flat?

I used an x-acto for my trigger guard, but chisels for everything else I can remember. . .not to sure why, perhaps because the depth was small.
 
Hi Mac,
Outlining inlets with thin razor sharp knives and blades may seem like the best way to go but there is a better way. Use a sharp pencil and outline the inlet. Then use very small flat chisels with bevels on both sides of the blade. Stab down on or on the inside edge of the pencil line to outline the inlet. The double beveled blade will compress the wood back from the inlet edge. Backcut to remove the edges and clean out the wood in the rest of the inlet. Your piece will go in easily but you will be concerned about gaps and a loose fit. Not to worry. When the wood is wet with water or finish, it will swell around the inlet and make it perfectly tight. If you used the sharp knife or X-acto blade, you will likely have to scrape the edges later to allow for that swelling.

dave
 
Dave,

That's really good advice. It makes sense to use a chisel rather than x-acto for the trigger inlet. I think we used a pencil, I can't recall on my first build. Thanks !!!
 
Think of my round nosed chisel as a flat chisel with a round or arced cutting edge. The bottom is stoned flat and polished, the bevel or relief angle forms the round shaped edge. I hope this explains it adequately. BJH
 
Back
Top