• Friends, our 2nd Amendment rights are always under attack and the NRA has been a constant for decades in helping fight that fight.

    We have partnered with the NRA to offer you a discount on membership and Muzzleloading Forum gets a small percentage too of each membership, so you are supporting both the NRA and us.

    Use this link to sign up please; https://membership.nra.org/recruiters/join/XR045103

Inletting on the lock, normal?

Muzzleloading Forum

Help Support Muzzleloading Forum:

This site may earn a commission from merchant affiliate links, including eBay, Amazon, and others.

Guest
I got my Jim Chambers kit started, barrel is inlet and pined, and started on the lock. Used inlet black and got the flash pan tight against the barrel, but to clear the spring I exposed part of the ram rod hole and part of the rear barrel. Is this normal?

Thanks, lots of mistakes on the first one, hopefully it will come out close enough to rite.
 
Sounds like you went a little deep. It's pretty normal to break into it with the lock screw though
 
I've done 3 Chambers's "kits" and on all 3 exposed the bbl but never the RR hole. Are you sure the lockplate isn't canted in? If the lock plate is parallel w/ the side flat of the bbl, then the RR hole wandered a bit. No big deal if it doesn't infringe on the RR all that much....Fred
 
+1. Sometimes a ramrod hole drifts. If the lockplate of flush against the barrel and perpendicular to the top flat, you have not inletted too deep. It's rare to not expose the lower diagonal barrel flat when inletting a lock.
 
Hi,
That happens quite often if you are making a slim gun with a big lock. You really need not worry about it. Even if you did not break into the barrel channel, the sliver of wood left between the mainspring and barrel is so thin it really doesn't provide much strength. The objection is cosmetic not structural. In many cases, the only way to avoid it is to thin the mainspring, but then you have to make sure the lock is still tuned with the weaker spring. When I make springs for locks, I make the lug or tab that anchors in the bolster long so the top leaf of the spring sits lower relative to the barrel. That often prevents breaking into the barrl channel. Exposing part of the ramrod channel is also not a problem as long as the lock does not interfere with the rod.

dave
 
Thanks, everything works, and it's not deep into the barrel channel or the ramrod channel, and won't interfere with either, just bugs me a bit. And as my first build I didn't know if it was normal or not.

Next issue is the cheap tang bolt, striped that sucker out and never even got it tight. Got another on order, but may wind up turning one out of something a bit tougher than the apparent pot metal it is made from. It was unbelievably easy to strip, even for 8-32 threads.

Thanks, it's quite a trip, hopefully I'll have a rifle that I can shoot and be proud of at the end.
 
Don't worry about the break thru but in the future remember that this entire area of the stock is the weakest part of the whole gun so remove as little wood as is possible while still maintaining the free operation of the mechanical parts.

As a general observation aimed at no one special, it never seizes to amaze me that we have so many good instructions on the Forum but everyone seems to overlook the rule.

The rule? What's the rule?

If you folks are using a PRE-CARVED stock gun from ANY of the suppliers that has the lock mortice roughed out by them, the FIRST thing to work on is inletting the lock.
This does not have to be to full depth. In fact, it's better if it is not until the barrel is fully inlet. But, the locks position should be fully established before inletting the barrel.

The rule is because, only when the locks position is firmly established will you know where the touch hole or the percussion drum or bolster needs to be.
Only then will you know how far the barrel must be moved back towards the butt to position the breech plugs face in the correct place to match the lock.

Now, if you are building a pre-carved stock THAT DOES NOT HAVE THE LOCK MORTISE CUT, then the correct order of assembly is to first do the barrel. Then using the barrels breech plug face for reference, locate the lock and inlet it.

OK. I'll get off my soap box for now. :)
 
Thanks Zonie, that's an eye opener, i was thinking that after the barrel inlet i could adjust the lock to meet the flashhole/touch hole liner. Better to check position of lock/barrel relationship first. My mind has been opened. Thanks again.

steve
 
Hi,
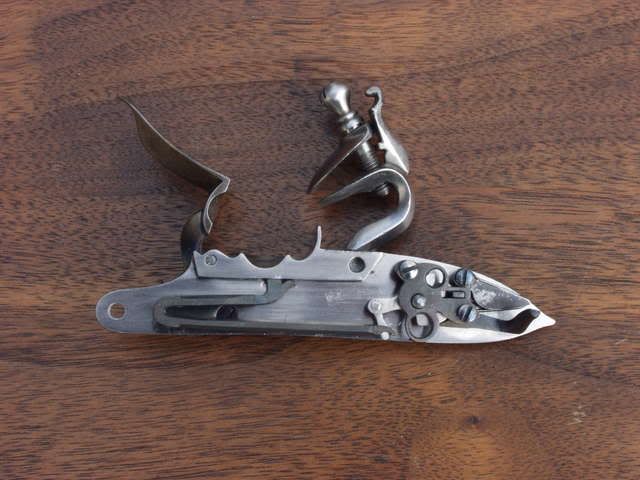
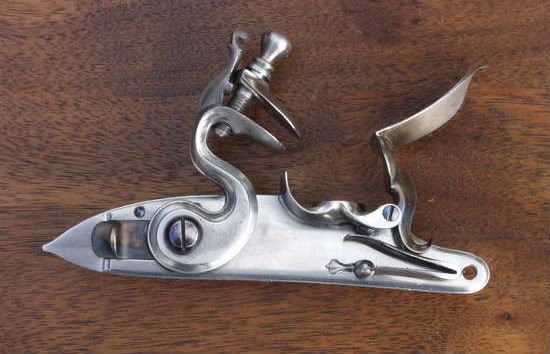
This doesn't help you now but it might in the future. This is a lock I built from castings supplied by Blackley's in England. The lock is a copy of those used on dueling pistols by Wogdon of London. I made all of the screws and springs. Note how long I made the tab or lug on the mainspring (the part that fits into the thickened bolster that forms the pan and snugs up against the barrel. A long lug like I made lowers the upper leaf of the mainspring and enblaes you to leave more wood between the barrel and the lock mortice. This was a common solution on fine English guns.

dave

wogdonlockinsideunfinished.jpg

wogdonlockunfinished.jpg
 
With a swamped barrel, I have never opted for a "semi inlet" lock, as the swamped profile limits fore/aft and you are basically stuck with what is cut (barrel channel) on a pre-carve.
With a straight profile barrel, then a "semi inlet" lock is acceptable. I personally prefer a non inlet lock/trigger precarve as I have found that touchhole location in relation to the pan and breech makes or breaks a flinter IMO.
Anyway, sometimes you get "into things" and getting a mainspring almost right up to the barrel comes with the territory (I have even had to file a light channel in the barrel's underside to get a front lock screw where I wanted it.

You do want as much ramrod as will allow though!
 
Hi Blade,
That is a safety bolt, which slides forward and locks the tumbler so there is no chance the lock can be fired. Note the slot for the bolt in the bridle and the spring fitted inside the sear spring. It was a common feature on better English locks from the mid-18th century until the early 19th.

dave
 
Back
Top