• Friends, our 2nd Amendment rights are always under attack and the NRA has been a constant for decades in helping fight that fight.

    We have partnered with the NRA to offer you a discount on membership and Muzzleloading Forum gets a small percentage too of each membership, so you are supporting both the NRA and us.

    Use this link to sign up please; https://membership.nra.org/recruiters/join/XR045103

Inletting Tools?

Muzzleloading Forum

Help Support Muzzleloading Forum:

This site may earn a commission from merchant affiliate links, including eBay, Amazon, and others.

Guest
What do you guys use for tools when inletting inlays into a gunstock? I put my first inlay in the stock of my pistol last night, and it came out okay, but definitely not as good as I'd have liked. I glued the inlay to the stock with a drop of Elmer's, traced around it with an Xacto knife, and removed the wood with a 1/4" wood chisel (the smallest thing I had that I thought was appropriate). It took a while, and I didn't rush, but I still found that when I was finished, the edge around the inlay was not sharp and clean. I found myself wishing I had some sort of smaller, more controllable tool to cut the wood out with. I also had a difficult time because I couldn't clearly see the cuts made by the Xacto knife... I'm thinking on the next one I'll both cut with the Xacto and trace it with a pencil for clarity?

I've done searches and gone back and read as many posts on inletting I could find, and I find references to things made out of hacksaw blades and such, but lack of detail leaves me wondering. I did make a block like Zonie's for curving the inlays, and that worked fine, so I at least have them curved to fit the stock. The next two inlays are stars, and I really want them to come out better than the first one.

Help?
 
StaticXDOOd,

I use an xacto knife and small sharp inletting chissels for cutting. I also have some small bottoming files I use as well.

I don't know if there is anyone out there that considers inlay work easy. You just have to take your time. One trick I have learned with brass inlays is that I will bevel the edges and "flex bevel" the inlay itself. This way when the area is ready I can insert the inlay, tap it down, and it will expand "Spread flat" in the prepared area. Works pretty good.

I use 5 minute epoxy and brass nails to hold my inlay work in place. I just sand over everything then polish it back with the finest grit emory cloth and steel wool. :thumbsup:
 
You need to chamfer the edge of your inlay piece at about 5-6 degrees with a file, all-th-way-around. I don't use glue to hold the inlay I would rather clamp the item in place.

Get yourself in good direct bright light on your work. Buy yourself one of those magnafication visors so you can see what your doing. Have all this in a good work area so you can have your wood steady and secure. Score the underside with a new xacto razor. Remove your material. Check for fit. Score, remove material only where needed. The idea is to work your inlay in at an angle and thus compensate for errors by wedging the piece in. Remember wood is fiberious, fibers bend and can be "mashed".

Get yourself a oil lamp and put some smut on the backside of the inlay. Place in inlet area and remove material as needed. Remove any darkened material which would indicate a high spot.

If your 1/4" chisel seems hard to control it's probably dull or possibly a poor angle. I find that a razor sharp 1/4" chisel 20 deg. edge works quit nicely.

BTW: Practice beforehand, sometimes its not the tool thats the problem.
 
Pardon my ignorance... I'm new to this gun building game, and need a little clarification:

What exactly is a "bottoming file"? And when you say "small, sharp inletting chisels", how small do you mean? Do you have a photo/link to where I can obtain such tools?

I don't necessarily expect it to be easy, and believe me, I didn't rush (or at least I didn't feel like I was rushing)... I think the biggest problem was I didn't have as much control as I needed with the tool I was using.

Thanks for the help!
 
Thanks, rootnuke. The chisel was brand new, never been used before, so no, I didn't sharpen it, but that doesn't mean it didn't need it. I was smoking the underside of the inlay with a candle, but I wasn't scoring the surface with the Xacto either... now that I think about it, that probably helped with the lack of control too, didn't it? I also didn't bevel the inlay, and will do that with the next one.

I will check the web site you suggested later this evening when I get home from work. I will also sharpen the chisel. :redthumb:
 
Let me step in here, these tools are in Brownell's catalog. A bottoming file is like a checkering file in size, only about 1/4" long. It is perhaps the only way to get into some corners. A particular gumsmith of note told me he makes small chisels out of electric jig saw blades. These can be made in any shape or size and work pretty well.
 
Static: I ended up building my own chisels.
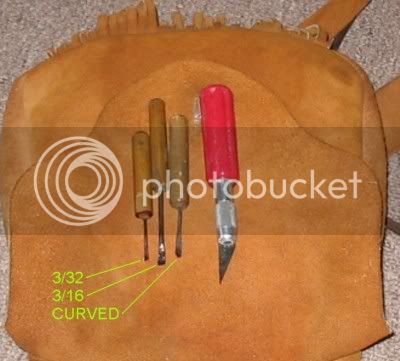
Although I made several, the ones I use the most for inlaying is one about 1/16 wide, one about 3/32 wide and one about 3/16 wide. I seldom use the 3/16 inch one as it takes too big of a bite and is too hard to control.
Heres a photo of a few of them along with the Exacto Knife I use (it takes #2 blades).
chiselstext.jpg


These chisels were made out of a piece of 3/32 and 1/8 inch dia music wire. (Hardware stores or hobby shops have it).

Using a propane torch a vise flat and a small hammer I hot forged the wire flat and then filed it to the approx shape and width I wanted. Note, you have to either anneal music wire or work it red hot. You cannot form it in the tempered condition it is in when you buy it. It is too hard.

After getting the tips filed, I heat treated them (red heat into an oil quench, then wet sand to remove the oxides and temper to a yellow color). After hardening and tempering them I ground the final edge and polished it with my polishing wheel and "stainless" compound. (They are all polished to a razor blade sharpness and take very little pressure to cut thru the wood.)
The chisels were then mounted into some 3/8 dia wood dowel stock I got at Ace.
It helps to file a small flat on the handles bottom. With the wedge or bevel up, file the flat on the bottom.
You can see this flat on the chisel on the left.
The points are so small they are difficult to see if the edge is up or down, so the flat on the handle gives instant notice about which way it's being held.

As you may have read in my earlier posts, I incise at least 1/16 deep with my knife before I remove the inlay (break the glue bond). Then using the 3/32 wide chisel I place the edge of the chisel (bevel up) about 1/32 to 1/16 inside the incised cut and using thumb pressure only I cut downward, towards the line at about a 45 degree angle.
Except to gauge where the point of the chisel is to start the cut, you don't have to worry about where the actual incised cut is, the wood will chip out until it hits it. :)

To finish the bottom, I turn the chisel so the bevel is down (against the bottom of the pocket) and again using thumb pressure only, I remove the wood until I get to the depth I want. ::
 
Good info. Thanks. I'll let you know how the next one turns out. Hopefully, by the time I'm done inletting the third inlay on this pistol, I'll have it down, and then y'all can start helping me with the silver wire inlay!

:what:
 
You might also try using a magic marker rather than candle soot. I have used both the errasable and permanant type.
Packdog
 
As mentioned above, outlinining the profile of the inlay with a crisp, clean cut line is critical to a right job. Be mindful of grain direction and try usin' two-face carpet tape to hold the inlay in place when ur outlinin'...Longshot
 
StaticXDOOd,

Sorry I did not get back to your question/reply. Been pretty busy. It would seem that the other guys answered the bottoming file question, and others, quite well! :thumbsup:

Now Zonie, he is the master of inletting inlays! You should look at some of the pictures he's posted in the Photo section. Very nice work! :thumbsup:
 
It sounds like your on your way to learning....don't get frustrated, keep trying...your doing pretty good so far. Before you know it, it will be a piece of cake.
 
No problem Ohio Joe... and yes, I've looked at Zonie's photos of his rifles, and yes, I agree, he definitely knows how to inlay.

They say practice makes perfect, so I just need to practice some more, and sharpen my tools. Not frustrated, just wanted to make sure I was headed in the right direction. Thanks for all the help everybody! I will post some pics of the first one, and the second one, hopefully you will see some progress and improvement. :)
 
I used two chisels, 1/4" and one ground to 1/8" and the reddest, cheapest lipstick I could buy. Worked fine and I could see the red better than the black marking.
 
are you using bench chisels?
i think carving tools would work better and get a skew type they work nice in the tight corners especialy if you are going to do a star.
the most important part is learn how to sharpen your tools find a local carver or woodworking store and have someone show you how to hone your tools. witch is really polishing them once you learn how to hone your tools woodworking becomes a lot more fun.
 
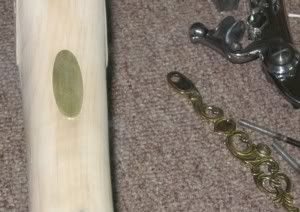
Speaking of inlays, here are a few photos:
inlays1.jpg

After the inlay is in place, it often has to be filed and sanded flush with the adjacent wood. This shows the satin finish which results.
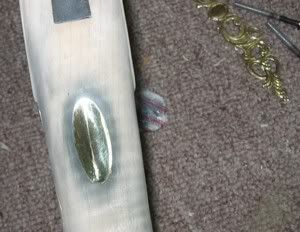
Most people aren't looking for satin inlays, so I have used a high speed tool (Dremel) with a flex attachment. In the flex attachment I have a small buffing wheel and I used "stainless" buffing compound.
inlays2.jpg


No matter how careful you are, you can expect to see buffing compound on the wood when your done.
If your working on Walnut or other dark woods it may not matter, but on Maple, obviously the discoloration needs to be removed.
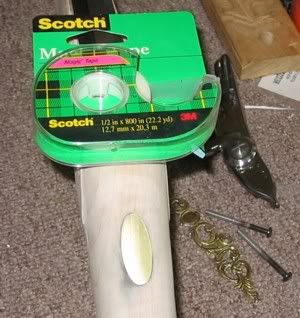
inlays3.jpg

My method envolves very lightly sanding the wood adjacent to the inlay.
To protect the polished surface, I apply two layers of Scotch Tape. I like this because you can see thru it and it cuts easily with a razor knife. Here it is trimmed at the edge of the inlay with the tape outside the inlay removed.
This tape will protect the inlay, but it is not real robust so I try to avoid sanding it while I remove the discolored wood surface around the inlay. The job is just about done.

When the job is done, leave the tape on the inlay. It will protect its surface when you apply the oil or other finish and rub/steel wool or whatever to the woods finish.

After the stock finish is applied, you can remove the tape.
Removing the tape isn't as easy as you might think. I have found that prying up the edge and dabbing the exposed undersurface with rubbing alcohol helps with this. ::
 
First off, sorry it's taken me so long to get back to this, been sick for a couple of days, and the thought of looking at a computer screen well, let's just say I didn't think it would help the situation... :no:

Well, I did my second inlay over the weekend, and I gotta tell you guys, it went much better than the first one! I still need more practice, but man the work went much easier than the first one! Just the one tip of scoring the wood to be removed with the Xacto knife before removing the wood saved me much headache!

Zonie, I did polish one of them with the Dremel just like you show in the photos, and I did get the discoloring around the edge of it. When I tried to lightly sand it though, I ended up getting scratches back on the inlay... so I just went ahead and cleaned it up until I could figure out how to polish it some other way. You must be psychic, because that was going to be my very next question to you! :: I will try the scotch tape thing and give it another go.

I will also post pictures soon, so y'all can get a good laugh at my l33t iN1377iNg 5k1LLz. :crackup:

Thanks again for all the help! Progress is slow but steady, and hopefully we'll have a finished pistol here in a few weeks!
 
"...You must be psychic,..."
The word is psycho :: :: :: :: ::

Just remember psychopath is the little trail a psycho leads you down, or is it the person who has a uncontrolable urge to build a muzzleloading rifle or pistol????? ::

Maybe it's the path one builder leads the other builders down?
 
Okay, here goes... try not to laugh too hard. :redface:

Here's the first inlay. Probably not the smartest one to start with, curvy shape, and curvy part of the stock (right behind the tang on the curve of the grip).
dpinlay1.jpg


Here's inlay #2. Far from perfect... but at least the work was easier than on the first one.
dpinlay2.jpg


Work's been crazy this week, and I haven't had a chance to try the Scotch tape trick and polish them yet, but I will. They're just sanded with 320 grit in these pics.

PH34R MY 5K1LLz! :crackup:

(Hey... if you can't laugh at yourself... :redthumb: )

I have to say, even though I'm kinda beating myself up about the slight gaps around the edges here and there, even with those they still look really good. At 12+ inches away from your eye or so, you can't see anything wrong. I'm kinda hoping too that sealing/oiling the stock will swell the wood some and make the gaps even smaller or perhaps eliminating them? I can hope anyway... regardless, I still think the final product will be acceptable, as long as I keep the magnifying glasses away from it.
 
Back
Top