• Friends, our 2nd Amendment rights are always under attack and the NRA has been a constant for decades in helping fight that fight.

    We have partnered with the NRA to offer you a discount on membership and Muzzleloading Forum gets a small percentage too of each membership, so you are supporting both the NRA and us.

    Use this link to sign up please; https://membership.nra.org/recruiters/join/XR045103

knife handle pin technique

Muzzleloading Forum

Help Support Muzzleloading Forum:

This site may earn a commission from merchant affiliate links, including eBay, Amazon, and others.
Joined
Oct 10, 2011
Messages
208
Reaction score
38
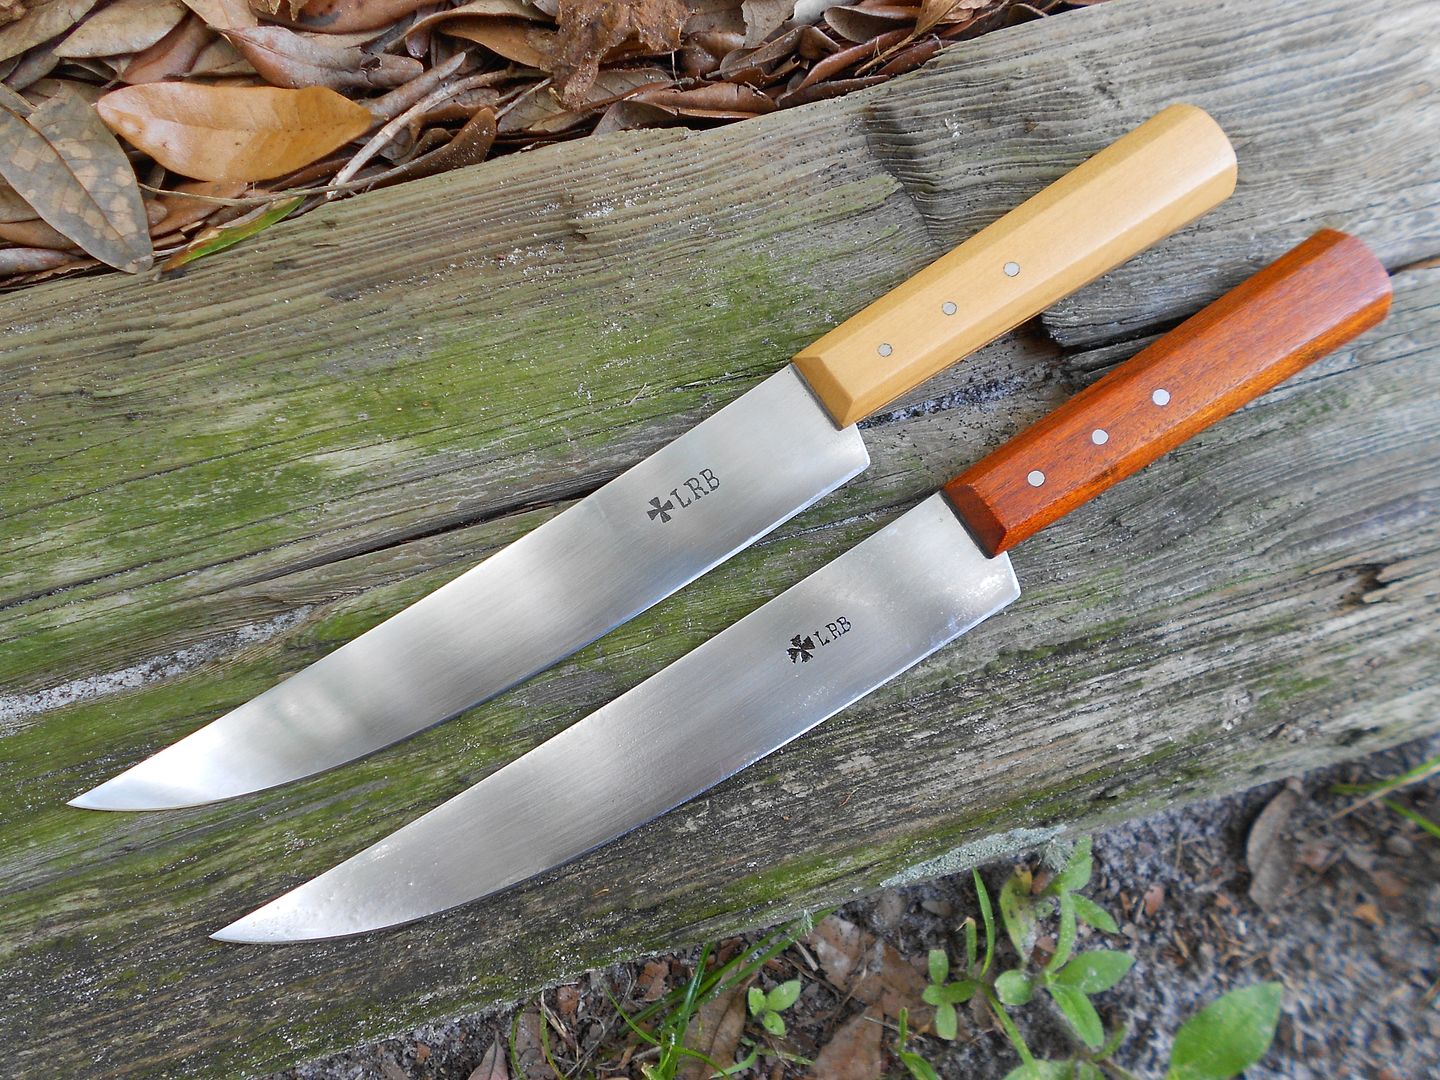
Was working on an skinner type knife that I forged out of 1084 several years ago the other day. I got the handle scales basically shaped and was almost done with the darn thing then when I tried to put the pins in I broke one scale and now have to start over.

Wondering if I could get some tips and pointers on doing peened handle pins. I'm not sure if I will glue this handle in addition to the pins but eventually I would like to get to were I can do solely pinned handles that are nice and tight and secure.

Some of the things I would like to know are the hole fit in relation to the pin size and if there is any sort of chamfer or counter bore on the scales. Also how much should the pin stick out of the scales before peening? I think most of my problem was I had the pin way to long and was trying to peen a head of sorts on the pin instead of simply expanding it in the hole. Also what size is typically best. I'm using 3 3/32 pins, which might be a little small but that's the size of welding and brazing rod I happened to have.
 
Well......big subject with no really good answers. From a historical point these skinners. scalpers, and butchers were mass produced in Sheffield, England. Originally the tangs were full from top to bottom but tapered towards the rear and only extended back about 1/2 to 2/3 of the scale's length. Some scalpers were one piece with a sawn cut in front into which the half tang was driven.
On the one piece, sawn cut type handle a 3/32 pin is about right and 3 in a straight line. On the 2 piece handles you can do it several ways. Pins can be 3/32 or 1/8". 5 pins was common- 2 in front, one in the middle, two in back, often called an "H" pattern. You can also do 3 straight pins or 4 pins in a sideways "T"- 2 in front and one in the middle and one in back.
The pins were mild iron/steel. Sometimes a brass screw was used in the middle, this was screwed all the way through and the ends cut off- looks like a brass pin.
Because the tangs were half the scales on the originals actually had a very slight bent. The pins looked peen hammered but how this was done- I've spent a lot of time on this and never got an answer. My GUESS is the pins were installed and some sort of tilt hammer or heavy drop hammer was used to expand the pin ends- and with enough force to slightly bend the scales. That's just a guess.
On the pin height- any where from 1/2 diameter to full diameter and rounded. I gave up trying to peen hammer because I'd hit and dent the scales or over do it and crack the scales. I just epoxy glue them in place.
Trick: on the inside of the scales- you can scrape that out just a little to create a rim that touches the tang and then slip in flattened aluminum foil to ID any high spots and scrap those- to get a really good fit. Epoxy putty fills any voids.
I also use a template and drilling jig to make sure the pin holes line up on both sides. I drill in from either side where the holes meet in the tang area.
 
What are the scales made from? To be PC/HC, the pins should be iron/steel, like cut from nails or other rod type source. Brass or copper is not correct for early knives. Your pins are not too small. 3/32" is good for English types, French are usually a tad thicker, about 1/8". The hole after drilling needs a little bit of a countersink. It doesn't take much. The pin is cut to be just long enough that you can peen it down with but very little head left. Just peen enough to fill the shallow countersink, then either leave it, or dress it off flush. As for the actual peening. Cut or file the ends flat, then file the sharp edges off, rounding the ends slightly This prevents the head from splitting as it spreads. Use a ball peen hammer of moderate size and peen the ends using moderate blows. Many light blows are better than a few heavy hits. Work the hammer blows from center outward as evenly as you can. Just fill the countersinks, then stop. I like to get both sides started, then alternate the peening side to side. Be very careful to not strike the grip scale when you hammer.

 
I counter sink a little to give the head room to mushroom out. Err on the side of caution because if you counter sink the hole too much you might find that it is difficult or impossible to fill it all the way.

The biggest thing I have learned with peening is to take my time. A lot of time. Resist the urge to hit with heavy blows. Lots of small, precise, light taps are in order. I will usually put on a television show or audio book or something in the background when I peen pins to keep me mentally occupied while I sit there and tap, tap, tap tap...

It can be a little discouraging at first because you will feel like nothing is happening but eventually you will get a nice round dome forming.
 
My apology for getting to this thread late, but I have not been feeling well lately.

Back in the 80's, I made quite a few full tang knives using ready made green river. kitchen knife and other knife blades. I mainly used black walnut for the handles, though I used some curly maple and even some slabs I made from elk antler. I found one has to be a LOT more careful with peening the pins on the elk antler so as not to crack the scales, but more on that later.

I did not have a table saw to cut the scales, nor a drill press at home at the time. Since I had a half dozen blades, I decided to try to emulate what they did in an 18th century cutler's shop or at least use some techniques they might have used.

I have not been able to document this, but I think they may have used something like a Nail Header to pre-form a peened end on one side of the pins before they put the pin in each hole. If you have never heard of a Nail Header, here is a link with a picture of some nail headers down the page. http://www.spaco.org/Blacksmithing/Nails/~tm3D.html

Now, I have never been a blacksmith, so I did it a bit differently. I took a piece of 1/4 inch thick steel and drilled it with a hole that was large enough for a slip fit of the nails I used for the pins. Then I countersunk the top of the hole on one side with the exact same drill bit I would use to countersink the holes in the slabs. Next I hardened and annealed the 1/4 inch piece of steel I made my "Header" from. I'm not sure that has to be done, but figured it would keep a missed/glancing peening blow from messing it up.

I already had the jaws of my machinist vise ground smooth, but one could use smooth jaw inserts made from brass or even angle Iron. The idea is you don't want the body of the nails to be marred or deformed when you tighten them in the vise. To "Head" the nails/pins, you put the nail through the hole with just a bit protruding from the top of the 1/4" Header and tighten the body of the nail in the vise with the Header over it and on top of the vise jaws. Then you can carefully peen the nail/pin to form the head on the nail/pin on one side. I can't remember if I used a torch to heat the head of the nail/pin before I peen formed each head, but I don't think I did.

Once each nail/pin had the head formed on one side, I put them aside until I had the scales on the tangs. That way I could put a nail/pin in each hole and mark it where it went through the scales and just came out a little beyond the far scale with just enough pin left over to peen it down on that side of the outermost scale. I then filed it smooth on the cut end, as others have mentioned.

I doubt they glued their scales on the tangs in the old days, though they may have used hide glue or fish glue between the tangs and scales. I always used clear epoxy to glue the scales on because I did not want blood, guts or meat to get between the scales and tang and ROT and possibly cause infection when I used the knives. More on this in the next post.

Gus
 
Last edited by a moderator:
As Wick and others have mentioned, they used soft Iron for the pins to hold the scales on the knives. That stuff had more "give" and would peen easier than modern steel. The problem is, where the Heck do you find Iron Wire nowadays?

I got a clue from the old terminology they used of "Pinning Wire." I found some 13ga Black Iron Soft Annealed Wire that is close to the period 3/32 inch size pins the English used. I can't remember exactly where I got it, but I think I got it from a company that sold bailing wire ties?

Now, maybe I am off base and someone like Wick can recommend where to get this stuff or something that is equivalent to it?

Gus
 
For convenience, since I always have drill rod on hand, that is what I use. It is soft annealed as it comes, and I can tell only a minor difference in peening it or nails and wire. It does no harm to form a head on one end of a pin before installation, but is not necessary. You simply prepare the pins to have the proper amount of excess in length and peen in going from side to side. With a little practice it is pretty easy, and eliminates an extra step. If one is going to reproduce a "trade knife" or scalper, they arrived in the Americas with beech wood grips being most common. Also boxwood and reddish exotics from SA and Africa. No walnut or curly maple, but some full tangs in bone. Last I read, Ken Hamilton has come to the opinion that perhaps most French boucheron scalpers had two piece grips on half tanged blades. Need more info on that. The common English scalpers were one piece slotted for a half tang. Commonly, the English used three in line small diameter pins, while the French commonly used two larger pins of about 1/8" in diameter. Spaced from what I understand at about 1 1/8" apart. Not sure of the English spacing as it seems to vary slightly at the least, and on some original blades I've seen, not always carefully aligned. The English pins were spaced lower than center on the blade tangs, to allow them to center on oversized grips which overlapped the under tang area. The French grips were better fitted to their tangs, and did not need this lower positioning. Now, all this is in regards to 18th c. common trade scalpers. Other trade knives are often a bit different. Crockett can give you good info on 19th c.
 
I always keep a wide variety of 18inch lengths of drill rod on hand from Brownells and reorder the sizes I need most, as I use them. However, I found the soft Iron wire much easier to peen as pins.

I agree that 18th century scalper and butcher knives came with beech, boxwood and other handle material you mentioned. No doubt about it. I just figured if the original scales got cracked or split from dropping them or something similar, they would have used woods common to America and whatever wood they had on hand or preferred. So birch, apple, pear, walnut, maple or other woods may have been used.

I also agree one doesn't have to make a "Header" for one side of the pins, but I found it easier when I used one. I just personally found it easier than peening heads on both sides of the pins.

With the scales on full tang knives, I found it easier to drill the holes in the tang, then glue on one scale. Then drill through the tang and scale, making sure the scale was on another piece of wood so it would not chip out when the drill bit came through the scale. Then glue on the other scale and after it cured, drill through the other side and tang and into the newly glued scale, making sure to use another piece of wood under the second scale so the wood would not chip out when I drilled through.

With antler or bone scales, I put a thick piece of leather against the scale I was drilling through and then onto another piece of wood, so the antler/bone would not chip out as I drilled through.

Once the holes were drilled, I countersunk each side with the same size drill bit I used on my home made "header."

When peening the antler/bone scales, I put a piece of leather between the scale opposite to the side I was peening and that over the flat anvil surface on my vise to peen the pin/s.

Gus
 
"With the scales on full tang knives, I found it easier to drill the holes in the tang, then glue on one scale. Then drill through the tang and scale, making sure the scale was on another piece of wood so it would not chip out when the drill bit came through the scale. Then glue on the other scale and after it cured, drill through the other side and tang and into the newly glued scale, making sure to use another piece of wood under the second scale so the wood would not chip out when I drilled through." Articifer.

Different ways for different folks. I have never found chipping from the drill to be of great concern. Most often, the scales will be finish shaped with a taper from wider at the butt to narrower at the front. Any chipping will be filed or sanded away, anyhow. With the method above, You cannot taper the thickness before drilling, or the hole will go through on an angle. In the case of wood, I will be sure my scales are flat and true in thickness. The pin holes in the blade tang will already be there. My scales will be slightly over sized in width, length, and often in thickness, to be dressed to the tang in finishing. Using a few tiny drops of superglue, I glue one side down, drill through the tang holes, then pop the scale off, and do the other side the same. The two scales are then pinned together, and I shape and fully sand the front faces as a unit. This way the two scales perfectly match, and there is no chance of marring the blade finish trying to sand the scale fronts while installed. On some I will taper the thickness before final installation, and on others, afterwards. Depends on the particular knife and design. When drilling bone or antler scales, I superglue the scale to the tang, put and true the knife in a drill press vise, then carefully drill with a wedge support under the scale. Only once did I chip out the bone so much as to require a replacement. Antler scales seldom chip enough to be a concern. If the hole will be countersunk, that almost always cleans up any minor chipping or ragging. The antler or bone is also pinned as a unit to have the front faces finished and pre polished before installation. One must use sharp drill bits, and go slow and careful. If maximum strength is desired, as to the scale attachment, the tang is drilled with a few large holes, and multiple smaller ones. Then for the final installation of the scales, enough of a good quality epoxy is used that fills these tang holes and covers the entire surface. The scales are then tightly C clamped in place with the pins installed. The front faces are cleaned off with acetone before the epoxy sets. All these drilled holes in the tang make epoxy bridge connections between the scales that are very high strength. So much that the pins are only there for shear strength. Done well, you cannot even hammer these scales off. They have to be burned off, or heated enough to cause the epoxy to fail, if removal is needed.
 
What the razor makers and many other makers does to peen over one end of the pin in a vice and then install and clip/file and peen the other end using the already peened end to take the brunt of the impact on the "anvil" side. It may not reduce the odds of cursing and throwing things across your shop by 50% every time but it can't hurt. :wink:
 
It is interesting how a subject as simple as pin holes has a lot of nuances. If the tang is tapers or it is a half tang (so that the scales are now at an angle). The method of gluing on one scale and use that as a drilling guide for the other scale- won't work (been there/done that). I've also had the situation with 5 pins in an H design where I started out okay on one side but I must have been stressing the drill because run out had the holes off on the far side. If you use a template- maybe drill the holes through over sized scales (okay if no guard) Attach scales with all pins in place- sand down scales to tang, then drive out pins and epoxy glue everything, but even that causes trouble if a tapered tang angles the scales- for that I made a clamp on jig with tubes which drills the holes okay- drilling half way from both sides into the middle.
When you peen a pin it obviously expands the diameter so that the various pins might have different diameters. You can also get the pin out of round. In other words you need some skills to do a good job at peen hammering the pin heads. All told- for most folks- just glue them in place.
I've looked at some old butchers and scalpers- there was definitely some degree of peen hammering however Jedediah Smith had his butcher knife break (the handle- I think) in a fight with a grizzly bear so how well the scales were attached on the originals is debatable. Some originals have loose scales due to the wood shrinking with age. If you just glue in place- I cannot imagine the scales would ever come off. I've tried on a knife where one scale got damaged- I had to burn the wood off (blade wrapped in wet towels).
 
Ya know there are a couple of good how to knife building videos on You tube, check it out . They walk you through exactly what your doing, and might be helpful.


Chris
 
I use JB Weld but the putty is black and will show if the fit of wood to steel isn't good. A clear epoxy won't do this.
If I have a full tang I will scrap out the inner portion just a little to hold the putty. This leaves a rim of wood around the outside of the tang. I will slip thin sheets of paper or aluminium foil between the wood and tang and note any high areas and scrape that spot. Spend plenty of time getting a really good fit.
The glue or putty also helps keep water from seeping in between the scale and tang.
I think the traditional finish was linseed oil. Some exotic woods don't really need any finish- just polish- maybe some wax. If you have a highly figured wood- there are often voids that can be filled with superglue. Then use the superglue as the finish. You'll need to sand the superglue even and down to #2000 grit (auto body paper).
Some folks are allergic to exotic woods (coco bola) and the dust from sanding is toxic- wear a face mask.
 
And....knife making is really a great hobby. You start with the steel blade and then need a brass guard. That ought to be soldered in place. Then there are all sorts of handle materials. After that you need to work in leather for making the sheath- so lots of different things to keep your interest.
When you get into the historical aspect that adds even more. Get a photocopy and expand to actual size and then use that as a pattern for the knife.
If you really want to go all the way, there are guys making pc steel. As far as epoxy- the pc was cutler's rosin, pine sap cooked with pulverized brick or charcoal and used as a filler- dried hard as a rock. The leather- you get into the pc stains, etc.
 
For the strongest slab/scale grip, swiss cheese the tang by drilling a bunch of holes in it. Then use epoxy to glue the slabs in place along with pins. Use enough epoxy that it fills the holes you drilled, creating epoxy bridges directly from one slab to the other. This works best for non-oily types of wood , and most all other types of grip slabs that epoxy will adhere to. One of the strongest epoxy or resin is Acraglas. I use Devcon 2 ton slow set, because it fully hardens in 24 hrs, and is also pretty strong but you can use most any quality two part epoxy. I had a similar experience as Crocket. I had to remove buffalo horn slabs that I had installed a few years before, in the manner I described above, so that I could re-install ivory slabs. I was able to drive the pins out, but could not hammer the slabs loose. I used a 4 lb hammer and could not knock them loose. As did Crockett, I ended up burning them off. I don't go much for PC when it involves stronger and invisible applications, but to each his own.
 
For the oily, but very pretty woods that we all love, wiping/cleaning the gluing surface with acetone right before assembly supposedly works.
 
I've done that Joe, but am never fully confident in it. Although I would probably do it again if really necessary to a project.
 
Back
Top