Knife Making Help

Muzzleloading Forum

Help Support Muzzleloading Forum:

This site may earn a commission from merchant affiliate links, including eBay, Amazon, and others.

yoda1624

32 Cal.
Joined
Jan 17, 2007
Messages
42
Reaction score
0
I have been lurking here for a while learning best practices for muzzle loading from you guys. I appreciate all the help that everyone has given.

I have been working on making a simple knife. I have been following the instructions on this site. http://hossom.com/tutorial/jonesy/ Unfortunately I am at work and cannot post a picture just yet. I will do so soon.

I am at the part where I am getting ready to form the blade and I was wondering how you ensure that the blade comes to a point in the middle of the piece of steel. It seems like it would be easy to get the blade off to one side or the other.

Thanks in advance for your help.
 
Last edited by a moderator:
Pretty easy really. Before you start removing steel for the bevels, and have a flat uniform profiled blade, you color the edge with a felt tip pen. Then you scribe two lines about 1/64" apart down the edge. Grind, or file a 45o angle in your blade, stopping at these lines. Then do your main bevels and all will be centered. To do the scribing, you need an adjustable tool of some sort, that can be set on a dead flat surface. Then move it along the blade edge, or move the blade along the scribe. Flip the blade over and repeat, and you have two scribed lines giving you a dead center edge, and point. This can done with calipers, but you may wear the points on it. Email me, and I'll send a photo of what I use, and how to make one easy. Actually, when I started out, I would just grind the end of a file to a short edge at one corner, and use that. It's a cut and try method, but would work for what you are doing.
 
From the tutorial, it looks like you find the center by the method he shows by scribing two center line along the edge of the material with the drill bit laid on the bench and scribe the marker blacken edge. Looks like he used a brad-tip drill bit!....hope this is what your talikng about?
Ooops!....Wick beat me to the response and he would know more about it, but I think you get the idea!


Rick
 
Yep, let's go over that one more time. You can use a caliper and clamp it down to scribe a line but if you wobble the caliper as you draw it along the blank's edge, the line may wander off a bit.
I therefore prefer to lay the blank on a flat surface and set up a scribe. You can raise of lower the scribe a bit with shims- paper works pretty good. The edge of your blank needs to be polished for the line to show up. If you are sanding the edge, do so in a cross wise maner so the scribbed line is at a right anle to the sanding and shows up. The scribe is held in place (clamps, etc) and the blank drawn along it. As Wick said, leave around 1/64" or so between the two lines and grind or file to that spot. The pro's grind and they are good at that but for me it's a hobby so I use a file and I hold the file at right angles to the blank and draw file. This removes a lot of steel. Takes a couple of evenings to do a blade. I also make a filing jig where the blank is bolted down and a small board beyond the spine is used to insure the bevel on the blank runs even. You set this up so after one side is filed you make flip the blank over and use the jig to file the other side to the same angle.
Then use some mild steel bars as a sanding block and take out the file marks. I start around #80, then #150, #240, and #320. After heat treating you can go to #600, # 1500 (auto part stores carry this) and then green rouge for a mirrow shine.
If this isn't clear, just keep asking more q's.
and remember, for the hobbyist your greatest asset is TIME. take your time and do it right.
 
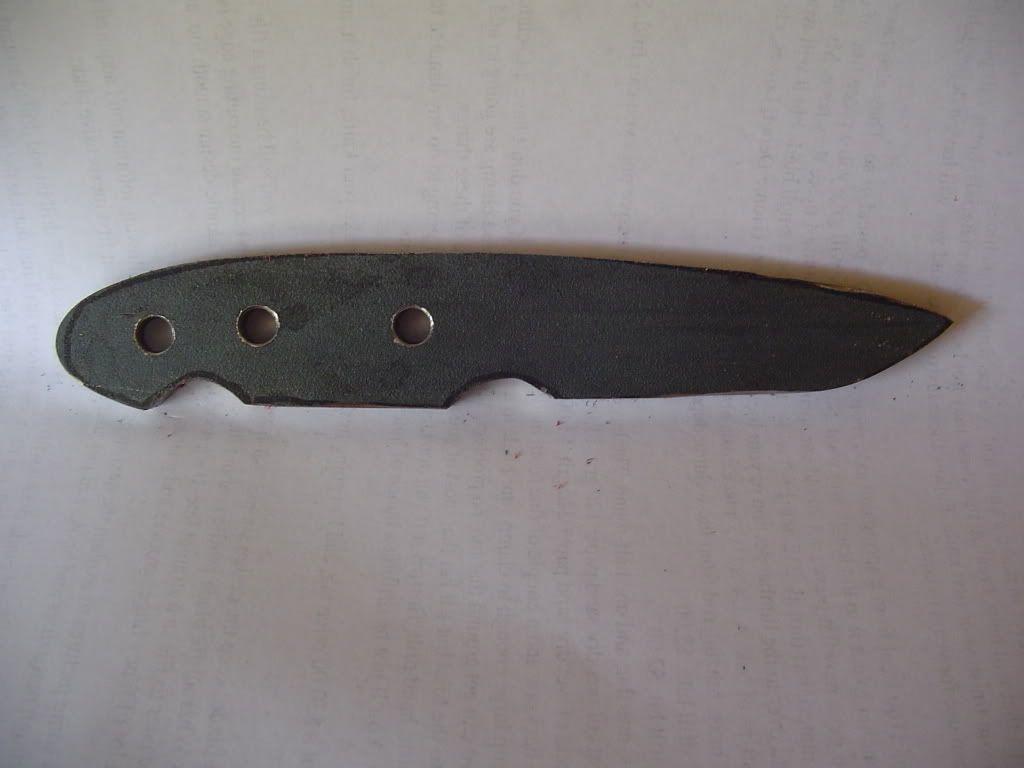
Thank you for the help. Here is a photo of my knife. It is my first.

Thanks for your help and comments.

DSC02201.jpg
 
Fabucci,

I did not see your question. I have made 6 stock removal knives so I am going to tell you how I do it. I am not saying this is the only or most correct way. This is just how I do it.

Get a drill bit the same diameter as your knife stock. Grind/shape the blade shape and then sand the edge that will ultimately bee the edge. Color that edge with a sharpie or permanent marker, or even dykem. Lay the knife down on a flat surface and lay your drill bit down on the flat surface as well. Use the point of the drill bit to scribe into the marker coating the entire length of the blade. turn the metal over and do it again on the other side. Because metal is usually a little thicker than it supposed to be, you will more than likely have two lines running paralell. Just grind to the center of the two lines and you will have it.

I hope this makes sense. If not message me and I will try to explain a little better.

Tommy
 
Just grind to the center of the two lines and you will have it.
leaveing a small amount of steel between the lines will help prevent warpage, and some decarb in the heat treat. You can take down very close, .010, to .015, then bring it to an edge after the HT, but be careful to not overheat after it's HT'd.
 
Thank you all for your help. I finally figured it out. I will post some more photos when I get more work done this weekend.

Thanks again to all of your great responses.
 
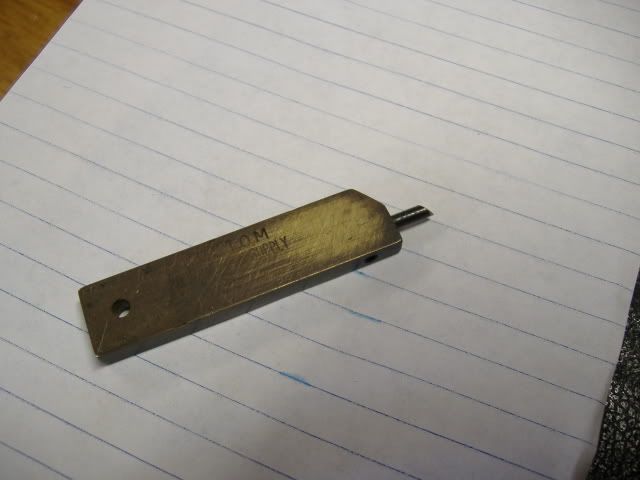
Fabucci, here is my little scriber. It measures 2 5/8" long, 5/8" wide, and is 1/4 thick brass. The scribe tip is 1/8 drill bit. The point is ground at about 45o. That allows one to roll the point up, and down for adjustment. Look closely and you will see a set screw to lock it in place. This, as mentioned, is pulled along the blade edge to mark a line. Flip the blade over, and mark a second line. Have the point adjusted to leave about 1/64" between lines.
pennyknife521_640x480.jpg
 
That is pretty cool. I think I might have something that would work similarly.

I have a table saw, so the flat surface should not be a problem. I am going home tonight to work on it.

Thanks for all your help.
 
Back
Top