• Friends, our 2nd Amendment rights are always under attack and the NRA has been a constant for decades in helping fight that fight.

    We have partnered with the NRA to offer you a discount on membership and Muzzleloading Forum gets a small percentage too of each membership, so you are supporting both the NRA and us.

    Use this link to sign up please; https://membership.nra.org/recruiters/join/XR045103

Knife Sheath Question

Muzzleloading Forum

Help Support Muzzleloading Forum:

This site may earn a commission from merchant affiliate links, including eBay, Amazon, and others.

wdbritt

36 Cal.
Joined
Mar 7, 2009
Messages
50
Reaction score
0
Anyone have a picture of or pattern for a knife sheath like the one Wick showed with his redesigned trade knife? I really like the way it looks but want a more substantial way to attach it to a belt (No offense intended Wick!). I've seen sheaths like this before and I can't figure out how to cut one out so that it will have a folded over tunnel loop on the back. Any thoughts or information welcome.

Thanks, Warren :v
 
A loop using a separate piece of leather can be attached to the back easily, before sewing the sheath together. The problem I have when doing that, is that the loop gets squished like a frog under a semi when I press the sheath. They still work fine, but look terrible. Now you got me thinking, and that's dangerous. Okay, the upper portion of the loop could be sewn. The lower portion that is pressed flat could be riveted with a copper rivet. Carefully drill the rivet holes, trim the rivet as far as you dare. Round off the ragged tip that you trimmed, force the rivet into the sheath using long needle nosed pliers and work it through the hole. Slide a piece of 1/8" steel in under the rivet, to be an anvil, then rivet it down on a vise anvil, or similar hard surface. Protect the leather with a piece of poster board under it. I have done this with other sheaths, but have never tried it on one of the center seams. As long as you can work the rivet through the hole, it will do the job, and not look so bad. Thinking more on it. You should be able to do the same if you just left a tab to fold over like you said, after the sheath is pressed.
 
Wick,
When you talk about pressing a sheath what do you mean? I always wet-form my sheaths and holsters to fit whats going in them. I've never made a center seam sheath so I'm not sure about where to start. Any help/ideas you have would be great!

Thanks, Warren :v
 
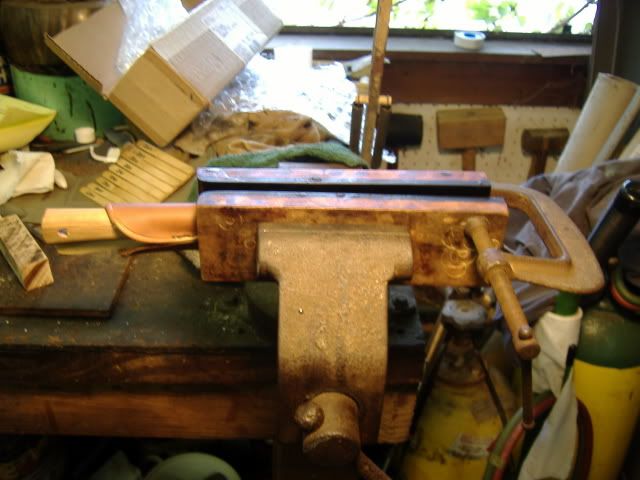
After a good soak in alcohol, I insert a dummy knife in the sheath, then put it between two thick wood and micarta plates, then put that in a vise and crank it down as far as I can. Let it sit over night, then it is formed and the seam is very flat with little or no thread showing except on the upper section where it is not flattened.
pennyknife650_640x480.jpg
 
Pressing is not mandatory, but I like the flat seam, and it does protect the thread. If you do this, note the ends of the press plates are rounded to not leave a hard line crease, and get the flattening started while the sheath is wet by beating the seam with a hammer. If you will protect your blade with duct tape, then wax over the tape, it will release much easier when it is dry, otherwise the leather can glue itself to the blade. Do not leave more than 3/32" of leather above the seam, or it may distort, and get snakey. You may already know, but if you don't, make the pattern just as you would a side seam, but get the leather as close as you dare to the blade, and still have room to sew it. Once wet, then you can center the seam and hammer it.
 
Hey Wick
Do you have a picture of the sheath after you have sewed it before you wet it to turn the seam and put it in the press? For some reason, I'm having trouble visualizing it but I think I know what you mean. Thanks Harold
 
Wick what about using one of those flat turn screws in place of a rivet .. then you just drill or punch the hole and install the screw in the hole after sewing the sheath? :hmm: Its not period correct I am sure, but its hidden anyway.

Davy
 
Here you go. Doesn't show it all, but that is a top view before the the seam is turned center. Also, heres a shot of the leather before starting.
pennyknife646_640x480.jpg

pennyknife639_640x480.jpg
 

Latest posts

Back
Top