• Friends, our 2nd Amendment rights are always under attack and the NRA has been a constant for decades in helping fight that fight.

    We have partnered with the NRA to offer you a discount on membership and Muzzleloading Forum gets a small percentage too of each membership, so you are supporting both the NRA and us.

    Use this link to sign up please; https://membership.nra.org/recruiters/join/XR045103

Lead vs Leather Experiment

Muzzleloading Forum

Help Support Muzzleloading Forum:

This site may earn a commission from merchant affiliate links, including eBay, Amazon, and others.

Larry Pletcher

50 Cal.
Joined
Jul 27, 2006
Messages
1,313
Reaction score
67
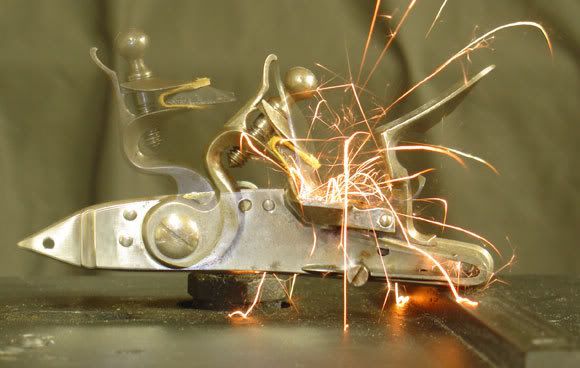
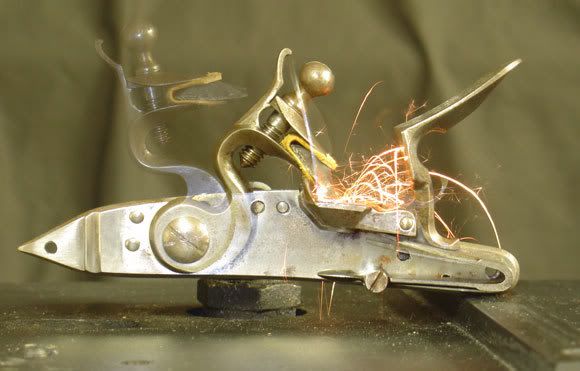
Because of the recent discussions about attaching flints with both lead and leather, I decided to see if I could use photographs to study the problem. An experimenter does not dare approach his work with a preconceived answer, and I assure you that I have "no dog in this fight."

I began by selecting two chipped English flints as close to the same shape as I could. I glued a piece of leather to one and make a lead wrap for the other. I hammered the lead fairly thin and trimmed off all that was unnecessary.

Previous experience with timing locks has allowed me to conclude that the first strike of the flint is never the fastest in a series, so both flints were struck 3 times before the photography started.

With the lock mounted in the fixture, I set the camera for a 4 second time exposure. I opened the shutter and fired the lock during the 4 second delay. All sparks made during the strike are shown in the pic.

During the first session I fired the lock 5 times and then turned the bevel down and fired 5 more. Then the other flint was installed and I repeated the process. Both flint/lock combinations worked slightly better with the bevel up.

In the following series of photos I alternated lead and leather pics to make comparison easier: Lead #1, Leather#1, Lead #2, Leather #2, etc.

Lead_BU_1W.jpg
[/img]

Leather_BU_1W.jpg
[/img]

Lead_BU_2W.jpg
[/img]

Leather_BU_2W.jpg
[/img]

Lead_BU_3W.jpg
[/img]

Leather_BU_3W.jpg


Lead_BU_4W.jpg
[/img]

Leather_BU_4W.jpg
[/img]

Lead_BU_5W.jpg
[/img]

Leather_BU_5W.jpg


I did another set that continued the sequences until the flints were knapped. However, those showed nothing substancially different from the pics above.

In this experiment I tried to keep variables to a mininum. The same lock is used; BTW same lock that was used for the slow motion stuff earlier. The flints were mounted the same - as best I could. Photography methods were the same. The flints and the method of securing them were the variable. The fact that two flints were used means that they could wear at different rates.

If I were to draw a conclusion it would be that I can not see significant differences in the performance of the two methods. I doubt that I would be at a disadvantage with either method. However, this is a very well-made lock and others may act differently. Your conclusions and your mileage may vary.

Regards,
Larry Pletcher
Pletch
 
I tried that with a Chamber's lock and got a lot more of the fat, lingering type sparks with the lead wrap :hmm:
[url] http://www.robinhewitt.net/leather.wmv[/url]
 
Last edited by a moderator:
Pletch,
Thanks for sharing your testing with us. The reason that I use lead is that I believe that the cutting edge of the flint does not fill up with steel as much when lead is used instead of leather. Did you make any observation concerning that? I can't see that it makes that much difference as long as lead is kept tight; they both work well. Your photos look very similiar with perhaps a bit more sparks with the leather. Very good study!
 
Larry, you've done it again...simply outstanding!!

Extremely unique, well lit, high quality action stills, with the leather having the edge in the volume of sparks.

And again, your unselfish attitude in spending your personal time then sharing the results with us is terrific!

:hatsoff: :hatsoff: :hatsoff:
 
I think all it proves is that if you have a quality built and tuned lock, with a properly hardened, and tempered frizzen, yer gonna get spark, and lots of it. It's another reason you should not skimp on the lock when buying, or building a rocklock. Add aproperly lined up touch hole liner, and you have instant ignition all the time. Oh yeah, ya need a good flint also.

Bill

Life is like a box of chocolates, what the heck does that mean :)
 
Thanks Roundball. I realize that different locks may produce different results, but felt like this might zero in a bit on what we can learn about flintlocks. When I retired from teaching, I realized that the only thing for fun than teaching something was learning something.

Regards,
Pletch
 
Pletch,
Thanks for the interesting photos, they are really interesting and educational. As they say a picture is worth a gazillion words. :thumbsup: :thumbsup:
 
Excellent! And thank you for not only sharing the results but also for the use of your resources and your impressive skills. :hatsoff:

sneezy
 
Really great pics, why is the first strike slower? and my eyes show the lead ones with a brighter spark in the pan than leather, I cant get this CVA lock to do anything like that (it did first 5 strikes then just some yellow sparks - so I changed flints, nothing, put the lead on and more sparks but dull, coned around the hole and it goes right off cheap lock cheap fix) Fred :hatsoff:
 
roundball said:
with the leather having the edge in the volume of sparks.

:shake: I guess people will see what they want to see.

Larry, thanks for doing this. Great job as usual. Question, in the first two leather strikes, the camera angle is such that we are looking into the pan and all the other pics, both lead and leather, the view is accross the pan. Was the camera situated differently or did the lock move?.
 
Larry, thanks for doing this. Great job as usual. Question, in the first two leather strikes, the camera angle is such that we are looking into the pan and all the other pics, both lead and leather, the view is accross the pan. Was the camera situated differently or did the lock move?.

The lock position did not change. I did try raising the camera. The additional trials that I mentioned (working until knapping was needed) I did with the camera elevated so that you looked down at the pan instead of level with the pan and vent hole. The result in terms of sparks was the same.

The other thing I noticed that I didn't cover was the bevel down trials. Both flints acted the same - they tended to place some of the sparks forward of the pan. The amount and quality didn't seem to change, but the area the sparks landed on was expanded to include the area forward of the pan.

A side note that was not covered in this experiment is to note that this lock sparks just as well and may be faster with sawed agate for a flint. That sounds like heresy, but it seems to do well with about any reasonable cutting edge. One of the reasons I like this lock is its reliability. The man who built it is much better than most. It does make a difference who puts the lock together IMHO.

Regards,
Pletch
 
Stumpkiller said:
Great stuff!

So, is a spark 4" in the air over the frizzen better than one dropped right in the pan? :hmm:

My guess is that if the spark ended up 4" above the pan, it bounced off the pan to get there. It helps that you can see where they've been by watching the trail they leave.

Whether the bounced sparks would bounce if they landed on powder instead of an empty pan is anybody's guess. This might be a reason to leave a little powder in the bottom of the pan if you tend to bank powder to the outside. Sometimes the more to see of flintlocks, the more questions you have.

I was pleased to see that the sparks were well concentrated, especially with bevel up.

Regards,
Pletch
 
Robin, I think that means you are getting bigger shavings off your frizzen. bigger bit of metal larger amount of latent heat
 
Larry: First of all, thank you for this effort and the nice pictures. As we have discussed before, one of the limits of photography, particularly when photographing bright lights, is the inability of the cameras to reproduce true color.

Its the same problem that blacksmiths have dealt with whenever they were using color to forge metal to a particular degree of maleability. The Smiths always close their doors and windows to natural light, and make the area around the forge dark. Then they give their pupils time to adjust to the dark, so that they can see the true subtle changes in the color of the iron or steel they are working. Smiths today, using the same process, darken their shops when heat treating iron or steel, just like their predeceasors.

What is not seen well here is the " LIFE " of the sparks from the flints, using both kinds of wraps. Like your experiment here, I did a similar approach, and didn't " SEE " anything different. Then, my gunmaker buddy, Don, had me come to his shop, where he was working with a new .62 cal. fllintlock rifle. He had the gun mounted in his vise, and the shop was dark. We waited for our pupils to adjust to the dark- about 10 minutes.

1. With the leather wrap, we got lots of sparks, but they were orange or red in color( which when I tried this in daylight I could not see, either! All the sparks looked whitish!), and more important, they bounced only once in the pan, or somewhere around the pan, and then died before they hit the pan a second time. Some of the weaker sparks were dying before they made it to the pan! That concerned us both, but not to the point of panic. After all, we still saw lots of sparks bounce in his pan.

2. With the lead wrapped around the SAME flint, ( done with the lights on, and after mounting it in the jaws, and striking it 5 times to set the flint in the lead, then tightening the cock screw again) we turned the lights out again, waited another 10 minutes for our pupils to adjust( While I was thinking to myself " This is just a waste of time and so much B.S"). Then he fired the lock with the lead wrapped flint in it.

Wow! What a difference, and I really was not expecting it. The sparks were light yellow to white in color, but they were high in volume, none burned out before striking the pan, or some surface, and they all bounced Twice before burning out on the upside of the second bounce from the pan.

I was most shocked that I could see these difference in a darkened room with my pupils dialated, while I could NOT see this when firing the lock in daylight! I certainly could not see any difference in color in daylight, and only rarely, now that I knew it was occurring, can I even now see the sparks make that second bounce. I stayed for more than an hour, and we repeated his "test" a couple of times, switching back and forth from the leather wrap to the lead wrap to see if what we had observed was a "fluke". It wasn't.

All I do know from watching a blacksmith work for hours as a kid, is that color does matter, and the whiter sparks Don was getting from the same flint, were obviously hotter, and they lasted longer.

We found( Don's next experiment along this same question) that using thin, raw, hide- parfletche-- that is, rawhid that is wetted, and then pressed to make it thin, hard, and flat, seemed to provide the hottest sparks we could get from using a leather wrap. Almost as good as lead.

The lead wrap has to be thin, or it too has a limited, but evident " give " to it, which can also make the flint come lose and fall out of the jaws! Been there, and done that!! :rotf: :shocked2: The lead has to be given time to conform to the wavy surface of those English flints, and is the reason that we "dry fire " the flints 5 times, and then tighten the cockscrew again.

The real downside of using chrome tanned leather, or any kind of thick leather, is that it becomes a shock absorber, when the edge of the flint first hits the face of the frizzen. The flint actually rebounds, and strikes the frizzen a fraction of a second later, but lower on the face.

What remains as evidence of this bounce is several washboard-like gouges to the face of your frizzen. As these deepen over time, they begin to destroy the edge of your flint, and prevent it from scraping steel off the face.

For a quick lock time, you want the flint to scrape steel and THROW it down into the flash pan in one swipe of the flint, with no bouncing and studders.

Now, if that flint is not striking the frizzen at a 60 degree angle, you are going to get that bounce, and chatter marks even if you wrap the flint in lead. However, if your lock is tuned to strike the frizzen at the proper angle, then using lead to wrap your flint will give you longer lasting and hotter sparks. The 60 degree angle allows the flint to self-knapp, with each strike (shot).

One of the locks you tested at Friendship in June, 2007, and pictured, was posted on the rail on the North side of the porch where you were set up, Larry. The picture clearly showed the flint rebounding from the frizzen, with a leather wrap made of thick leather. My brother, Peter, who you met that day, also, spotted the picture and drew my attention to it, while we were waiting for you to set up someone's lock to photograph.

So, while these photographs are very interesting, they don't give all the " Picture " ( sorry about that) concerning this unnecessary controversy. RB seems to take great delight in your work, however, and if it simply quiets him down, you have done us a service.


If someone wants a good flint wrap made of leather, but doesn't have access to raw hide, buy a " chamoise " clothe from your auto parts department in your favorite discount store. Cut a strip as wide as your flint, and about twice as long, or longer. Now soak it in a glass of water until its totally wet, and then squeeze it between two boards in a vise, to remove the water and leave the chamois hard and dry. Use that for your flint wrap.
If you glue the leather to the flint, you introduce a foreign substance to the leather, and soften it, making a shock absorber again. Flattening and hardening the leather is done for the purpose of removing the shock absorber, so don't glue it to the flint.

Now, get that angle of impact of the edge of your flint to the face of the frizzen set to 60 degrees, and go shoot.

Thanks. Paul
 
I'd stick to science rather than trusting my eye after being in the dark. To have it be a real test you'd need to repeat the test with leather or lead in various orders, blinded to what the flint was wrapped in. Even then, the eye's impression may have nothing to do with ignition.
 
I use leather. It works very well enough. I would remind everyone, and inform those who don't know, that Jim Chambers will void the warranty on his locks, if a lead wrap is used, and the cock or frizzen breaks. I believe it is the same with L&R. I would have to assume that there is a good reason for this. Just a notice, or reminder. I don't care what others use, or how they treat their own equipment. :) :) :)
 
You just know everything.Tell us Paul what was the lighting source used in these images?
 

Latest posts

Back
Top