• Friends, our 2nd Amendment rights are always under attack and the NRA has been a constant for decades in helping fight that fight.

    We have partnered with the NRA to offer you a discount on membership and Muzzleloading Forum gets a small percentage too of each membership, so you are supporting both the NRA and us.

    Use this link to sign up please; https://membership.nra.org/recruiters/join/XR045103

Leather Ball Flask

Muzzleloading Forum

Help Support Muzzleloading Forum:

This site may earn a commission from merchant affiliate links, including eBay, Amazon, and others.

Greebe

40 Cal.
Joined
Sep 8, 2013
Messages
236
Reaction score
3
One of my hobbies is leather working and I wanted to make a leather ball flask kind of like the shot flasks you see.

However I am traumatized at the moment from searching Google Images. Until a few minutes ago I Was unsure what they were called and searched for the following; lead ball bag, and leather ball pouch. Some images pooped up that were something I wish I had never seen. :barf: You get the gist I am sure.

So in light of my failed searches, I figure it is safer to ask here.

I want to make something like this:
94-50100.jpg


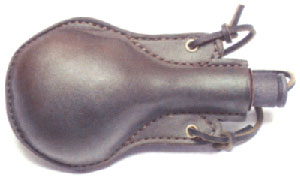
What do you guys think about ball flasks? It looks like a nicer way to carry round balls then in a leather bag. With the leather bag I have, it is easy to dump a bunch of RB's out on the ground.

Do you guys have any ideas on making these. I notice that there looks to be a wood stopper and a wooden neck inserted into the leather bag. Also are these usually waxed to make them stiff to hold their shape.

Thanks,
Greebe
 
I, too am amazed (well, now that I'm old and jaded and cynical, perhaps not so much amazed as disappointed) at what pops up when you type stuff into a search engine ...

really, your honor, all I wanted was bagpipe parts!

having said that, I'm in the middle of a build of sorts and here goes (without photos, mainly 'cause I'm too lazy to get off my dead duff and go down and find my camera and take the photos)

this is for a thirty six caliber bag (that is, a bag which will hold thirty six caliber ball)... I squared up a couple of pieces of 2x4 and glued them together - bear with me; it will make sense in a minute... then I put the whole mess on my lathe, and turned the deal until it was a pleasing shape, but with some conditions: ... the neck must accommodate the diameter of the ball (so you can get balls in and out - sounds simple, but I've done dumber stuff...) also, the body need not be humongous: really, how much lead are you gonna carry around? ... further, you want to leave the 2x4 ends still attached to the turning ... this is important for the next step ...

the next step involves the table saw, where you set the fence so that the blade will just take the seam where the glue goes ... now trim the extra material off of the form, and you have half a ball bag (see where we're going with this?) ...

glue the half form to a nice flat pine board, and go make good smoke while everything dries ... the fun part happens next ...

(cue up 'fun part' theme song)

grab up an appropriate size hunk of thick veg tanned leather, and boil it ... now, there is a stunning variety of ways to do this ... here's a link - nothing kinky, I promise
http://www.dagorhir.com/HowTo/cbgryml.htm

so you take your boiled leather, put it over the form, and tack it down so that the edges stay nice and close to the joint where the form meets the board ... you will use these holes again for sewing the other half ... I have now yet devised a system for keeping the holes from wandering into one another (this is a work- in- progress, after all)

when one half is all done, repeat. you should leave some leather flopping out on one of the halves (or both- not sure which just yet) so that you'll have a place to run attachments for straps, the dummy string to the stopper, and so on.

when both halves are cool, tack them together with rubber cement and start sewing ... (haven't got this part doped out yet ... work in progress... mumble mumble mumble ...)

turn a cool looking plug, do up some straps, and there you go...

hope this helps!
 
Last edited by a moderator:
Hey thanks for the reply. I would be interested to see some pictures when you are done with it.

I was thinking of cutting out the two basic shapes for the flask out of 8 oz. vet tan and then sewing them together with my standard saddle stitch. Then fill it with water and let it get soft and pliable.

After it is soft then fill it with lead shot to form the flask into a round shape and let dry. (Could use sand or steel bb's I suppose.) After that I was thinking of waxing it to waterproof and stiffen it a bit. That way it will not collapse on itself.

I am going to get started on one soon I think.

Thanks
 
Greebe,
:hmm: If he don't check in, you might want
to shoot BEAVERMAN a PM on this subject. I purchased a ball pouch and a canteen from him.
No problems at all with either.I know he used
beeswax on the canteen,but I am not sure what if
anything he used on the ball pouch.

snake-eyes
 
I'll cede to guys who make lots more than me, but a few points have come up as I "evolved" the design to suit my own needs.

#1 and a big #1: Pay attention to the diameter of the neck relative to the size of balls. It obviously has to be be big enough, but you don't want it too big. If they're much oversize, you'll get "bridging," or a tendency of balls to hang up when two at once try to go into the neck. Kind of like two fat guys hitting a doorway at the same time! :rotf:

#2: If they're too rigid, they rattle like castanets when you carry them with just a few balls in them or you're trying to shake a ball out.

#3: Even when fairly rigid, if the neck gets too long on them, they'll eventually want to fold over right at the base of the neck. That can raise all kinds of cob when trying to get a ball out, even after you straighten the neck. Usually when leather has been folded, it leaves a crease right at the bottom of the neck and tends to grab onto a ball. One solution is to extend the wooden neck right down to the base of the leather neck, or make the neck short as the wooden liner, however you look at it.

#4: Long as you're playing with leather, wooden necks and stoppers, try this: Make yourself one out of soft leather, basically as soft as a drawstring bag, but with a neck and stopper. That's turned out to be my favorite version. It's quiet as can be, and though it wants to bridge a little at the base of the neck, you can simply squeeze the bag a little to shake a ball into the neck. Purty handy for me, but the next guy might not think so. You're only out a little scrap leather and thread if it turns out you don't like it.
 
I've made a few pouches out of fairly thick cowhide. Draw it out on paper, leave yourself 1/4" to 1/2" extra not counting seam allowance. You can glue two patterns together to see how it fits. Stitch your pouch together (saddle stitch), and soak it in water. Fill it with fine sand and pack it in till the bulge looks right. Let it dry and dig out the sand gently. Put the bag in a fairly hot oven a minute or two until hot (watch it closely) and using a brush, paint melted beeswax or parrafin on the outside and let it soak in. The bag will darken and turn very hard when it dries. If some of the wax dries up white on the outside, reheat gently and rub it off with a rag. While the leather is still warm, insert your previously shaped wood plug. I don't use a collar. Good Luck! Tree.
 
BB,
I have also heard of craftsmen using rice for
the same reason you state....easier to remove.

snake-eyes
 
I tried the rice, but as the leather dries the rice sticks to it. You'll still be shaking out rice grains a year later in my first-hand experience. Lead shot all the way for me now.
 
That probably turned out looking pretty cool after it wore the high spots.
 
BrownBear said:
I tried the rice, but as the leather dries the rice sticks to it. You'll still be shaking out rice grains a year later in my first-hand experience. Lead shot all the way for me now.


My experience as well... :td:
 
Back
Top