New shot pouch

Muzzleloading Forum

Help Support Muzzleloading Forum:

This site may earn a commission from merchant affiliate links, including eBay, Amazon, and others.
You are one condescending s.o.b. aren't you. I was simply questioning you term to "roll" the cut to reduce the material. Didn't know if there is some material reducing cut that I'm unaware of. The corners are cut on a curve, I might turn the bag inside out and take a pic or two and post it. For my own learning purposes,,,,,
 
I don't even understand the point being tossed in your face, and I sure wouldn't bother to post any more photos. Your bag is what it is and it's good for that.

Might be pretty nice to see photos of the first-ever bags built by your critics. I'm kinda suspicious that we haven't seen any work by them done in the last 10 years or so either.

I'd say move on and enjoy your bag. I'm betting you already have plans for another, and I look forward to seeing that one, too!
 
OK here is a little critique, and its not all bad. First of all, your stitching looks pretty much nice and uniform. I'm wondering if you used a groover or a over stitch wheel to lay out the stitches. Next, the design is good. Using the antler button for strap adjustment is a good idea that I have used frequently. I did notice the holes punched at the end of the button holes. Very good idea. Flap over the inner pocket is another good idea I have used. On the negative side, I wouldn't have stamped it on the flap. But that's just me. If you like it go for it. Also, I would have used a welt between the two pieces of the body, as the leather looks on the thinner side and it would protect the stitches a little more. Again, that's just the way that I would do it.Lastly I would sharpen the pinking iron used to make the scallops on the flap binding.
Over all a pretty good start to a leather working lifetime. Don't let the idiots scare you off. There are plenty of us that have been doing this a long time that will gladly step up and offer help and advice.
 
I can't remember who wrote this on the Wallace Gusler pouch, but I think it may have been Mark Elliot? Anyway, he/someone brought up the point that the bottom edges of the pouch look/looked like the corners were very slightly curved, but in fact the corners had been sewed at a 90 degree right angle. It was just that when the pouch was turned inside out, that caused slightly rounded corners in the bottom of the pouch.

The problem for me is I have never seen the Wallace Gusler pouch in person and I don't believe I have ever read what type of leather it was made from and how thick the leather was.

Anyway, with very soft and especially thinner leather, it is difficult to nigh near impossible to know ahead of time what the pouch will look like before you sew it up and turn it inside out. Also, if the bottom/s of the parts that form the pouch/bag are very close to the belly and/or the areas between the legs and the belly, those areas will naturally curl much more (and often in different directions) than near the back or what is the center of the hide.

Gus
 
Thanks, B.B. I really don't mind if someone doesn't like the bag. I do mind when I don't understand the "instructive" part of someone's criticism, and I get insulted for asking a question or two. Or for pointing out that some of us don't have a bunch of fancy specialty equipment and a big wide open work space to spread stuff out on, meaning, if to do what they are suggesting I need a bunch of "edge rounders", slices, and such, I'm going to need a work around.
I've never claimed my work is perfect, that's part of why I post it here, it's not posted for approval and ego stroking, I know my work needs work. Otherwise I'd just post post it in the classifieds for sale.
 
I too regret the positioning of the stamps. I do wish to incorporate the cross over the native turtle somewhere on my work, but that was not the best place for it.
I did not use a "pinking iron," for the scalloped edges, where can I get one? ( I do have another topic going about this ) I intend at some point to try the idea of making a cutter out of a piece of pipe, wondering if copper is strong enough.

Thanks
 
I seem to remember reading that Gussler's original bag was "made from thin Russia leather."

Based on the description of this "Russia leather" as being thin, red, and for upholstery type applications, I bought a "designer double shoulder" that is thin but seems very tough, amd is of a burgundy color tbat turns almost black (think black cherry) when oiled and sno-sealed. And used it on another bag I haven't posted yet.

I really don't want square 90 degree corners at the bottom of the bag, that point will just wear away leaving a hole. I would like them symmetrical though.

Thanks for your help, I am trying to I corporate all the info I've gotten from you and a couple others.
 
On the above note of trying to incorporate the tips and advice I've received here, I forgot to mention in my response to you that I have been using either an overstich wheel and an awl, or, more recently, a 6, 2, or 1 hole poking "diamond hole stitch chisel," depending on where the line of stitching is and how close together I want/need the holes.

To others, as I can't remember who suggested what sometimes. I am currently reading Stohlman's book on hand stitching leather. It was out of stock at my local Tandy for a while, but was in and on sale last week.

Thanks again.
 
One thing to keep in mind about Historic "Russia Leather" is that it was a tanning/finishing process and done on all sorts of different weights/thicknesses of leather. It was a very expensive leather in the period, as well.

I have seen original documentation that in the 18th century, it was considered the finest leather to use for saddles and that means it wasn't just thin or very thin leather. It was used for bookbinding, though, and that would have been very thin leather. Shoes were made of it as well and that would have been a bit thicker than book binding leather.

So even during the period when they had and someone could afford "Russia Leather" for a project/item, they matched the weight/thickness of the leather to what was needed for the project.

Gus
 
Brokennock said:
So how do I, "Roll/curve the cut of material in your lower corners so you don't have all that extra material there,,"?


FWIW, I trace out a bag shape on some sturdy brown kraft paper (shopping bags cut to lie flat), then after I'm satisfied with the shape, I transfer it to leather/hide.

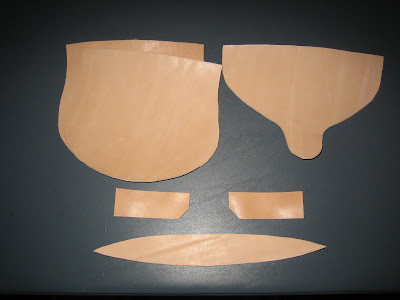
major_pieces.JPG
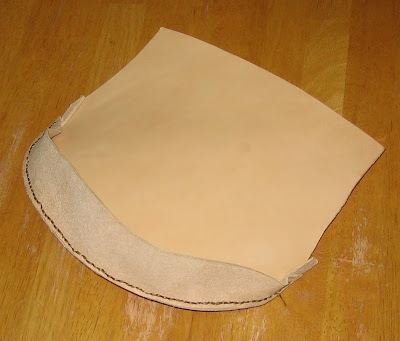
back_and_gusset_2.JPG


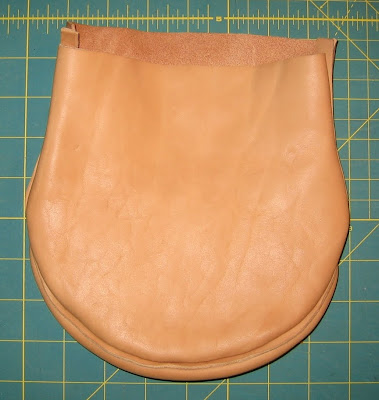
outsideout.JPG
 
When you switch to a little thicker leather and want to showcase that stitching a little more, I would suggest a groover to make a little ditch, if you will, for the stitches to sit down into. This will protect them from surface wear and also makes for a nice even-laying stitch.

I've considered switching to a chisel myself instead of the old diamond shaped awl. Might be easier on my arthritis.

For all of my pinking irons and many other old leatherworking tools, I always go to Bruce Johnson's website. He has a huge array of tools and very good prices. He's the only place I have found the irons.

Bruce Johnson Pinking Irons
 
Thanks. I have the Glover with both the cutter and the creaser. Figured it would help keep my stitches in a straight line. Tough to use with the thin soft leather, but works good on some thicker, stiffer veg. tan bellies I have.
 
Thanks. I've been using the stiff, heavy paper from the big manila or white file envelopes from work for my paper patterns.

I'm thinking of taking a page from some guys I know that make d.i.y. camo templates out of blue painters tape. They make it into sheets by sticking it to wax paper and printing the pattern on it. Then cut out the little pieces. Anyway, I could then trace the pattern onto the tape, stuck to the leather, and cut it out with no shifting of anything. Wondering if "contact paper" like what some folks line the shelves in cabinets with would stick then peal off cleanly?
 
Since the bag's sewn up inside out before reversing it, I just trace directly around the template onto the leather with a black Sharpie. (aka: K.I.S.S. :wink: )
 
You could try cutting the leather next to the Sharpie line, so the line ended up in the scrapped area....... :)
 
BTW, I cut the leather pieces out with an inexpensive drywall razor knife with replaceable blades.
 
Brokennock said:
Yeah, tried that. Somehow sharpie would always wind up showing somewhere after I was done.

Yes, that can happen especially with softer leathers and using a knife. This is why I use sharp shears for soft leather and can better control staying away from the sharpie line.

Also, if you wait until you sew up the project and before you turn it inside out, you can cut the edge of the leather that shows the sharpie line at an angle to get rid of the sharpie line.

Gus
 
Back
Top