Pedersoli Pistol Kit

Muzzleloading Forum

Help Support Muzzleloading Forum:

This site may earn a commission from merchant affiliate links, including eBay, Amazon, and others.
Well, I got on a roll yesterday, and finished filing and re-bluing the barrel. I used a small Nicholson mill ******* file, and when I got done, it was so smooth I didn't even need to sand it! (Thanks for the filing class, Zonie... I'm sure it wouldn't have turned out as well as it did without it.)

Here are some crappy pics. I'll try to take the stuff outside and get some better pics later... the indoor flash thing just doesn't do it justice.

Top flat:
dpbarrel1.jpg


Muzzle:
dpbarrel2.jpg


Touch hole side:
dpbarrel3.jpg


I'm highly impressed with the BC Perma Blue. I donned the latex gloves, cleaned the barrel with alcohol, dried it, and swabbed on the PB with a cotton ball, very liberally. Waited the 60 seconds, then rinsed with water. Dried with a paper towel, and it looked like EL CRAPOLA! It was all blotchy and stuff... so I said, well, it says to steel wool it, so I broke out a pad of steel wool, started buffing it, and WOW. The blotchiness went away, and it shined right up to a nice, even blue! Cleaned it with alcohol and did it again... WOW. Very nice... came out WAY better than I thought it would look. Wiped it down with a good coat of oil... and the barrel is done! The only thing left is to drift the sights into the dovetails.

Here's one last shot of it sitting down in the stock:
dpbarrel4.jpg


Getting closer! Get this stock filled and finished, and she'll be a done deal! :RO:
 
Thanks! Yep, if you scroll up a little bit, you can see photos of all three inlays. The one on the other side turned out the best of all three. :winking:
 
Well, I got the first wet-sanding done tonight. You were right Zonie... the 400 was just too fine, I had to cut back to 320, which worked well. You can really tell it's filling in the pores of the grain... I found a couple of small spots I missed along the edge of the ramrod groove, and when you compare that to the areas that I didn't miss, you can really tell the difference.

I will let it dry for 24 hours, and do it again tomorrow night. Hopefully, that will be enough to fill them all completely. If not, I'll do it a third time, which should definitely be enough.

Then, I'll get it down clean and start hand rubbing the Tru-Oil. Giving a 24 hour dry time for each coat, and given that I can put a coat on it every night, I'm hoping this thing'll be a done gun by March 1. WOOHOO!

More pics to come when the wet-sanding process is complete, before I start the final oil finish.
 
Okay, here are some pics after two wet-sandings, a little steel wool, and some rubbing with a piece of denim:

dpws2.jpg


dpws3.jpg


dpws5.jpg


dpws6.jpg


dpws7.jpg


Looks pretty good, starting to look like a real stock. The grain is all filled in very nicely, and in a couple of the pics it may look speckled, but that's just the flash playing off the grain, it doesn't look like that in RealLife(tm). ::

Looks like I'll start rubbing the Tru-Oil tonight. :redthumb:
 
Well, since Friday, I have hand-rubbed 6 coats of BC Tru-Oil into the stock. (I thought I would have to wait 24 hours between each coat, but after reading their web site and the bottle, which says at least 2 hours, I couldn't tell the difference between 4-6 hours and overnight, so I've been doing 4-6 hours dry-time.)

The first four coats were diluted 1:1 with mineral spirits. Hand rubbed in a circular motion in small sections until it just started to get tacky, then wiped off with a small cotton towel. The fifth coat was not diluted with mineral spirits, but was wiped in the same manner. The sixth, which I just finished, was rubbed in until tacky, but not wiped. Honestly, after the 2nd diluted coat, I couldn't tell any difference between that coat, and the fifth. So, I think this sixth coat is going to be enough. If it's too shiny/plastic looking after it dries, I will take some of the gloss off of it with some fine steel wool. If it doesn't look any different than the last 3 coats have, then I'm calling it done. Either way, I should be able to re-assemble the gun this evening and call it done! I will post pictures of the final product then.

Once again, I want to thank Zonie for all of his help and hand-holding through this process, as well as everyone else who gave tips, offered suggestions, or simply commented and encouraged me. This is truly one of the best forums regardless of subject I've ever taken part in, you guys, quite simply, rock. :redthumb:

Now... look out John Armstrong, here I come! :what: :crackup: :youcrazy:
 
Ok, I took a couple of pics just now to show the finished product, but I want to take some of it outside later, so I don't have to use the flash and you can see what it really looks like. Anyway, it's a done gun and I can't wait to shoot it again! ::

dpdone1.jpg


dpdone2.jpg
 
Lookin good, but what's with those suppositories setting in tha background there. How many grains a black powder ya put behind them :crackup:
 
LOL um... yeah... those are my um... traditional 1950's era .357 Magnum rounds I left laying there. :redface: ::
 
Hey John,

Your pistol looks great... you've put a lot of work into it and it shows.

Hope all is well...

Jon
 
Why is the sideplate area lighter than the rest? BTW, NICE GUN!! :master: :master: :master:
 
"Why is the sideplate area lighter than the rest?"

That is called sapwood.
When a tree grows, the outer wood near the bark is often lighter colored than the heartwood of the tree.
As the tree gets older, this wood darkens like the heartwood in the center of the tree, while the tree adds new sapwood to the outside.

It is not really "bad" wood, it is just lighter.

The presence of the sapwood on a "kit gun" is fairly common, and because it is a kit gun, you have to take what you get.

As I mentioned earlier in the post, if someone doesn't like the light wood, they can always stain it so it matches the rest of the wood before they apply the final finish.
In this case Static wanted it to be "natural", so that is what it is.

If you are building a stock from scratch, you wouldn't want to buy a piece of wood which has both sapwood and heartwood in it.
Heartwood has the best color and is sometimes a little harder and stronger than sapwood.

If you buy a stock from one of the Stockmaking companys like Pecatonica River or Chambers or TVM or..... They will not send you wood like this pistol has.
Their reputation depends on providing high quality wood to their customers.
 
Wow... resurrected from the dead!

Yeah, 'ol Zonie tried to get me to stain that light wood so it would match the rest... but I didn't wanna. I thought it would make the gun interesting... and it does in my opinion.

Thank you for the compliment. It was pretty easy to build, really... if I had chosen not to put any inlays on it, it would have probably been done in less than 2 months. Most of the work was just sanding, filing and polishing. Unlike the rifle I'm currently working on... a Chambers Early Lancaster, which requires MUCH more work than something like this. Still, this project helped me get a feel for what I was in for, and I did learn a lot from it, as well as had a lot of fun.

Let us know if you decide to build... I as well as many others on here who know VASTLY more than I do will help you any way we can. It never ceases to amaze me the amount of help the good folks on this forum are willing to provide, even those who do this for a living. :redthumb:
 
Zonie, I see, thanks for the info!

static, I like the look, I agree that it gives it some great character. Makes it look great IMO.

I will be sure to ask if I have a question, this board is one of 2 on the net that I have found that I like. The other is www.SKSboards.com :: :: ::

BTW, everyone that has a bad trigger pull on their flintlock, if you take a dremel and some "lug raceway polishing compound" (this stuff is used in trueing and accurizing old military bolt actions) and use that and a dremel w/ a buffing wheel; you can smooth out the trigger tremendously. :winking:
 
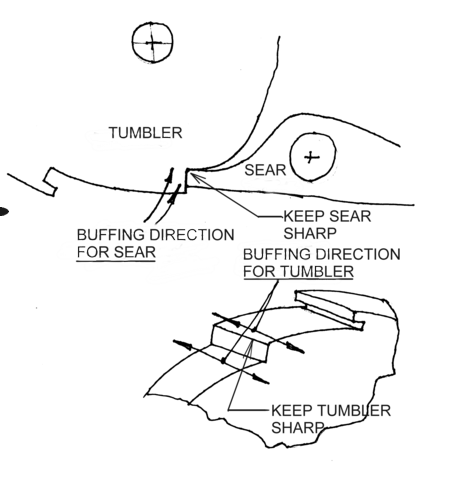
If one wishes to use an abrasive to polish the sear nose or full cock notch they must take special care not to remove the sharp edges or change the angle of the surfaces.

Here is a little photo I made to show the direction of the lapping to prevent these things from happening:
LAPPINGTEXT.png
 
Wouldn't the sharp edge wear down eventually? But thanks for the drawing, I can use that wn I'm building my kit. ::
 
Sure. Everything wears eventually but in the case of a properly hardened sear and tumbler, it shouldn't be for thousands of cycles of normal use.

These parts are hardened just about as hard as the steel in a good drill bit. The only thing which cuts steel this hard is some kind of abrasive grinding wheel or material.
Polishing compounds are basically, soft abrasives which can still cut very hard steel. That is why their use to polish the sear and tumbler must be done with care. :)
 
Back
Top