• Friends, our 2nd Amendment rights are always under attack and the NRA has been a constant for decades in helping fight that fight.

    We have partnered with the NRA to offer you a discount on membership and Muzzleloading Forum gets a small percentage too of each membership, so you are supporting both the NRA and us.

    Use this link to sign up please; https://membership.nra.org/recruiters/join/XR045103

Picture of in-the-white Hawkens rifle (build)

Muzzleloading Forum

Help Support Muzzleloading Forum:

This site may earn a commission from merchant affiliate links, including eBay, Amazon, and others.

bioprof

62 Cal.
Joined
Dec 20, 2004
Messages
2,812
Reaction score
6
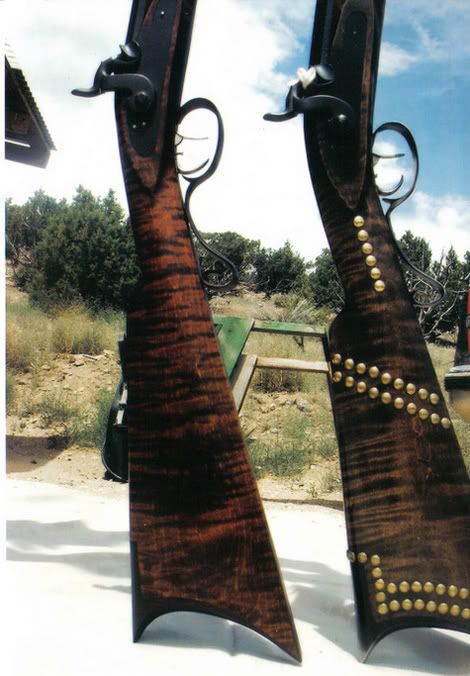
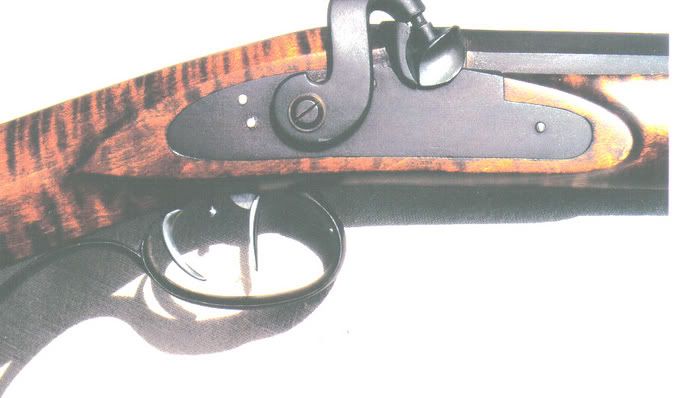
I rough sanded out the Hawkens rifle that I have been working off and on for the past 6 months. I built it with a closeout Rice barrel in 54 cal. and a stock second from TOW. Finally got the forend shaped down to where I wanted. Before I start the finish sanding, is there any place where more wood needs to be removed? I just finished rounding off the sides of the barrel channel walls so that they taper down to the barrel. Also, any suggestions as to stains? I'm thinking of using aqua fortis. I'm still debating whether or not to put a capbox in the butt. There isn't much figure where one would go.
Hawkensinthewhite.jpg

btw, it shoots really nice. Not much kick at all. I need to file down the front sight a bunch though. Windage was only off by about 2" at 50 yards.
 
It's difficult to tell from the photo but it looks like you have the lines right. It looks like it is ready for final sanding.

I have never used Aqua Fortis so can't help you there. I have used Laural Mountain Forge stains and really like them. If you want a red finish, their maple is very good. I finished a fullstock Hawken flinter with a TOW second plain stock. It brought out figure I didn't know was there. For a more brown finish their Lancaster Maple does that. Both stains are alcohol based so you can use rubbing alcohol to cut them with if you feel the undiluted stain is too dark.

A capbox would be a personal choice. I never use the things so don't put them on any of my rifles but a well done capbox can be nice finishing touch.
 
I'm wondering if I need to remove more wood from the border just behind the lock plate. It seems to stick out more than the other sides. I have to plead ignorance though; I really didn't do the research that I probably should have before I started working on this rifle. I probably should read some of the books on the Hawkens rifle before I do the final sanding and reach the point of no return. It's too bad that work gets in the way of rifle building.
 
Looks good, I use AQF to stain Hawkens, and get it dark. Check the transition from the forend to the rear pipe/nosecap area- that's a tough spot. Show us the cheekpiece side!
 
I have wondered what the shape of the forestock on Hawkens are supposed to be... straight sided, eggish-shaped, rounded?? I have built several, and still haven't found out this info...I read where Hawkens have a slight fishbelly on the lower butt, and a slight hump on the comb. ::
 
It is very nice. Very nice 2nd Stock. If that's a second, the 1st must be really nice. Anyway, I just finished using Laurel Mountain Forge Antique wood stain in Cherry. I like the stain but Cherry goes on very red but gets better as it darkens when it dries. I only used one application. You can see a sample of it in my "Underhammer Kit" thread for a refference.

It's hard to tell from your photo but is the wrist grip area a little thick? Sometimes it's hard to tell when the wood is light in color and the angle of the photo.

Very nice job overall. How are you going to finish the metal? I used the Laurel Mountain Forge Browning solution myself. Took me a couple of days only because I was busy with other things. It's a good product. Are you going to Color Case Harden the side plates, hammer, and trigger? :thumbsup:
 
You're doing great, Prof! It looks a little slab sided. I have this same problem also. Neill Fields, who used to build these things for a living at the old Green River Rifle Works (said his record was building one in 37.5 hours-), critiques mine. The stock forend is "egg-shaped", which confused me, thinking that means that there is a more pointy part somewhere. But he may mean "oval". But not flat through the keys. I always had to round mine more. And Rich is right, the area above the entry pipe seems to need more blending. And here is something about Jim Bridger style (at least that one) Hawkens. The front lock panel rounds in a gentle curve into the front of the breech snail, right through the top front bolster of the lock. These pictures are of a Hawken Neill built on the left, and the original shop Hawken from the GGRW on the right. See the rounding?
grnfbutt.jpg
 
I don't have any good photos of the forestock. But look at John Baird's "Hawken Rifle, the Mountain Man's Choice", plate No. 1. Shows 7 Hawkens, full length, both sides. They have pointy lock panels and are slim at the entry pipe, but they do not show the rounded bolster. Track of the Wolf has this book, you can also get it through an interlibrary loan. Those lock panels vary a lot. Here are more photos of them. This is the GRRW shop rifle.
grlock.jpg


This is Neill's Hawken.
nflock.jpg


This is a .54 Hawken I built for Ron. Some Hawken locks were engraved like this, see page 7 of Baird.
smithhaw.jpg


GRRW's stain was chromic acid, the sealer thinned spar varnish and the finish boiled linseed oil. This stain turns kinda green with age. Nothing to recommend it.

Neill's stain, I dunno. He quit using aqua fortis a long time ago. Likes Laurel Mtn Forge Lancaster Maple now, as do I. He did use linseed oil all these years but is having to change due to rifles moving to wetter parts of the country.

My stain was Fiebings dark brown oil leather dye, thinned linseed oil, full linseed oil (supposed to do something to show grain, don't use it anymore), Permalyn sealer (dries out in can, now use thinned spar varnish sealer), seven coats of low gloss Formby's tung oil. Melted beeswax rubbed in. Metal- 13 coats of Wahkon Bay Tru-Brown. Now use Laurel Mtn. Forge Barrel Brown and Degreaser. Heat the metal with a propane torch enough to melt beeswax, rub that in.
 
Nice looking rifle, I hope my rebuild turns out that good. What is aqua fortis? Is that an acid solution?
 
Apparently, a lot of the rifles ended up like the maker felt that day. Some of the lock areas were pointed on the rear and some were rounded. In Hansons book, THE HAWKEN RIFLE: ITS PLACE IN HISTORY, both the pointed and rounded lock plate panels are shown. Also, in Bairds book, the dust cover and page 85 show drawings of rifles with rounded lock plates, in other places they are pointed. Chapter 14 on page 81 of Bairds book is called Modern Hawken Replicas. It spends several pages pointing out subtle differences about various rifles and what distinguished the Hawken, it also points out how to lay out a Hawken stock.

Here are some closeups of my rifle. I used the rounded lock panels as shown in Hansens book.

336588.jpg

336577.jpg

336585.jpg

336586.jpg

336587.jpg


I built this rifle in 1985 or so. The stock is finished with Aqua Fortis. AF does its own thing to the wood, and it gives you what it gives you. It works somewhat differently on different woods and how you do it. You dont have to stain it. Part of the color is from how much you heat it afterwards, this stock being heated to a light char over a tall camp stove flame. It was then neutralized and finished with a hot mixture of linseed oil and beeswax RUBBED in with wads of burlap. The burlap was rough enough to scour off the very light char and bring out the grain. There is at least 50 coats of oil and wax on this stock.

The barrel was finished with TOW Tru-Brown, which is close to the Laurel Mountain mix available today. After the barrel was done, I coated it well with the linseed oil and beeswax and laid it in a buddys pizza oven when the temp got down to 200 as he shut it off for the night. The barrel was cold the next morning when we took it out and it has an almost parkerized finish on it. The earlier hawkens had a little bit~~very subtle~~of a bow on the comb of the stock and just a little bit of belly on the forearm. Later Hawken rifles were straight. I finished this one to be as close as I could to an 1838 average, and it has the curves in the stock.

I have hunted with and shot this rifle for 20 years now. It has the marks from usage on it and I figure that they just give it character. This is just another example of a well used rifle. I like purty stuff, but it has to be functional.

Bill
 
The "fishbelly" on the lower buttstock is almost invisible, as is the one on the bottom of the forestock. Both are subliminal--if not there the stock looks wrong and too much gives the stock a chubby appearance. This is a big part of the reason why half-stock Hawkens are considered to be hard to make. But they are worth it.
 
How are you going to finish the metal? I used the Laurel Mountain Forge Browning solution myself. Took me a couple of days only because I was busy with other things. It's a good product. Are you going to Color Case Harden the side plates, hammer, and trigger? :thumbsup:

I'm going to use LMF Browning solution. I used it on the first rifle that I assembled and was pleased with the results. I will probably brown all of the hardware, but leave the trigger armory bright.
 
And here is something about Jim Bridger style (at least that one) Hawkens. The front lock panel rounds in a gentle curve into the front of the breech snail, right through the top front bolster of the lock. These pictures are of a Hawken Neill built on the left, and the original shop Hawken from the GGRW on the right. See the rounding?
grnfbutt.jpg

Thanks to all for the great pictures. :thanks: I see what you mean about the front of the lock panel. I will remove some of the wood to form a more rounded curve. I'm glad I asked before I started staining. :hatsoff:
 
Bountyhunter, I think your Hawken looks very good. Yours, too Bioprof. Found some photos I took at GRRW in 1976.
grrwbw.jpg

From left, a Poor Boy, then a Little Leman, Leman Trade rifle (I built one of these there in 1978), and two Hawkens. It is possible each of these was built by a different person. These rifles were not replicas, but copies of original rifles. We had Jim Bridger's Hawken down from Montana, took it apart in our class. I don't remember anything about it. But Hawkens vary, so this is not the only way they can look. I have seen copies of a Sante Fe Hawken, which was owned by Kit Carson, and those copies are so ugly I can't believe they represent a rifle made by Hawken, but I know for sure one copy, by Lee Robertson, was a faithful copy of the rifle in Sante Fe. I still don't know about the Sante Fe Hawken.
 
Here are some pictures of the cheekrest side. I only paid $79 for the stock because of the knot on the cheekpiece. I look at it as natural carving. It reminds me of the head of a sperm whale. I guess I'll have to call it a "whale-of-a-gun". :haha:
Hawkensleftside.jpg
Hawkenscomb.jpg

btw, I shaped the end of the forend based on the Lyman GPR that I have. It WAS a lot more rounded above the rear ramrod pipe, but I didn't like the looks of it. I guess it's too late now though; I can't put the wood back on.
 
By the looks of that stock, the stripes are really going to "pop". As a second the stock looks awesome.
 
Bioprof, the comb line is straight to very slightly Roman nosed. And though it is probably too late now, Doc White (GRRW) told me the stock is laterally thickest at about the end of the cheekpiece and then tapers slightly down to the side of the butt plate, at least on the opposite side. Also, the lock panels taper front to rear, wider at the front and narrower at the rear, 1/16" to .1 inch difference. I had to file a taper on the lock bolster to achieve this. And perhaps your lock panels could be more pronounced by fluting around it. Look at the other photos. I have in my notes that the stock is flat from the trigger front tang to the edges of the lock panel, and Neill always has me flute the front and rear of this area more.
 
Back
Top